Quick Search:
Why Make Synology Backup to SharePoint?
Both Synology NAS and SharePoint Online are excellent and professional cloud services for users to access files easily without the limitations of time and place. However, SharePoint Online works better in many aspects that make people want to back up data from Synology NAS to SharePoint. For instance:
- SharePoint is more popular in businesses. Produced by Microsoft, SharePoint is deeply integrated with other Office tools, such as OneDrive, OneNote, Outlook, etc. So, users can connect these services together and work more efficiently. Meanwhile, companies and organizations will find it more convenient to collaborate with employees because of the practical features that SharePoint offers.
- SharePoint is more secure. When using Synology NAS, users have to buy hard drives that are invulnerable to natural disasters. Once the data is missing, then it would be a nightmare. Whereas users can utilize SharePoint safely since it’s totally on the web.
So, when you want to back up data from Synology NAS to SharePoint, what should you do? How to backup Synology to SharePoint? In this post, you will learn 2 useful methods to accomplish this target.
How to Make Synology Backup to SharePoint Manually
If you only have a small number of files to back up from Synology NAS to SharePoint, you can download files from Synology NAS to your local PC and then upload them to SharePoint manually. At the same time, you should make sure that the internet is available and stable.
Step 1: Log in to your Synology NAS on the web and locate the file/files you want to make a backup.
Step 2: Select it to Download from Synology NAS to your local computer.
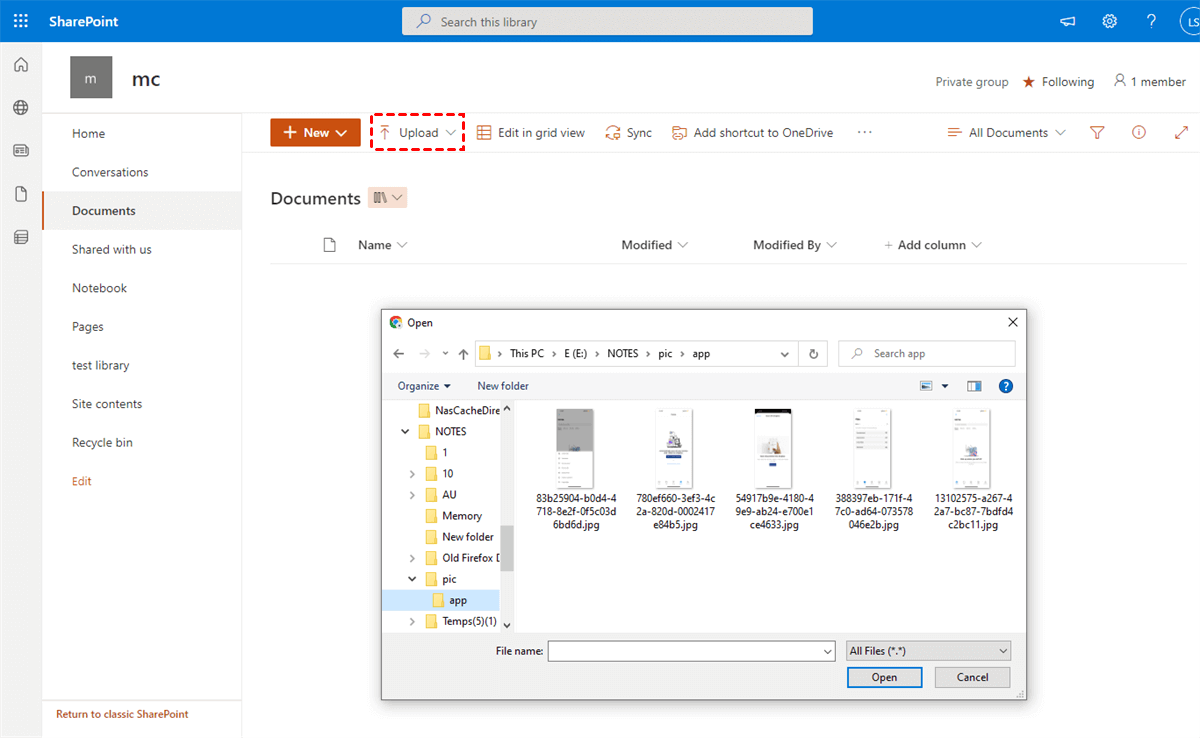
Step 3: Now, visit your SharePoint on the web, and go to the Communication Site to go to Documents. Then, you can upload the data you’ve downloaded from Synology NAS via using the Upload feature on SharePoint. Alternatively, you can simply drag and drop files from your PC to SharePoint.
This is how to backup Synology NAS to SharePoint Online via the download-and-upload method. Although it is a little cumbersome, you can make a backup on SharePoint in the end. But, what if you have a great amount of data? How can you back up it then?
How to Make Synology Backup to SharePoint Easily
When you have a great many files to back up from Synology to SharePoint, you should try a popular cloud backup service – MultCloud. MultCloud is a useful third-party tool that allows users to manage multiple cloud drives in one place. And, users can make migration between different cloud services easily.
Being a practical service, MultCloud supports many popular cloud storage services in the market, including iCloud Drive, iCloud Photos, Google Drive, Google Photos, OneDrive, Dropbox, Flickr, SharePoint, Wasabi, NAS, FTP, pCloud, OwnCloud, Amazon S3, and so on. Thus, users can add these clouds they use to MultCloud and manage them easily and efficiently.
How to manage then? There are many functions that MultCloud offers, including basic features and professional features. For one thing, users can rename compressed folders to Dropbox, download files from Google Drive, upload and share documents on other cloud drives, etc. For another, users can directly back up files from one cloud drive to another seamlessly.
Now, you can follow the operations below to learn the way to backup Synology NAS to SharePoint via MultCloud effortlessly.
Step 1: Register an account of MultCloud via your email. Or, you can sign in directly with your Google/Facebook account.
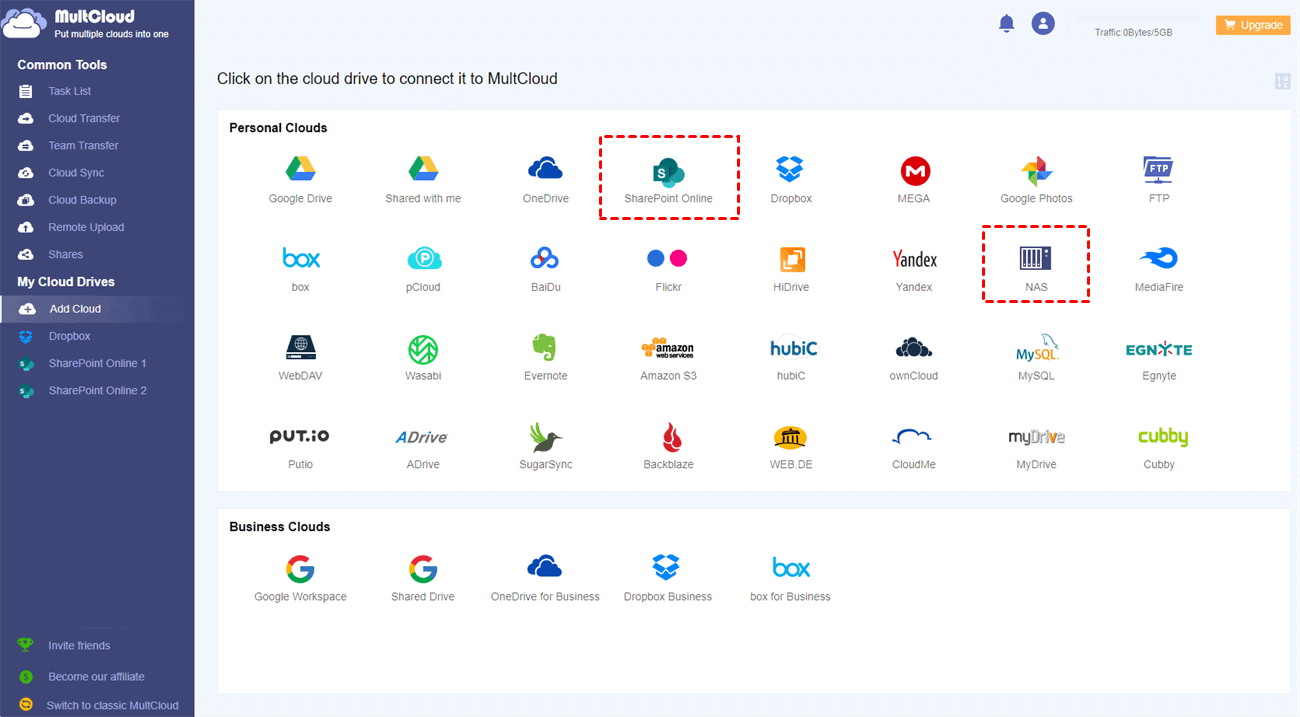
Step 2: Press the Add Cloud button on the left taskbar. Then add Synology NAS and SharePoint Online respectively. Then grant MultCloud access by following the guidance shown to you in the pop-up window.
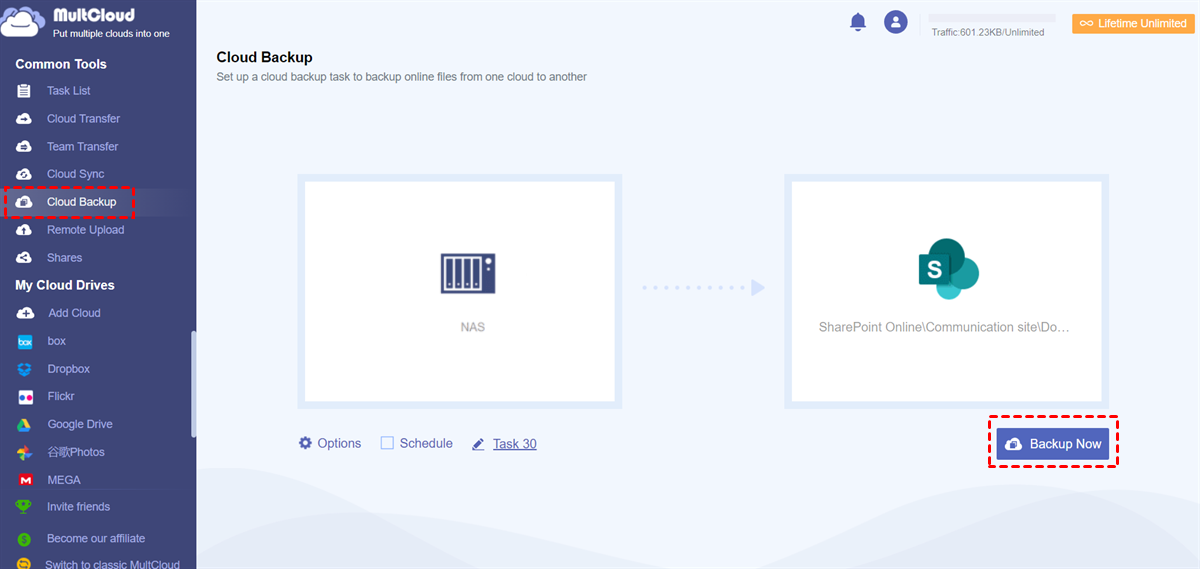
Step 3: Next, head to Cloud Backup on the left upper side. After that, you can tap the first box to choose Synology NAS and the second box to select SharePoint Online. Finally, you can Backup Now.
As you can see, you will only need to perform 3 steps, and files from Synology NAS can be backed up to SharePoint directly without downloading and uploading. Conversely, if you intend to backup SharePoint Online to Synology NAS, you can follow the same steps and re-select the original and target cloud drives.
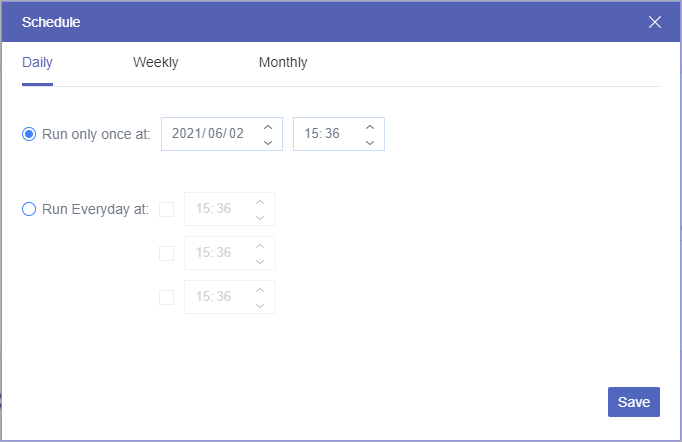
In addition, you can make up scheduled backups by heading to Schedule under the first square so that MultCloud will run them at a regular interval. For example, you can let them run at a regulated time, daily, weekly, or monthly. Meanwhile, MultCloud depends on data traffic to back up data between cloud drives, so you don’t need to care about the internet connection.
On top of that, MultCloud owns the best backup speed compared to its competitors. Therefore, even though you have a large number of files to backup, it can still quickly accomplish the task. And the best feature of the Cloud Backup on MultCloud is that it can restore data without any effort. So, if the data is missing on Synology and SharePoint, don’t worry. MultCloud can recover the missing data as long as you’ve backed up data via MultCloud.
In the End
That’s all about how to make Synology backup to SharePoint. After reading the whole passage, you now know 2 useful methods. In a word, if you don’t have that much data, you can download files from Synology and upload them to SharePoint. If you have many files, then MultCloud is your best choice.
Apart from the backup feature, MultCloud also allows you to transfer and sync files between cloud drives. If you are wondering how to sync from cloud to cloud, MultCloud can help you and it offers users 9 practical sync models, such as Real-Time Sync, Cumulative Sync, Update Sync, and more.
MultCloud Supports Clouds
-
Google Drive
-
Google Workspace
-
OneDrive
-
OneDrive for Business
-
SharePoint
-
Dropbox
-
Dropbox Business
-
MEGA
-
Google Photos
-
iCloud Photos
-
FTP
-
box
-
box for Business
-
pCloud
-
Baidu
-
Flickr
-
HiDrive
-
Yandex
-
NAS
-
WebDAV
-
MediaFire
-
iCloud Drive
-
WEB.DE
-
Evernote
-
Amazon S3
-
Wasabi
-
ownCloud
-
MySQL
-
Egnyte
-
Putio
-
ADrive
-
SugarSync
-
Backblaze
-
CloudMe
-
MyDrive
-
Cubby
