Why Sync SharePoint to File Explorer?
As a web application provided by Microsoft Office 365, SharePoint Online helps a lot in quick collaboration based on business documents. It is an excellent and intuitive platform for work and life, but some SharePoint users find they prefer to work outside of SharePoint. And many users get used to using their local File Explorer to work with SharePoint documents.
Fortunately, there are some easy ways for you to work with SharePoint files outside of SharePoint Online. The most efficient one is to sync SharePoint to local drive or File Explorer.
How to Sync SharePoint to File Explorer: 2 Reliable Ways
There are two most efficient ways for you to sync SharePoint folder to File Explorer. The first method is to use the Microsoft OneDrive application. Microsoft Office 365 allows users to map SharePoint Online on the computer as a local drive. Then you can quickly access your SharePoint files even offline. But if you want to sync SharePoint site to File Explorer with schedule plans set up by yourself, just use AOMEI Backupper and OneDrive app together.
Way 1. How to Sync SharePoint with File Explorer via OneDrive Desktop App
Syncing SharePoint to File Explorer is very easy. You can go to the documents libraries of SharePoint Online and click the Sync button. Then the OneDrive two-way sync software will be installed on your device and a SharePoint disk will be created in your File Explorer for you to access SharePoint files from it.
Step 1. Log in to SharePoint Online and open a SharePoint site.
Step 2. Open a documents library or a SharePoint folder in it.
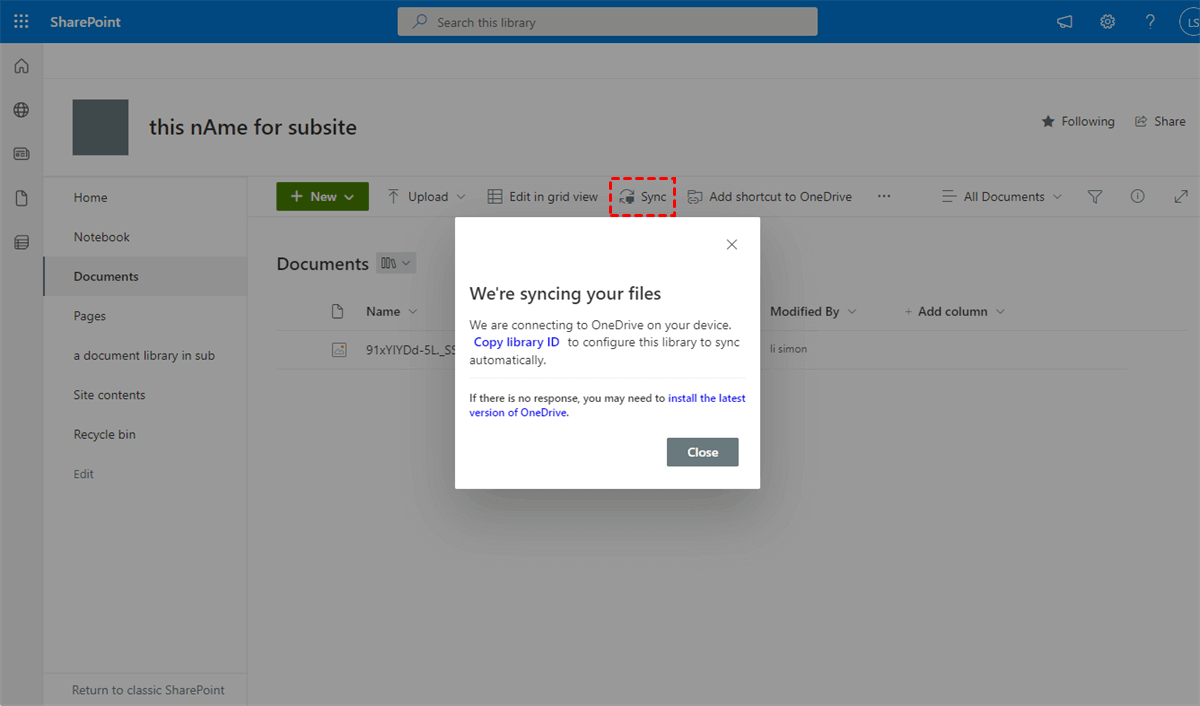
Step 3. In the feature bar, click the “Sync” button and install the OneDrive software on your computer.
Step 4. In the pop-up window, click “Copy library ID” and “Close” the window.
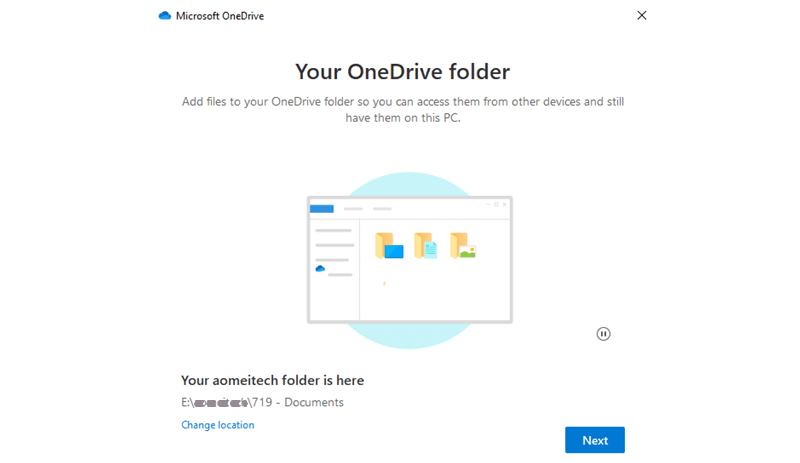
Step 5. Open the OneDrive software and log in with your SharePoint account.
Step 6. A Settings window will pop up. You can choose the SharePoint location you want in File Explorer and click “Next”.
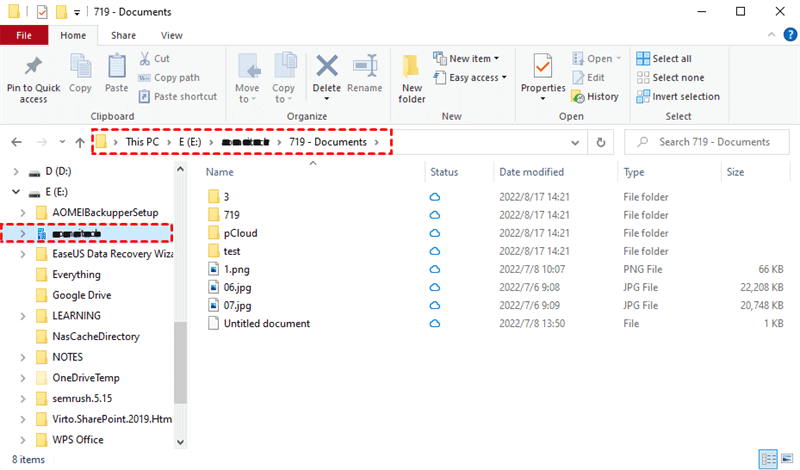
Step 7. Now you can find the SharePoint disk in File Explorer.
Way 2. Sync SharePoint to File Explorer with Schedules via AOMEI Backupper
OneDrive software will automatically sync the modified files and folders between SharePoint Online and File Explorer in real-time. However, if you need to back up SharePoint to File Explorer frequently on certain schedules, you can use a professional file sync software, AOMEI Backupper to help. Additionally, this is also a way to solve the “SharePoint not syncing with File Explorer” issue.
AOMEI Backupper is a well-known file backup and sync service that allows backup and sync between local destinations, clouds, or between local folders and clouds in one-way, two-way, or real-time.
Step 1. Make sure the SharePoint folder has been created in File Explorer by the OneDrive software.
Step 2. Download and install AOMEI Backupper on the desktop.
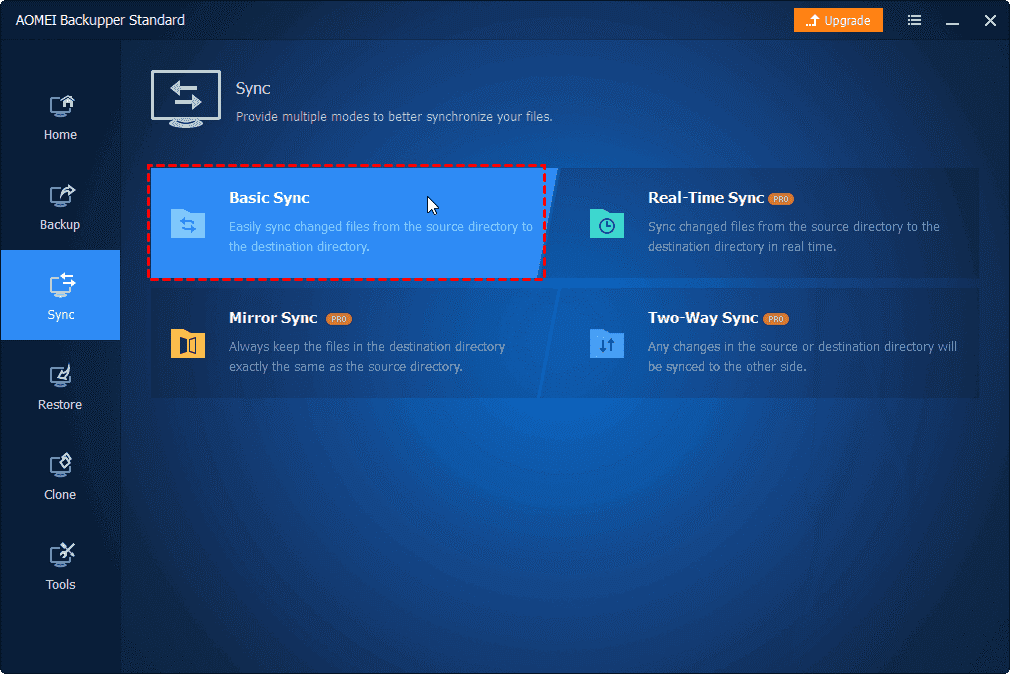
Step 3. Click “Sync” and “Basic Sync” in AOMEI Backupper.
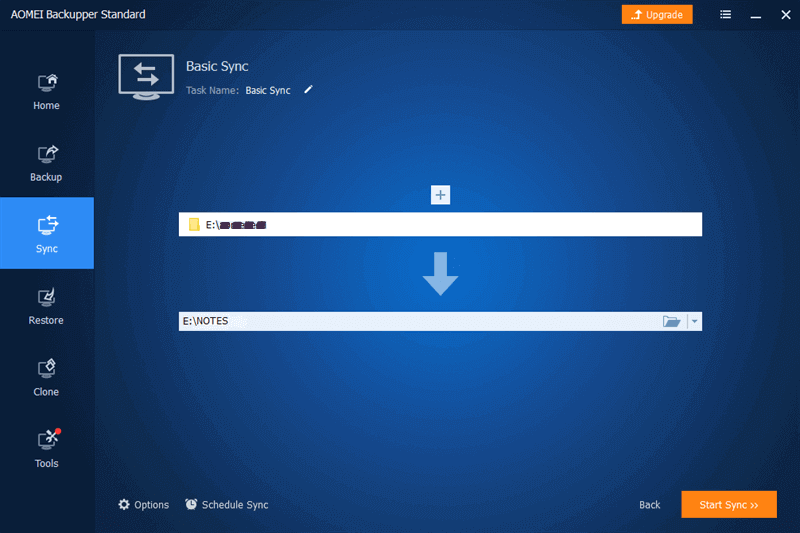
Step 4. Choose the SharePoint folder as the source and another local folder as the destination.
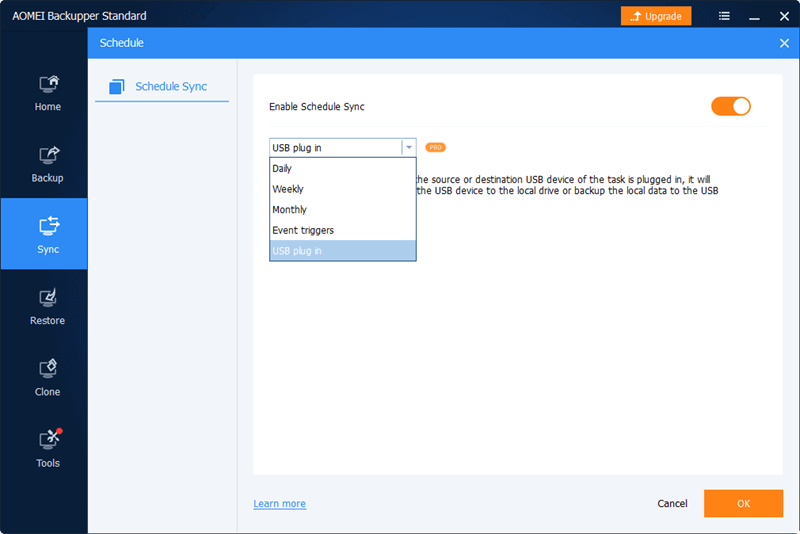
Step 5. Click the “Schedule Sync” button and choose a schedule in the pop-up window. Then click “Start Sync” and AOMEI Backupper will let SharePoint sync to File Explorer according to your plan.
Tip: You can choose from the daily, weekly, monthly, event triggers, or USB plug-in schedules according to your needs. But the last two can only be used by AOMEI Backupper Professional users or higher subscriptions.
Bonus Tip: Sync SharePoint to Another SharePoint Easily
Except for syncing SharePoint to File Explorer, you can also sync different SharePoint tenants to easily access and use the same file on different SharePoint Online accounts. To achieve this, a professional third-party cloud-to-cloud sync service is all you need.
Among all the cloud sync services, MultCloud may be the best one since it offers a great and secure web interface for you to add 30+ brands of clouds to it for multi-cloud management and synchronization. With the Cloud Sync feature of MultCloud, you can choose 1 of 10 excellent cloud sync modes to sync data across clouds with a single click.
Step 1. Create a MultCloud account and log in.
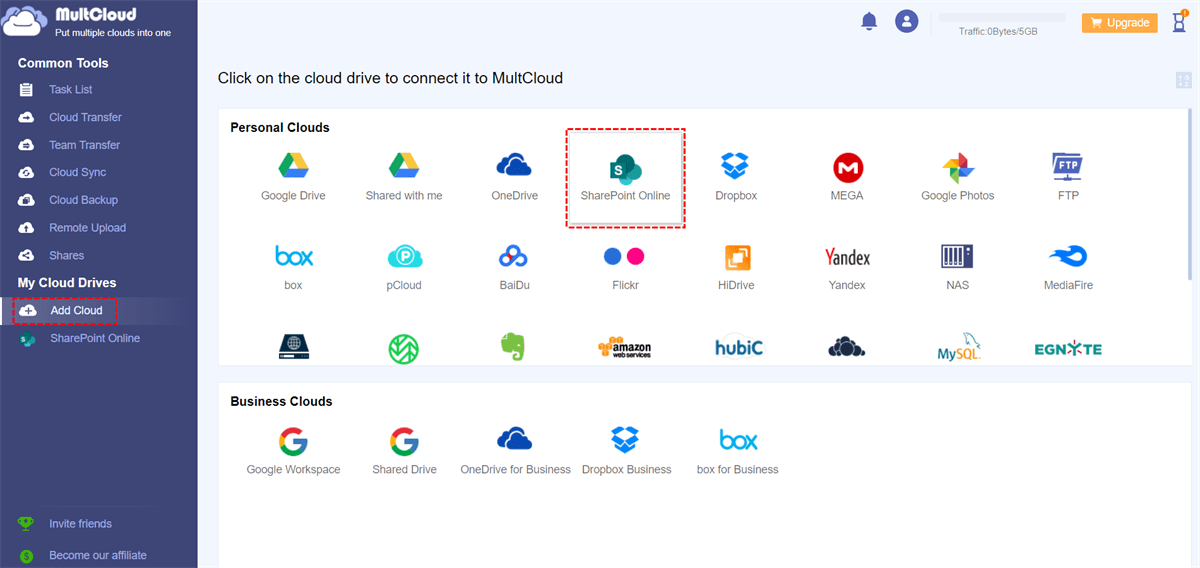
Step 2. Add your SharePoint tenants to MultCloud respectively by clicking “Add Cloud”.
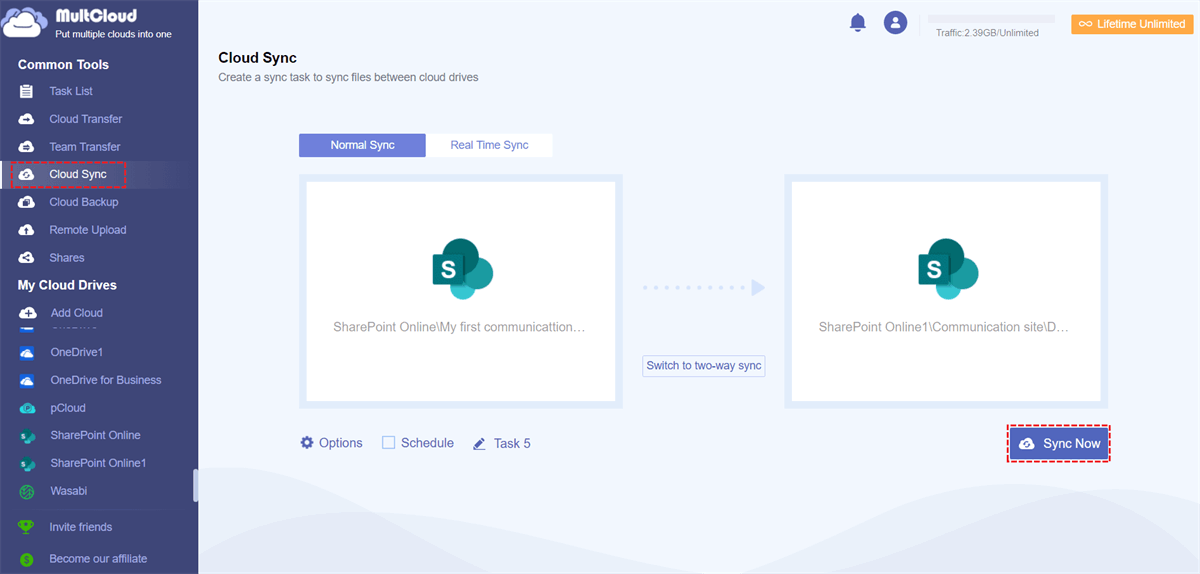
Step 3. On the Cloud Sync page, click the left square to choose a documents library or files and folders in it as the source. Then click the right square to choose a documents library of another SharePoint Online tenant as the destination.
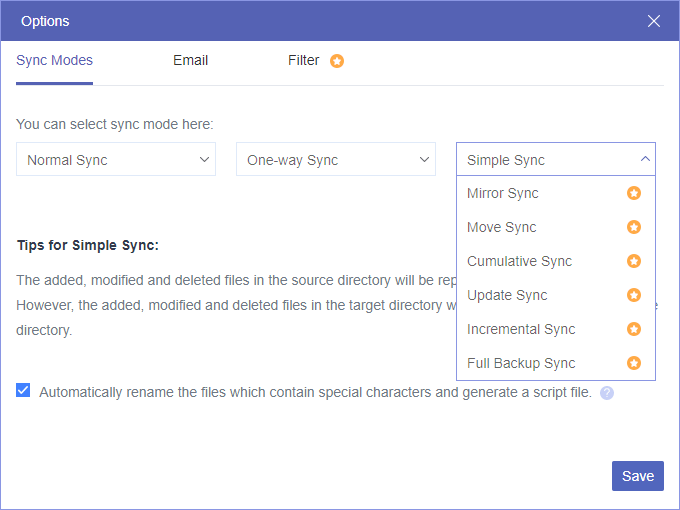
Step 4. Click “Options” to choose a sync mode you need and click “Sync now” to let MultCloud sync data between SharePoint Online tenants at once.
Tips:
- Among 10 helpful cloud sync modes, 6 advanced one-way sync modes can only be used by MultCloud subscribers.
- MultCloud also provides daily, weekly, and monthly scheduled sync plans for you to customize your tasks.
Summary
Now the “SharePoint files not syncing in File Explorer” issue can be easily solved since you have two great options to sync SharePoint to File Explorer with the step-by-step guides illustrated above.
Besides, if you have the demands to sync SharePoint to Dropbox or any other clouds for backing up SharePoint files to personal clouds, you can make full use of the Cloud Sync functions in MultCloud.
MultCloud Supports Clouds
-
Google Drive
-
Google Workspace
-
OneDrive
-
OneDrive for Business
-
SharePoint
-
Dropbox
-
Dropbox Business
-
MEGA
-
Google Photos
-
iCloud Photos
-
FTP
-
box
-
box for Business
-
pCloud
-
Baidu
-
Flickr
-
HiDrive
-
Yandex
-
NAS
-
WebDAV
-
MediaFire
-
iCloud Drive
-
WEB.DE
-
Evernote
-
Amazon S3
-
Wasabi
-
ownCloud
-
MySQL
-
Egnyte
-
Putio
-
ADrive
-
SugarSync
-
Backblaze
-
CloudMe
-
MyDrive
-
Cubby
