Quick Search:
Can You Make a SharePoint File Request?

Launched by Microsoft, SharePoint is an excellent cloud-based service that can help organizations and businesses to make better collaboration by sharing and managing content. With SharePoint, users will find it efficient to improve teamwork and find certain information. To better communicate with clients, it’s common to make SharePoint request files.
What is a file request? A file request allow others to upload files to a certain location in your SharePoint account using a link that you send them. They can only upload files; but can't see the content of the folder, or even edit, delete, or download them.
So, how can you achieve the goal on SharePoint effectively? Although you can create a basic file request by using SharePoint in 2020, this feature was quickly withdrawn somehow. Luckily, you can still make a file request on SharePoint by using some kind of walkaround. If you happen to need this, the following content illustrates 3 useful and simple methods to help you deliver the goal. After reading, you can choose the best method according to your situation.
How to Make SharePoint File Request
In this section, you will learn how to request files using SharePoint in 2 easy methods. The one is to give access to a special folder in SharePoint to your clients and allow it to be accessed by them; the other is to take advantage of OneDrive. Now, read below to learn the details.
Way 1: Give Access to a Special Folder in SharePoint
If you want to give others access to a specific folder on SharePoint without granting them access to other files and folders in your SharePoint, then you can follow the steps below to set up permissions to a special folder and make it visible to your clients only. Here’s what you should do:
Step 1: Head to Office.com, log in to your Microsoft credentials, and then go to your SharePoint.
Step 2: Locate the special folder, right-click it and select the Share button on the pop-up window.
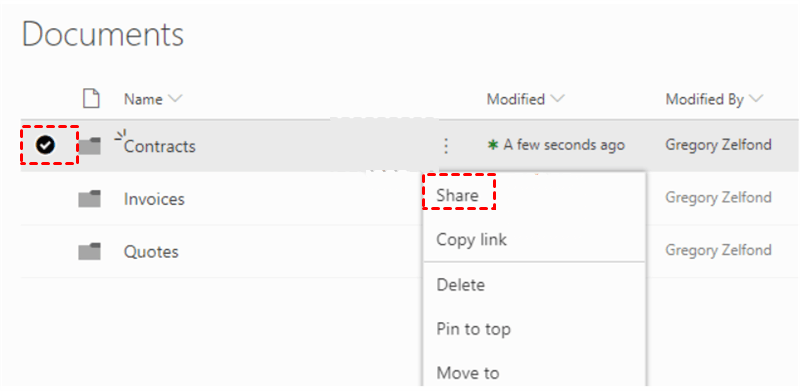
Step 3: Choose the Specific people tab on the next window, then click on the Apply tab. You can also make other settings by hitting Other settings. Then you will be asked to add the email address of the recipient. After that, you can tap the Send button.
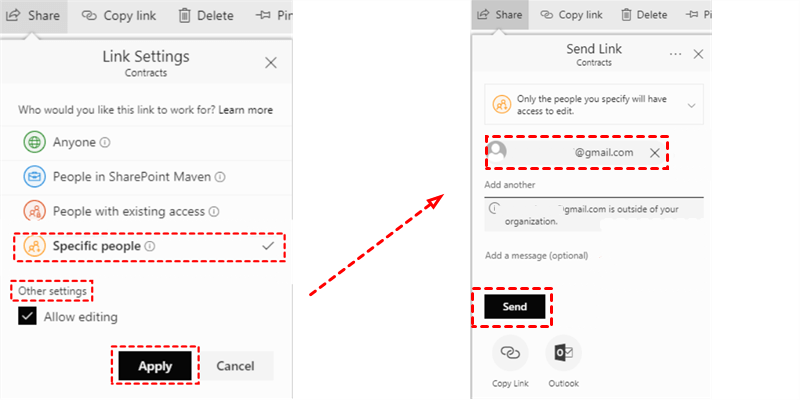
Tip: If you don’t know the email address of the recipient, you can Copy Link on the left lower side. Then paste the link to anyone or anywhere you want. The recipient who gets the link can access the special folder.
Step 4: When your clients or recipient receive the link, they can upload files to that folder.
However, if you are using SharePoint Server 2019, this method is not available for you. Meanwhile, you cannot make sure the data security when sharing that folder with others. In a word, making SharePoint request access to file is relatively feasible at most cases by sharing a special folder in SharePoint.
Way 2: Create SharePoint File Request Directly
SharePoint allows you to create file request directly with in a few clicks. Anyone with the file request link can upload files without having to log in. And it's OK even if you don't have a 365 account. Let's delve into the detailed operations:
Step 1: Navigate to your SharePoint and select the folder you want to make file quest.
Step 2: Tap the 3-dots icon on the right upper side. Select request files in the menu.
Step 2: Tap Next in the pop-up window.
Step 3: Send the file request by Copy link or enter the recipient's email address.
Step 4: If you choose to send an email, the recipient will receive an email like this. By tapping the Upload Files button, the recipient can add the file that you want. Later, you can access the folder to visit the file you need.
Way 3: Make SharePoint File Request on OneDrive
If you find it unavailable to make a file request in SharePoint by the first method, you can create one by using SharePoint and OneDrive. Specifically, you can make a OneDrive file request for your clients. Also, the best thing about OneDrive file requests is that clients can upload files to your shared folder without signing in, which is better than making it in SharePoint.
Before heading to the step-by-step instructions, you should make sure that you have a OneDrive for businesses account. If you don’t see the file request tab on your OneDrive, it’s because the feature is not available for Office 365 Government users, Office 365 operated by 21Vianet users, OneDrive for home users as well as Office 365 Germany users.
Now, refer to the guidance in the following content:
Step 1: Launch your OneDrive and sign in with your account.
Step 2: Click on the New tab and select Folder in the pop-up window.
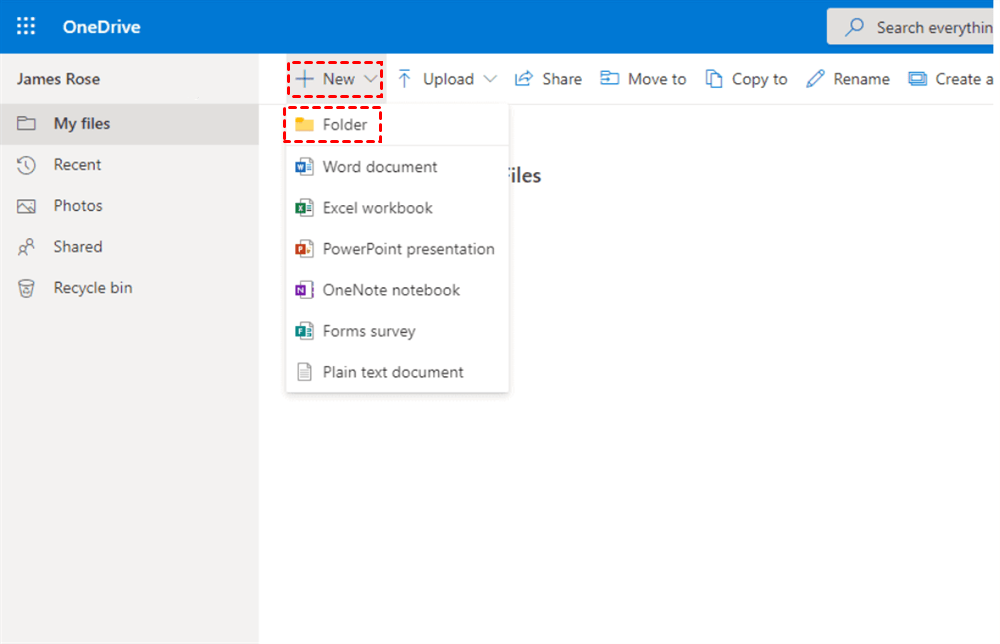
Step 3: Name your folder in the box and click Save. Then, select your folder and click on it, then choose the request files button from the grey top menu.
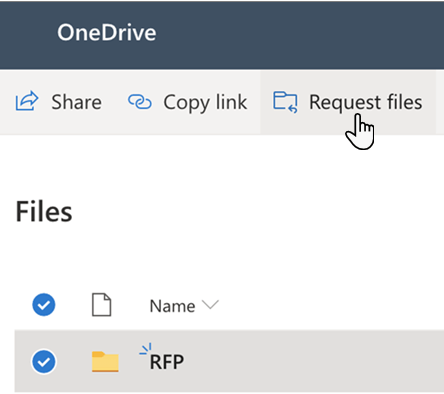
Step 4: Name it according to your situation in the box. After that, click on the Next tab.
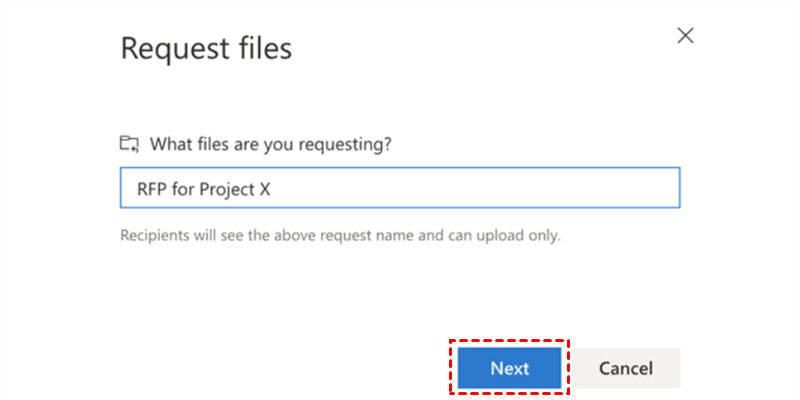
Step 5: Once you create a file request folder on OneDrive, it will ask you to send file request in the next window. And you will have to choices to send file request. The one is copying a link, and the other is sending an email.
Step 6: If you don’t have the email address of the recipient, you can Copy link; if not, you can Enter a name or email address and finally hit the Done button.
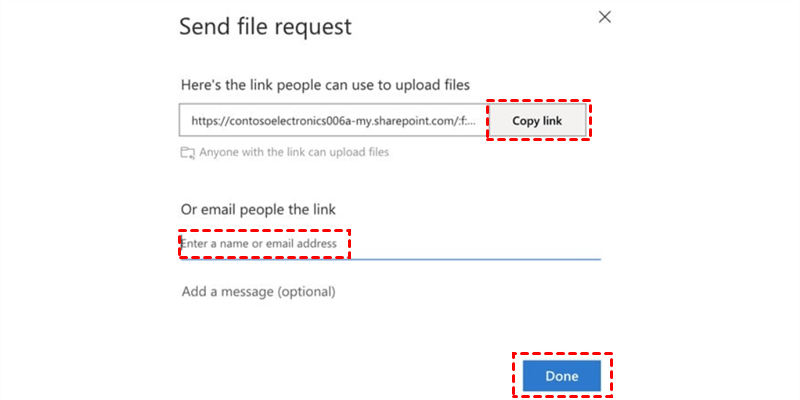
Then, the client or recipient will receive your link or email according to your choice. And he/she can access it to upload files you want him/her to.
Bonus Tip: How to Share Files on OneDrive
We’ve learned how to create SharePoint file requests. Actually, it’s common to make online collaboration in daily study and work life. As the user base of OneDrive gets larger, the need to collaborate on OneDrive increases. So, how can you share files on OneDrive with ease?
Certainly, you can take advantage of the Share feature on OneDrive itself. However, the file-sharing limit is up to 250GB on OneDrive. Meanwhile, there is a limit to the number of accounts that can be signed in: each device may only have one OneDrive for home account and 9 OneDrive for work or school accounts.
So, what you should do if you want to share large files on your different OneDrive accounts without frequent account shifting? In this situation, a technical and professional cloud file manager – MultCloud can work it out easily.
.png)
MultCloud allows users to manage different cloud services, such as iCloud Drive, iCloud Photos, Google Drive, OneDrive, Google Photos, Flickr, MEGA, Dropbox, Amazon S3, FTP, and other 30+ cloud drives in only one app with one login. In this way, you don’t need to sign in and sign out frequently.
With MultCloud, you can perform many basic features. For example, you can sync Google Photos to PC, upload a file to OneDrive, share Google Drive folders, and so on. So, how to share files on OneDrive with MultCloud? Follow the steps below:
Step 1: Create a MultCloud account for free and log in.
Step 2: Go to Add Cloud, and add OneDrive for Business by clicking it to grant MultCloud access.
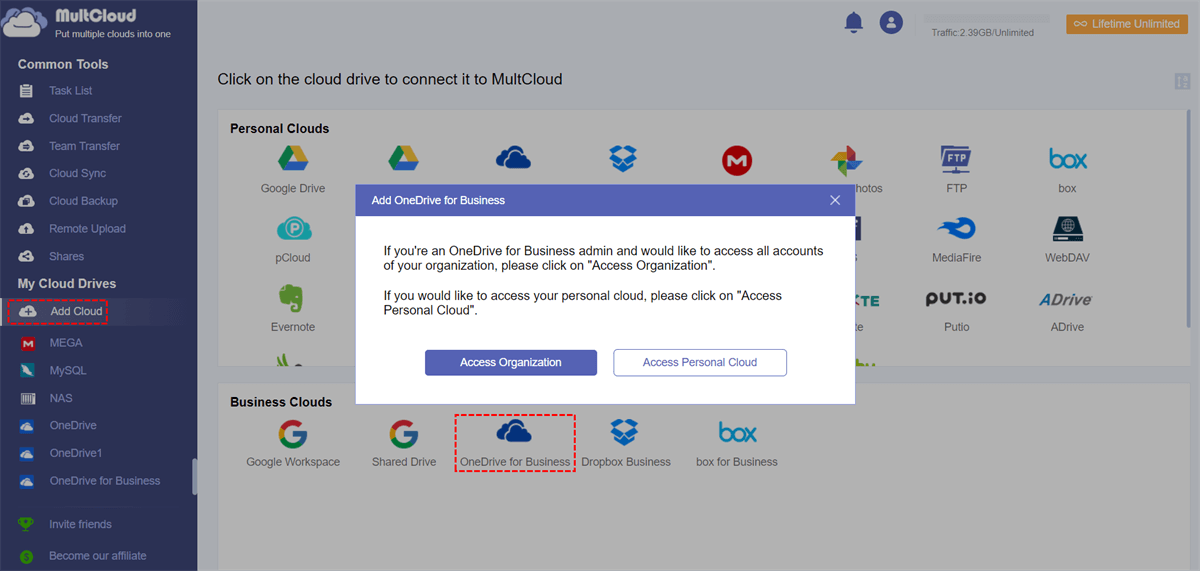
Step 3: Head to OneDrive for Business, and locate the file you want to share. Tick the folder and click on the Share tab on the upper side. Tehn select the Share Mode according to your needs. There are “Public Share”, “Private Share”, “Source Share”. Take "Private Share" as an example here. Now you can Copy the link.
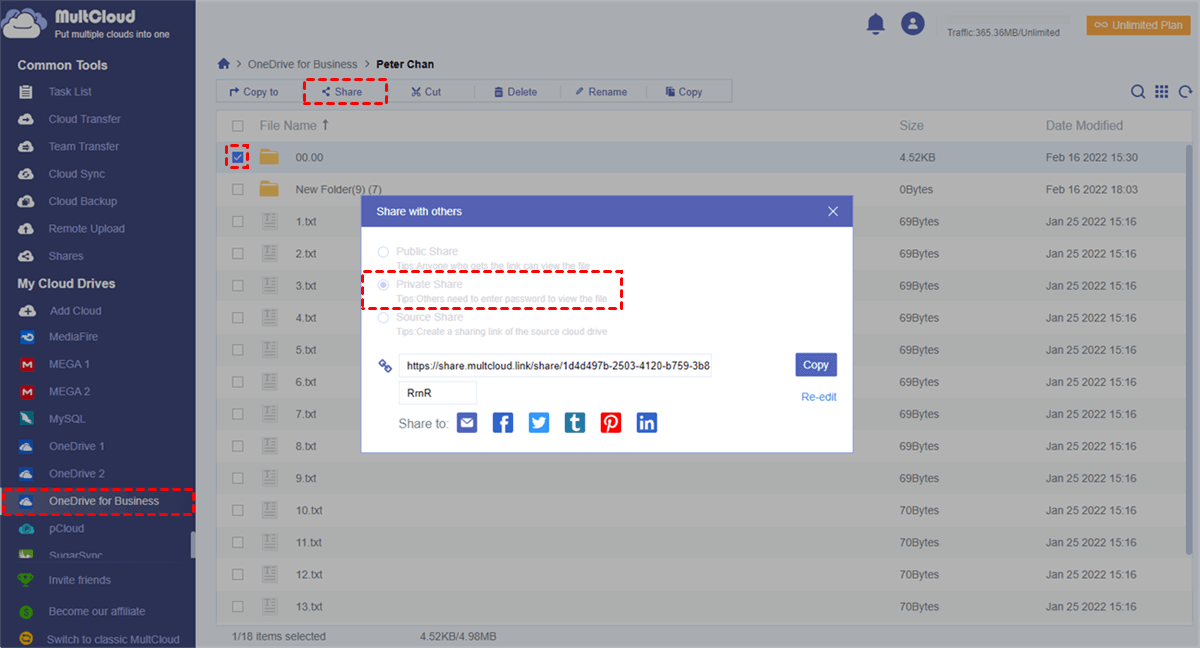
Now, you can paste your link to anyone or anywhere you want to. Also, you can directly share it to social media such as Facebook, Twitter, LinkedIn. In addition to basic features, you can perform advanced features as well, such as cloud to cloud transfer and sync.

- Efficient Cloud-to-Cloud Transfer/Sync. MultCloud allows you to transfer and sync files between cloud drives without downloading and uploading, ensuring a effortless and efficient process.
- Offline Cloud-to-Cloud Transfer/Sync. MultCloud makes it easy to move and sync data across cloud drives in the background. Once the task gets started, it won't be affected by the internet connection.
- Automatic Cloud-to-Cloud Transfer/Sync. MultCloud enables you to create scheduled transfer/sync tasks, so files can be run at regular intervals. For instance, you can transfer data from Dropbox to SharePoint daily.
Note: MultCloud also allows you to share large files with others by Create a Transfer. This feature can be viewed when you right-click the file to select Share or Create a Transfer.
In the End
That’s all about how to make a SharePoint file request. After reading this article, you can create a file request in SharePoint by giving access to a special folder to the recipient. Or, you can take advantage of the OneDrive file request. Meanwhile, if you want to share files on OneDrive without limits, you can utilize MultCloud. If you use MultCloud, you can enjoy other professional features for free, remote uploading files to any clouds that MultCloud supports.
In addition, MultCloud enables you to download files and videos from torrents and magnet links to your cloud services. When you want to copy an image from Instagram, MultCloud's Instagram Downloader feature can work it out easily and effortlessly.
MultCloud Supports Clouds
-
Google Drive
-
Google Workspace
-
OneDrive
-
OneDrive for Business
-
SharePoint
-
Dropbox
-
Dropbox Business
-
MEGA
-
Google Photos
-
iCloud Photos
-
FTP
-
box
-
box for Business
-
pCloud
-
Baidu
-
Flickr
-
HiDrive
-
Yandex
-
NAS
-
WebDAV
-
MediaFire
-
iCloud Drive
-
WEB.DE
-
Evernote
-
Amazon S3
-
Wasabi
-
ownCloud
-
MySQL
-
Egnyte
-
Putio
-
ADrive
-
SugarSync
-
Backblaze
-
CloudMe
-
MyDrive
-
Cubby


