What is Power Automate?
Before going to the steps for Power Automate to move files from OneDrive to SharePoint, we should know what Power Automate is. Power Automate (formerly known as Microsoft Flow) is used to create automated workflows between different applications and services. It offers a wide range of connectors, enabling seamless integration with various platforms such as Office 365, SharePoint, OneDrive, and many more. With Power Automate, users can automate tasks, such as file transfers from SharePoint to Office 365, email notifications, data collection, and approval processes.
Using Power Automate to Move File from OneDrive to SharePoint [8 Steps]
Moving files from OneDrive to SharePoint is a common task that can be automated using Power Automate. By creating a flow in Power Automate, you can streamline the process and ensure that files are transferred efficiently. Here's a step-by-step guide on how to move files from OneDrive to SharePoint:
Step 1: Open your web browser and navigate to the Power Automate website. Sign in using your Microsoft account or organizational account associated with your Office 365 subscription.
Step 2: Click on the "+ Create" tab located on the left-hand side of the screen and tap "Automated cloud flow" on the right part.
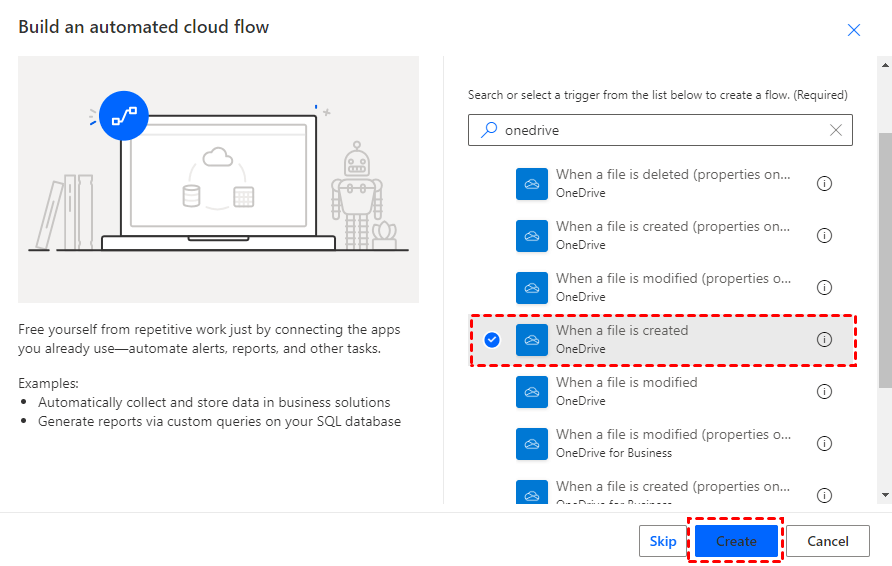
Step 3: Give a name for your workflow, search for "When a file is created" (OneDrive), and choose it. Then click "Create" to turn to set this workflow.
Note: Since OneDrive is different from OneDrive for Business, you should be careful when you choose the trigger.
Step 4: Specify the folder in your OneDrive where the files are located in the "When a file is created" order. This will be the source folder from which the files will be moved.
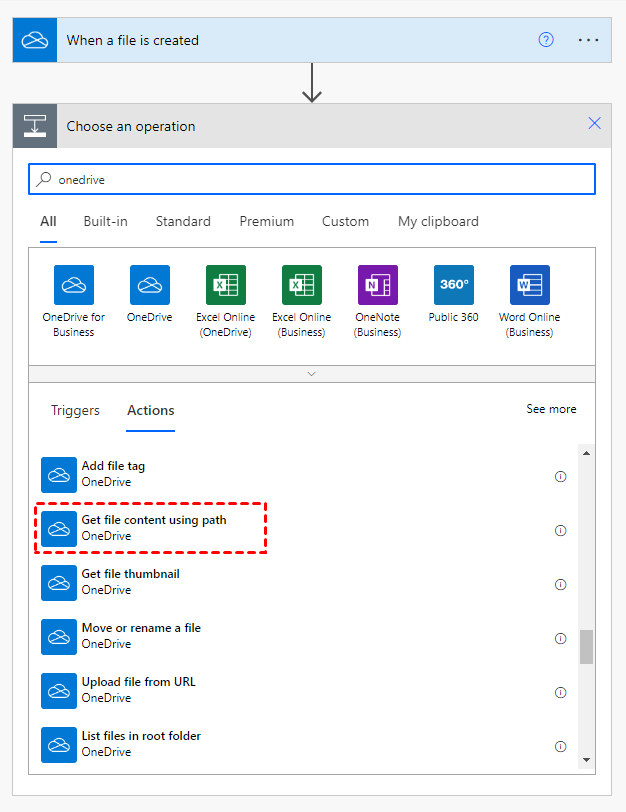
Step 5: Click "+ New step", search for "Get file content using path" (OneDrive) in the searching box, and select it. Then enter "/" and choose "File name" in the box.
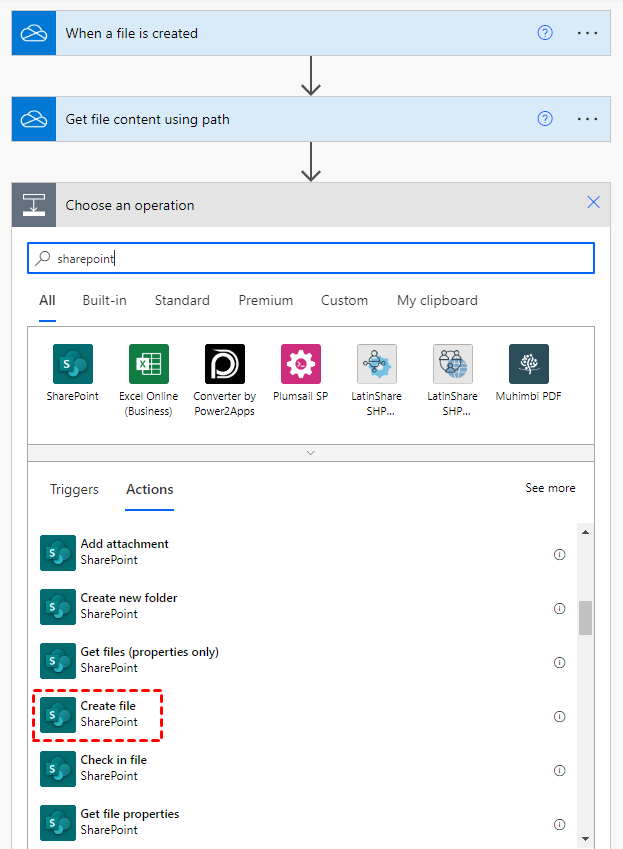
Step 6: Add a new action by clicking "+ New step", search for "Create file" (SharePoint), and select it. Then enter your SharePoint "Site Address" and choose "Folder Path", "File name", and "File content".
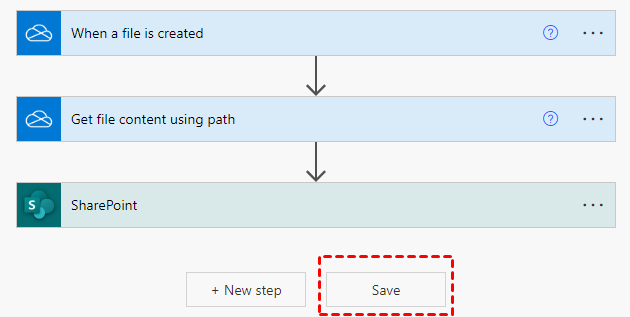
Step 7: Click on the "Save" tab to save your Power Automate move files from OneDrive to SharePoint workflow.
Note: You can test the flow by tapping the "Test" icon in the upper-right corner, choosing "Manually", and clicking "Test".
Best Alternative to Power Automate: Move File from OneDrive to SharePoint via MultCloud [3 Steps]
As you can see, there are many steps that you need to follow to move files from OneDrive to SharePoint by Power Automate. And Power Automate novice may find it difficult to understand how to fill in each blank. But don't worry! There is an easier way for you to move files from OneDrive to SharePoint Online which is by MultCloud Cloud Transfer.
The same as Power Automate, MultCloud is also designed for automating the workflows between multiple cloud services. To take over for Power Automate to copy file from OneDrive to SharePoint Online, you can use MultCloud Cloud Transfer. Cloud Transfer also automates the transfer workflow and you can choose which folder to send or receive files. Besides, you can schedule your transfer task and select the files you want to transfer with their file extensions.
Let's see how easy the operations are from the following operations.
Step 1: Get a new MultCloud account by clicking "Get started Free" after you enter the website.
Step 2: Click "Add Cloud" to connect OneDrive and SharePoint Online to MultCloud. Then you should select their icons and grant MultCloud access.
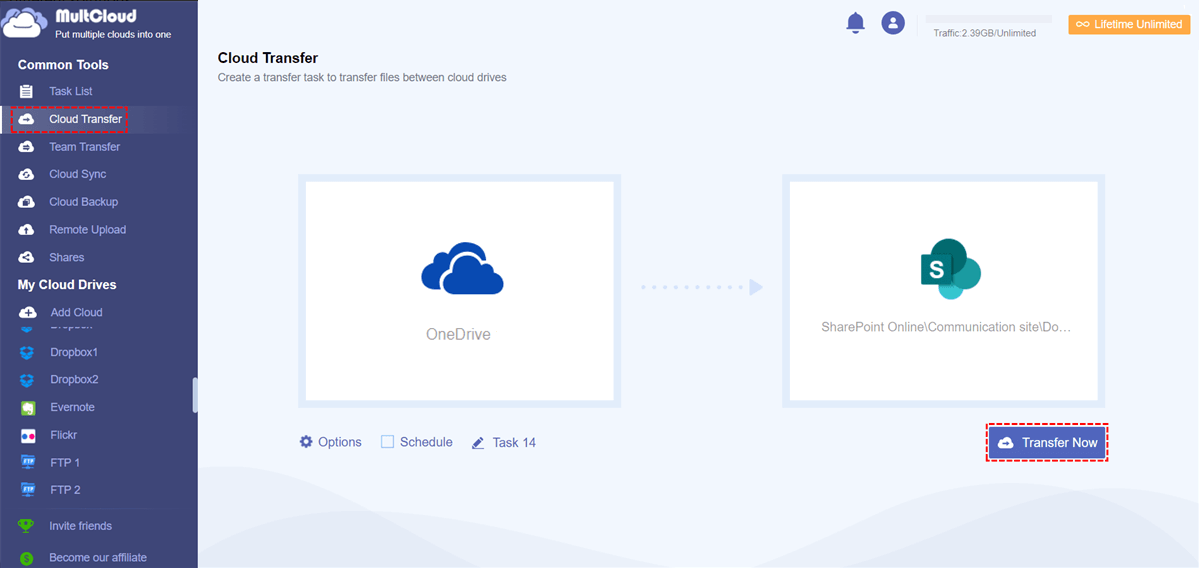
Step 3: Tap on the "Cloud Transfer" button and choose OneDrive in the left box and SharePoint Online in the right box. Finally, click "Transfer Now" to start the process.
Note:
- If you want to delete the OneDrive files after they were transferred to SharePoint Online, you can choose "Delete all source files after transfer is complete" in Options.
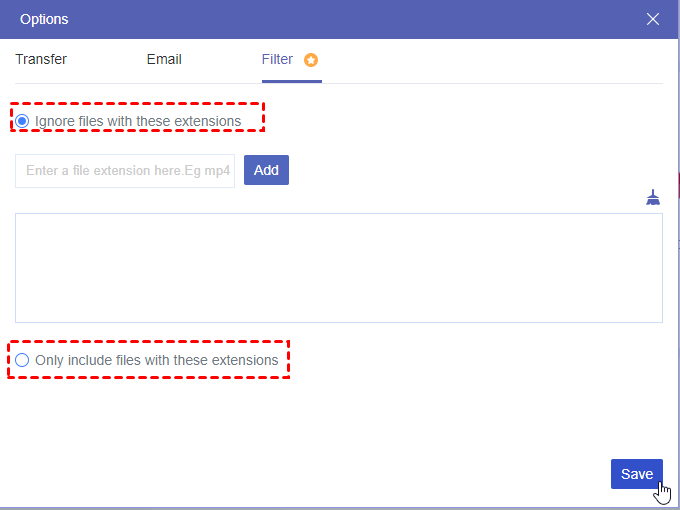
- There is a function that Power Automate cannot realize which is the Filter. Using it in Options, you can choose batches of files to transfer or ignore during the process by adding the file extensions.
- You can get 5 GB of free traffic to transfer files every month. If you have a lot of files that need to be transferred to SharePoint, you can purchase a paid plan. By doing so, you can get more data traffic and enjoy faster transfer speed.
MultCloud vs Power Automate: Which Tool to Choose
Both MultCloud and Power Automate can move file from OneDrive to SharePoint automatically. Therefore, how to choose which one to use? There is a brief comparison between these 2 tools.
| Power Automate | Free to use for 30 days. |
|---|---|
| Create a workflow with complicated operations. | |
| Mainly supports the Microsoft 365 products. | |
| MultCloud | Offer 5 GB of free data traffic every month. |
| Create a task within 3 easy steps. | |
| Allow you to filter the files with file extensions. | |
| Supports 30+ cloud storage services of different companies. | |
| Provide more functions for various requirements rather than cloud-to-cloud transfer, but cloud-to-cloud sync/backup, email-to-cloud migration, webpage-to-cloud upload, etc. |
Conclusion
Now you know how to use Power Automate to move files from OneDrive to SharePoint and you must see from the steps that Power Automate is not so easy to operate. In this regard, you can try MultCloud as an alternative. MultCloud can also satisfy all your needs as well as Power Automate with even simpler steps
What’s more, if you want to sync OneDrive to SharePoint, you can also use MultCloud. Cloud Sync is specially used for cloud-to-cloud sync. With it, you can constantly update files from OneDrive to SharePoint and you can decide to sync which files like those are modified are added.
MultCloud Supports Clouds
-
Google Drive
-
Google Workspace
-
OneDrive
-
OneDrive for Business
-
SharePoint
-
Dropbox
-
Dropbox Business
-
MEGA
-
Google Photos
-
iCloud Photos
-
FTP
-
box
-
box for Business
-
pCloud
-
Baidu
-
Flickr
-
HiDrive
-
Yandex
-
NAS
-
WebDAV
-
MediaFire
-
iCloud Drive
-
WEB.DE
-
Evernote
-
Amazon S3
-
Wasabi
-
ownCloud
-
MySQL
-
Egnyte
-
Putio
-
ADrive
-
SugarSync
-
Backblaze
-
CloudMe
-
MyDrive
-
Cubby


