What are Power Automate and Network Drive?
Instead of going straight to the steps for using Power Automate to copy file from SharePoint to network drive, let’s know something about Power Automate and a network drive first.
Power Automate Overview
Power Automate (also Microsoft Flow) is used to create automated workflows across multiple applications and services. It integrates seamlessly with various platforms, including SharePoint, Google Drive, OneDrive, and hundreds of other popular apps. That means you can use Power Automate to migrate Google Drive files to OneDrive.
With Power Automate, you can streamline your business processes by automating repetitive tasks and connecting different systems together. By leveraging connectors, triggers, and actions, you can design customized workflows to meet your specific needs.
Network Drive Overview
A network drive refers to a storage location that is located on another computer or server within the same network, such as a drive, NAS, or share. that is located on another computer or server within the same network.
Network drives are commonly used in organizations or workplaces to facilitate file sharing, data management, and collaborative work among employees. By connecting to a network drive, users can access files and folders stored on a server or another computer in the network as if they were located on their local machine. This enables users to share files, update information in real time, and maintain a centralized repository of data that can be accessed by authorized individuals.
Power Automate: Copy File from SharePoint to Network Drive [6 Steps]
As mentioned before, a network drive is rooted in your PC. So, here this section will list the steps for copying files from SharePoint to PC as an example. To get started with Power Automate, you'll need an Office 365 or Microsoft 365 account. If you don't have one, you can sign up for a trial or purchase a subscription.
Step 1: Enter Power Automate and log in to your account.
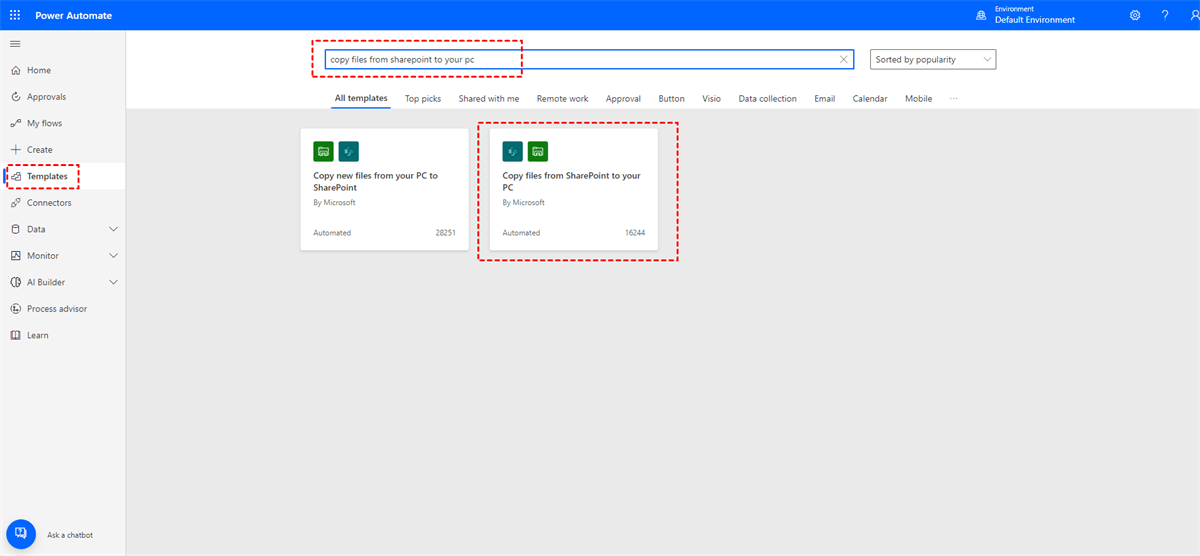
Step 2: Click “Templates” on the left sidebar and enter “Copy files from SharePoint to your PC” in the search box. Then choose the right template.
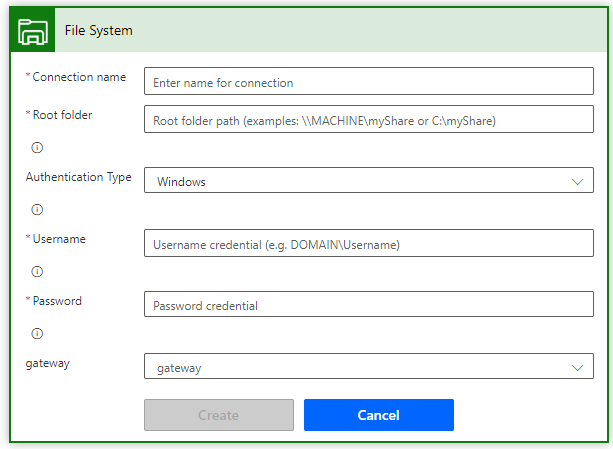
Step 3: Connect your SharePoint account and your PC to Power Automate, then click “Continue”.
Note:
- Connection Name: Name your PC.
- Root folder: Select a folder on your PC to receive the SharePoint files.
- Authentication Type: Choose Windows.
- Username: Enter the username of your PC in the Name/Administrator format.
- Password: The password of your computer.
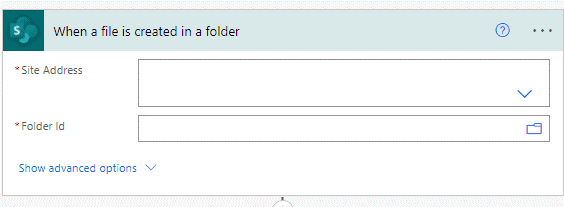
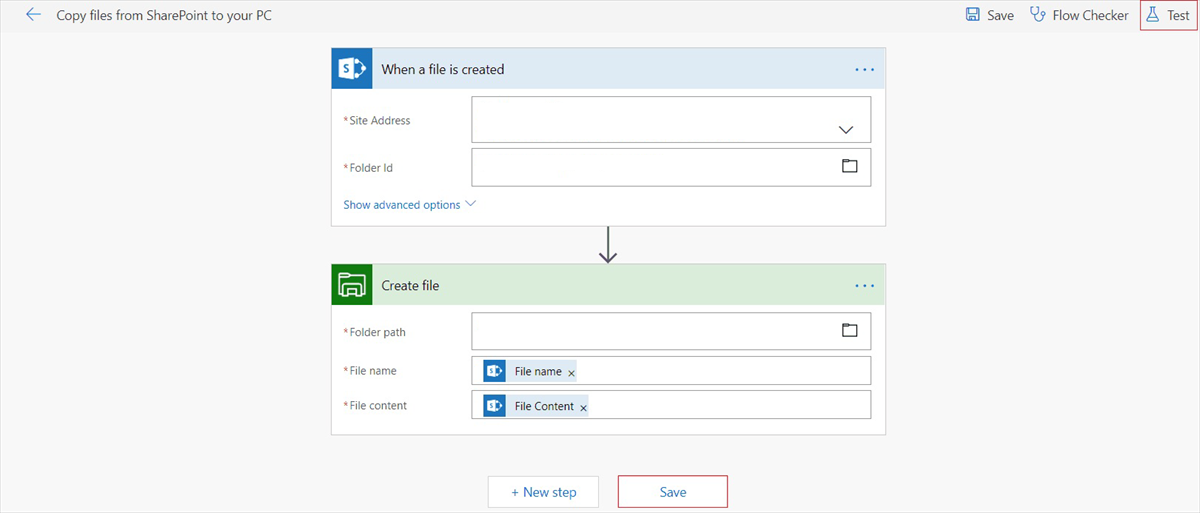
Step 4: Enter SharePoint’s Site Address and the Folder id where you save files that you want to copy to a network drive.
Step 5: Specify the Folder path, Filename, and File Content based on your PC. To fill in the “File name” and “File content” blank, you can choose from the dynamic content as “File name” and “File content”.
Step 6: Click on the “Save” button to run the process.
Note: If you want to check if this workflow can work successfully, you can click “Test” in the upper-right corner. Then upload a file to SharePoint to see if this file can be copied to the folder you chose on your PC.
MultCloud: Best Alternative to Copy File from SharePoint to Network Drive [3 Steps]
If you want to copy files from SharePoint to NAS instead of your PC, you can try MultCloud. Since there is no specific template for SharePoint to NAS transfer and it is not easy to create a new workflow. Using MultCloud, you don’t have to go through that many steps to connect the SharePoint and NAS accounts to it. Besides, you can simply give orders to the transfer process rather than adding actions and filling in blanks.
How to Copy Files from SharePoint to Network Drive via MultCloud
Step 1: Sign up for a MultCloud account after entering its website.
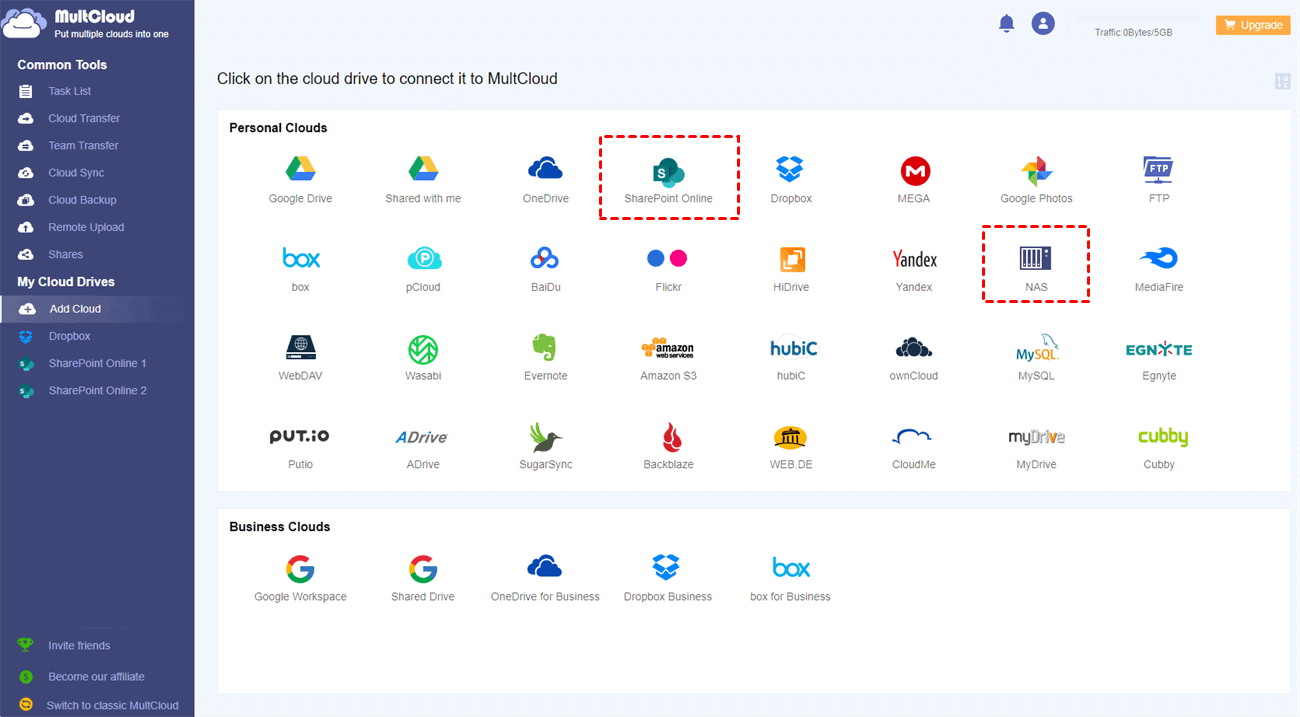
Step 2: Click “Add Cloud” and the cloud icons. Then you need to log into your SharePoint and NAS accounts and grant MultCloud access.
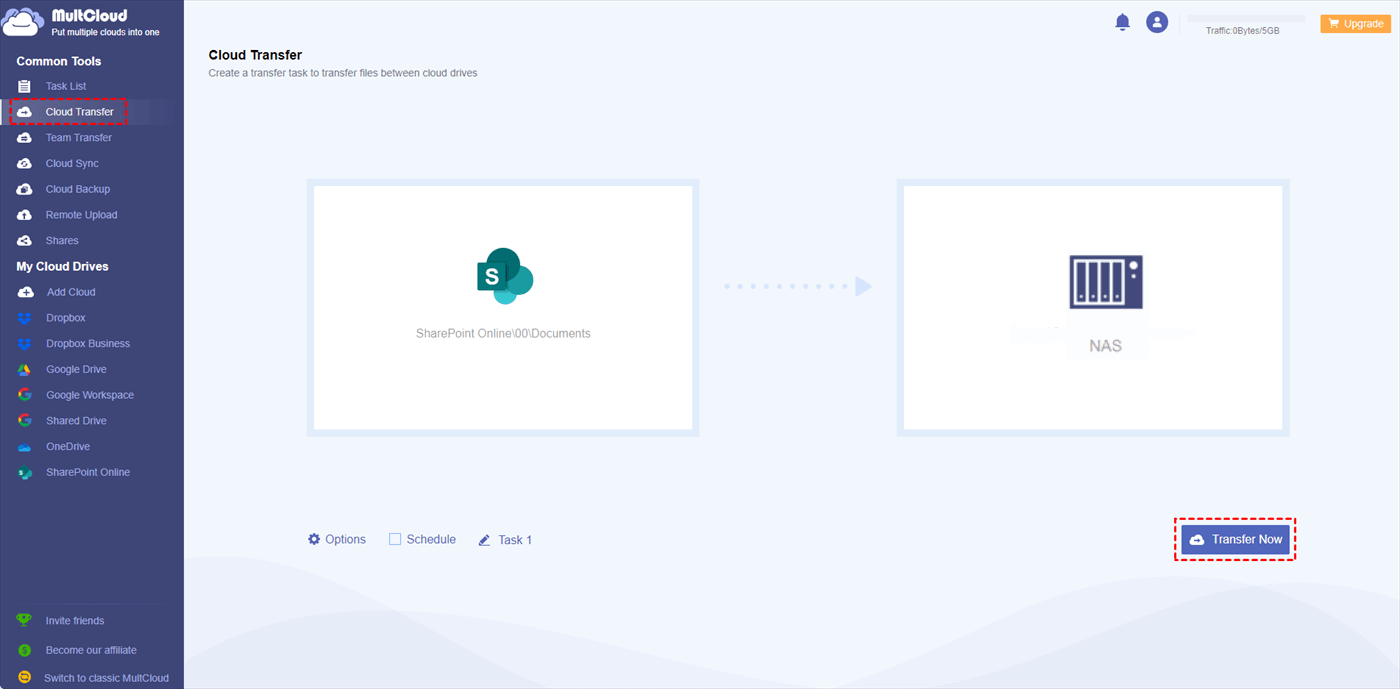
Step 3: Tap on the “Cloud Transfer” button and choose SharePoint Online and NAS in different boxes. Finally, click “Transfer Now” to initiate the transfer process.
Notes:
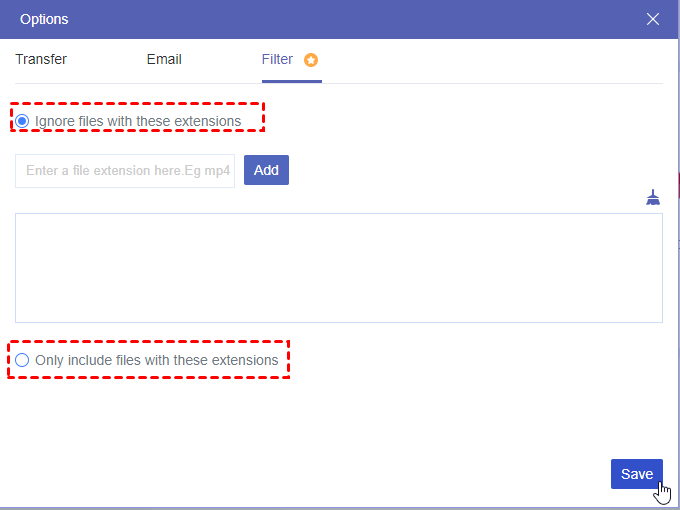
- You can use the Filter feature to select the files that you want to transfer or ignore by adding their extensions. For example, if you don’t want to transfer the photos with a png extension, you just tick “Ignore files with these extensions”, enter “png” in the box, and click “Save”.
- MultCloud uses data traffic to transfer files and you can get 5GB of free traffic each month. If you need to transfer a lot of files in a month, you can subscribe to a paid plan to get more traffic.
MultCloud vs Power Automate
There is a brief comparison between Power Automate and MultCloud to help you decide which one to use.
- Task Scheduling: Both MultCloud and Power Automate can schedule your transfer process. On Power Automate, you should add an action while on MultCloud, you need to apply the Schedule feature.
- Delete Files after Task: Both Power Automate and MultCloud can help you delete the files on the source cloud after the transfer is completed. Using Power Automate to realize it, you also need to add an action. While using MultCloud, you can tick the corresponding order in the Options.
- Online vs Offline Transfer: Unlike Power Automate which relies much on network stability and computer performance, MultCloud uses data traffic to transfer files whose speed is much faster and the process will still run even when your computer is shut down.
- Operations: As you can see, using Power Automate requires you to fill in multiple blanks. If you choose the wrong credentials like the username, password, or gateway, the connection cannot work well. However, MultCloud simplifies the process, you just need to add your SharePoint Online and NAS accounts and choose the source and destination to create a file transfer task. The operations will be much easier for everyone even if you are a computer novice.
Conclusion
See, using Power Automate to copy file from SharePoint to network drive is not an easy thing, so you can use MultCloud Cloud Transfer instead. With fewer steps and more universal methods, you can copy files in a more convenient way.
What’s more, there are more functions on MultCloud. You can backup or sync files from SharePoint to a network drive on MultCloud, too. Cloud Backup and Cloud Sync are as great as Cloud Transfer. Or, if you want to save your Gmail emails to SharePoint, Email Migration is recommended.
MultCloud Supports Clouds
-
Google Drive
-
Google Workspace
-
OneDrive
-
OneDrive for Business
-
SharePoint
-
Dropbox
-
Dropbox Business
-
MEGA
-
Google Photos
-
iCloud Photos
-
FTP
-
box
-
box for Business
-
pCloud
-
Baidu
-
Flickr
-
HiDrive
-
Yandex
-
NAS
-
WebDAV
-
MediaFire
-
iCloud Drive
-
WEB.DE
-
Evernote
-
Amazon S3
-
Wasabi
-
ownCloud
-
MySQL
-
Egnyte
-
Putio
-
ADrive
-
SugarSync
-
Backblaze
-
CloudMe
-
MyDrive
-
Cubby
