Quick Search:
Why Consider Moving from IDrive to Backblaze?
Finding a better fit for your needs or personal taste are often the main reasons for switching cloud providers. While Backblaze is frequently chosen by those seeking unlimited storage and a more straightforward, affordable option for large-scale data backups, IDrive offers outstanding capabilities like multi-device backup and syncing.
For users with a lot of data, Backblaze's affordable plan, which offers unlimited backup for a one-time price, is particularly alluring. IDrive, on the other hand, has a tiered price system and can be unnecessary if you only backup one or two devices.
If simplicity and flat-rate pricing sound appealing, switching to Backblaze might be the right choice for you. Now, let’s explore two easy ways to get your data from IDrive to Backblaze.
Note: Look here to clearly know the differences between IDrive and Backblaze.
[2 Methods] How to Move from IDrive to Backblaze
There are top 2 ways for data migration between IDrive and Backblaze. One is the automatic way --- MultCloud, another way is the manual way --- download & upload. Before moving your data, there are a few things to keep in mind:
- File Size: Larger files may take longer to upload or download. With MultCloud, this is less of an issue, but with the manual method, it could take time, especially for a large volume of data.
- Time Commitment: MultCloud provides a hands-off solution that operates in the background, whereas the manual technique necessitates more patience and work.
- File Organization: Before uploading your files to Backblaze, especially if you're doing it by hand, make sure they are correctly organized. This will let you access your data more quickly in the future.
Method 1: Automatically Transfer from IDrive to Backblaze Using MultCloud
With MultCloud, you can manage and move files between different cloud services without having to download and upload your data again. MultCloud allows you to save time and effort by transferring files straight from your IDrive account to Backblaze.
- ✅Easy: The operation is easy to understand.
- ✅Fast: The migration speed is fast.
- ✅Convenient: The migration can be automated.
You won't have to manually download files from IDrive or upload them to Backblaze when you use MultCloud because it manages the entire transfer procedure in the cloud.
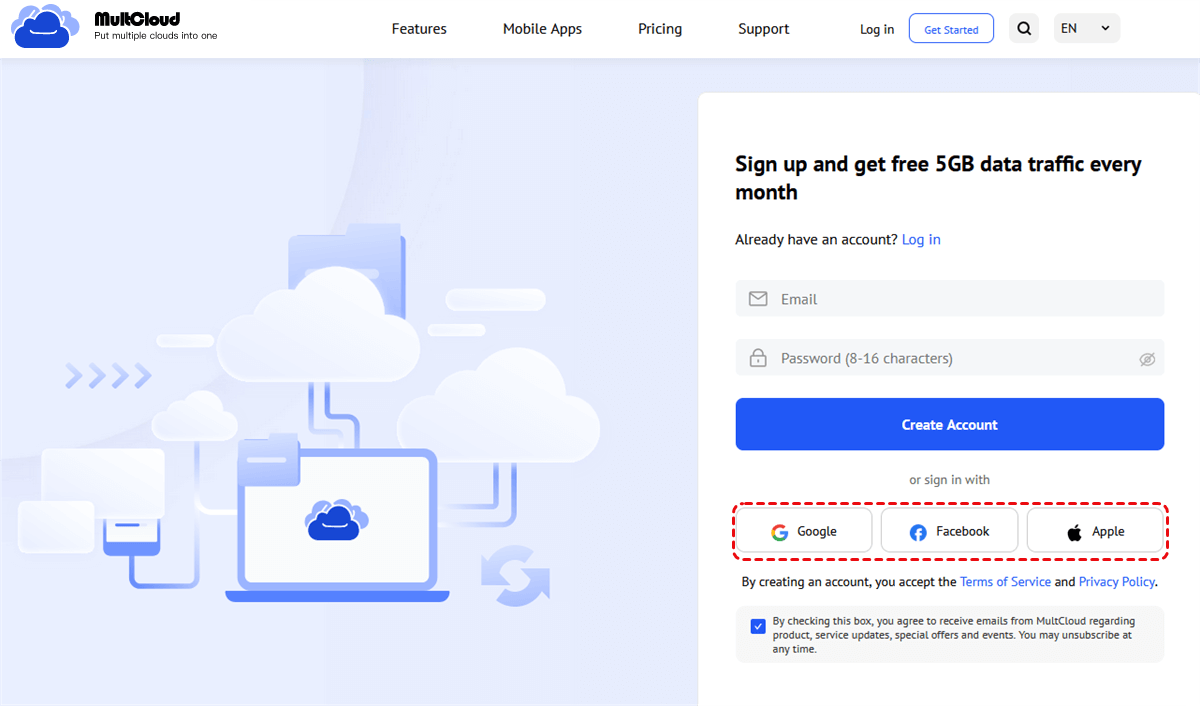
Step 1. Create a MultCloud Account: Visit the MultCloud website and create a free account. You can sign up using your email address, Google account, or other available methods.
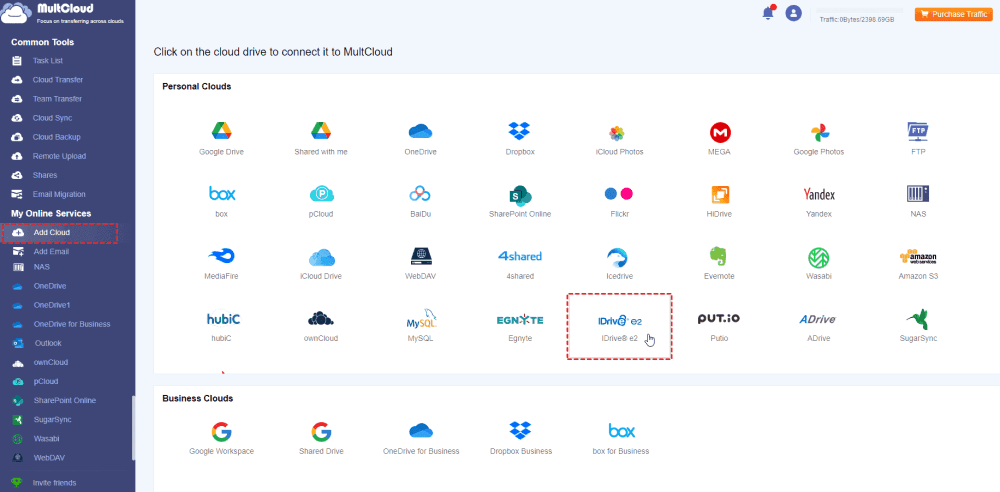
Step 2. Connect Your IDrive Account: After logging into MultCloud, click "Add Cloud" and select IDrive e2 from the list of cloud storage services. Follow the prompts to authenticate your IDrive e2 account and give MultCloud permission to access your files.
Step 3. Connect Your Backblaze Account: Similarly, add Backblaze to MultCloud by selecting it from the "Add Cloud" menu. Authenticate your Backblaze account and grant MultCloud access.
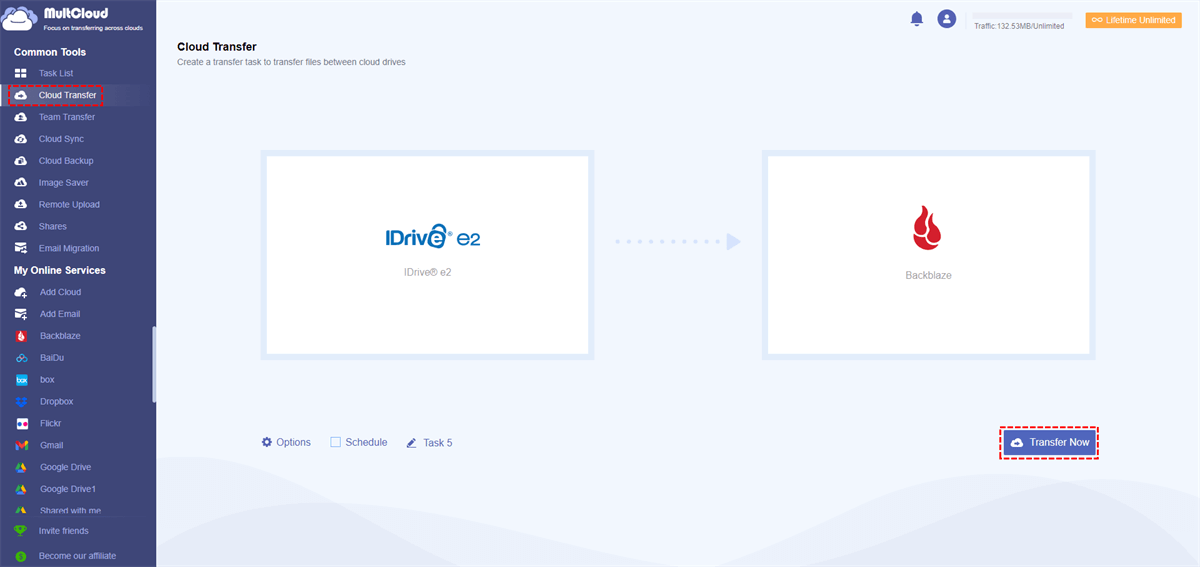
Step 4. Start the Transfer Process: Once both cloud services are connected, you can begin the transfer. Click "Cloud Transfer", select the files and folders you want to transfer from your IDrive e2 account, and select the destination in your Backblaze account. Then tab "Transfer Now", MultCloud will start moving your data in the background.
Step 5. Monitor the Transfer: The process will happen in the cloud, so you don’t need to keep your computer running during the transfer. MultCloud will notify you once the transfer is complete, and you can check your Backblaze account to ensure all files have been moved successfully.
This method is ideal if you don’t want to hassle with downloading files or manually managing large backups. You can transfer all your files with just a few clicks, and MultCloud handles everything in the cloud.
Method 2: Manually Move from IDrive to Backblaze
The manual method is also a good choice if you want to guarantee a more selective transfer or if you prefer a more hands-on approach. In this instance, you will manually upload files to Backblaze after downloading them from your IDrive account.
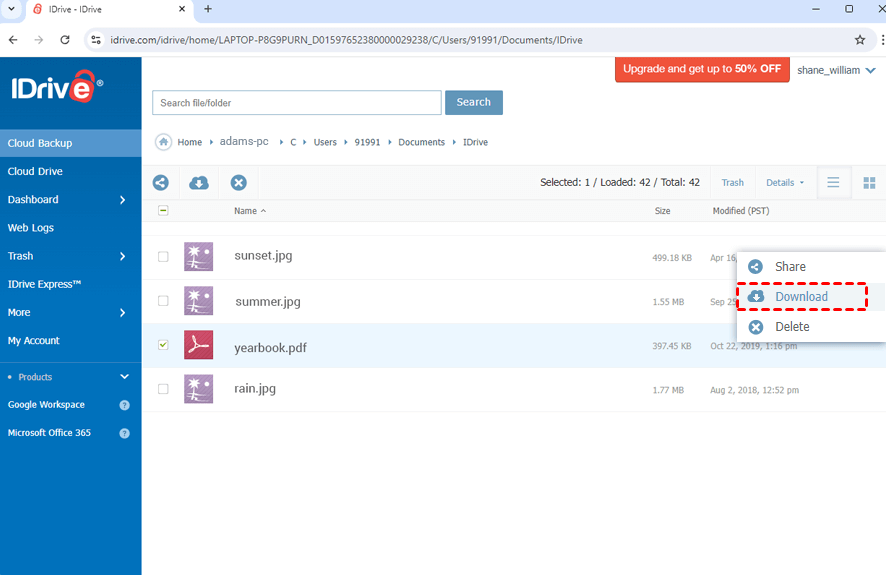
Step 1: Download files from IDrive: Choose the files or folders you wish to move after logging into your IDrive account. You have the choice to download each one separately or to download them all at once by selecting the "Download All" option. Save the files to your PC.
Step 2: Arrange Your Files: After the files have been downloaded, arrange them on your computer into folders or groups. The Backblaze upload procedure will go more smoothly and be easier to handle as a result.
Step 3. Upload to Backblaze: Open the Backblaze software or web interface. Using the "Upload" button or drag-and-drop feature, upload the files you just downloaded from IDrive.
Step 4. Verify the Upload: After uploading, check your Backblaze account to ensure all your files have transferred correctly. You can do this via the Backblaze web interface or desktop application.
This method provides you with full control over the files being moved. It’s great if you only want to move specific files or folders and don’t mind taking the extra time for the manual upload.
Which Method is Your Best Choice?
Your level of control and time commitment will determine whether you choose MultCloud or the manual download/upload technique. MultCloud is the solution if you want a simple, fast transfer. It handles everything for you, transferring your data in a few easy steps from IDrive to Backblaze. But the manual technique allows you that flexibility if you want complete control over the process and don't mind investing a little more time.
In either case, you can successfully move your data from IDrive to Backblaze. The key is choosing the method that best fits your needs and preferences.
| Method | Pros | Cons |
|---|---|---|
| Transfer Using MultCloud | ✅No need to download or upload files manually; ✅Handles transfer in the cloud. |
❌Requires setting up MultCloud; ❌Limited to services that support MultCloud. |
| Manual Download and Upload | ✅Full control over the files; ✅Works even without MultCloud. |
❌Time-consuming; ❌Needs constant internet access for large transfers. |
Conclusion
Moving from IDrive to Backblaze can be a smooth and stress-free process when you use the right method. Whether you opt for the cloud-based transfer with MultCloud or prefer the manual route, both options offer clear steps to ensure your data is safely backed up to Backblaze. Assess your time constraints, data volume, and how much control you want over the transfer, and choose the method that works best for you. With your data securely in Backblaze, you can enjoy its simple and affordable cloud storage service.
MultCloud Supports Clouds
-
Google Drive
-
Google Workspace
-
OneDrive
-
OneDrive for Business
-
SharePoint
-
Dropbox
-
Dropbox Business
-
MEGA
-
Google Photos
-
iCloud Photos
-
FTP
-
box
-
box for Business
-
pCloud
-
Baidu
-
Flickr
-
HiDrive
-
Yandex
-
NAS
-
WebDAV
-
MediaFire
-
iCloud Drive
-
WEB.DE
-
Evernote
-
Amazon S3
-
Wasabi
-
ownCloud
-
MySQL
-
Egnyte
-
Putio
-
ADrive
-
SugarSync
-
Backblaze
-
CloudMe
-
MyDrive
-
Cubby
