Quick Search:
What Should You Know about File Server
Ensuring basic security is necessary for a traditional file server, which functions as a storage solution for files and folders. File servers are known by various names, such as network drives and shared drives. In today's work environment, employees demand rapid access to their files from any location, while also prioritizing security during file migrations, all while maintaining convenience. One compelling motivation for migrating from a file server to SharePoint is the elimination of the need for VPN connections to access files.
Why Migrate Data from File Server to SharePoint Online?
SharePoint Online utilizes modern protocols for sharing that are much superior to the structure of on-premises file servers. With SharePoint, users will find it more convenient to set up permissions and manage a great many files and documents. As an excellent service from Office, SharePoint just simplifies the collaboration between team members and improves work efficiency.
Specifically, the central admin console on SharePoint offers unprecedented organizational power for users to set up permissions for access and security. Meanwhile, users can enjoy great flexibility when accessing data on the web without consuming storage space on their computers. Moreover, many third-party services can be integrated to SharePoint for better functionality.
Due to the benefits above, it’s wise to start File Server to SharePoint migration. And in this article, learn how do I migrate from premise file server to SharePoint online in 3 practical methods. If you are interested, keep reading further.
How to Migrate Data from File Server to SharePoint Online
What tool can be used to migrate files from a file server to SharePoint Online? Well, there are 3 useful and smart services you can take advantage of, incluidng PowerShell, MultCloud, and SharePoint Migration Tool. We will walk you through how to use them respectively in the following part. Read below carefully to learn how do I move files from server to SharePoint.
Way 1: Utilize PowerShell
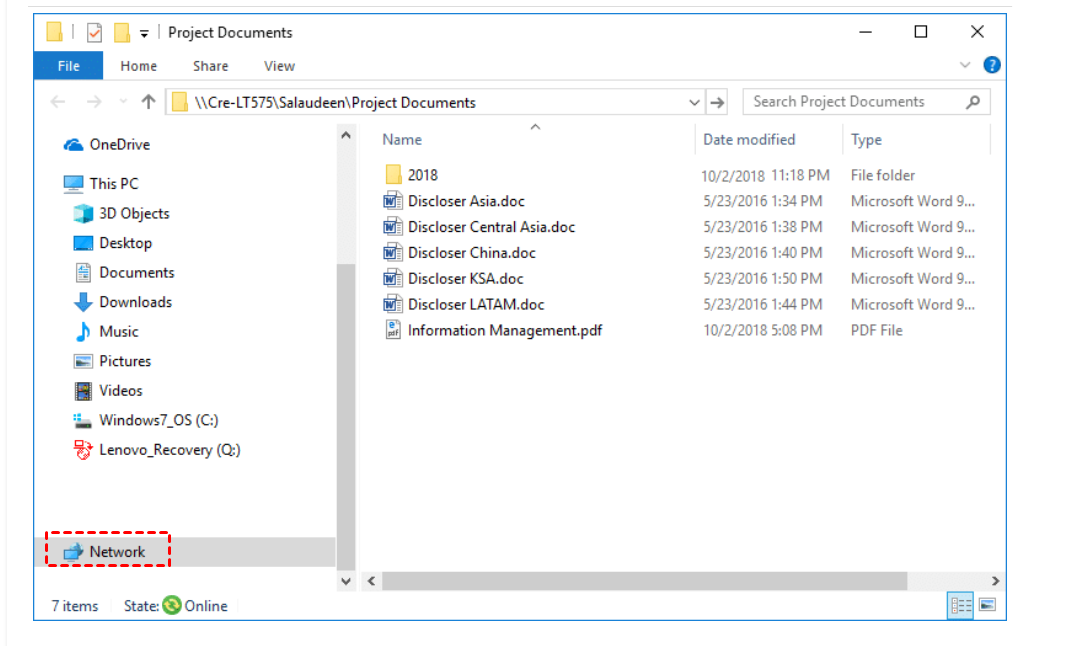
Step 1: Go to the network on your File Explorer. For instance, you want to move the data on the Network to SharePoint Online.
Step 2: Enable your PowerShell and copy the following content to SharePoint.
#Load SharePoint CSOM Assemblies
Add-Type -Path "C:\Program Files\Common Files\Microsoft Shared\Web Server Extensions\16\ISAPI\Microsoft.SharePoint.Client.dll"
#Function to migrate all Files and Folders from FileShare to SharePoint Online Function Migrate-FileShareToSPO() { param ( [Parameter(Mandatory=$true)] [string] $SiteURL, [Parameter(Mandatory=$true)] [string] $TargetLibraryName, [Parameter(Mandatory=$true)] [string] $SourceFolderPath )
#Setup Credentials to connect $Cred= Get-Credential $Credentials = New-Object Microsoft.SharePoint.Client.SharePointOnlineCredentials($Cred.Username, $Cred.Password)
#Setup the context $Ctx = New-Object Microsoft.SharePoint.Client.ClientContext($SiteURL) $Ctx.Credentials = $Credentials
#Get the Target Folder to Upload $Web = $Ctx.Web $Ctx.Load($Web) $List = $Web.Lists.GetByTitle($TargetLibraryName) $Ctx.Load($List) $TargetFolder = $List.RootFolder $Ctx.Load($TargetFolder) $Ctx.ExecuteQuery()
#Get All Files and Folders from the Source Get-ChildItem $SourceFolderPath -Recurse | ForEach-Object { If ($_.PSIsContainer -eq $True) #If its a Folder! { $TargetFolderRelativeURL = $TargetFolder.ServerRelativeURL+$_.FullName.Replace($SourceFolderPath,[string]::Empty).Replace("\","/") Write-host -f Yellow "Ensuring Folder '$TargetFolderRelativeURL' Exists..."
#Check Folder Exists
Try { #Get Source Folder's metadata $CreatedDate= [DateTime]$_.CreationTime $ModifiedDate = [DateTime]$_.LastWriteTime
$Folder = $Web.GetFolderByServerRelativeUrl($TargetFolderRelativeURL) $Ctx.Load($Folder) $Ctx.ExecuteQuery()
#Write-host -f Green "Folder Already Exists!"} Catch { #Create New Sub-Folder $Folder=$Web.Folders.Add($TargetFolderRelativeURL) $Ctx.ExecuteQuery() Write-host -f Green "Created Folder at "$TargetFolderRelativeURL
#Set Metadata of the Folder $FolderProperties = $Folder.ListItemAllFields $FolderProperties["Created"] = $CreatedDate $FolderProperties["Modified"] = $ModifiedDate $FolderProperties.Update() $Ctx.ExecuteQuery() } } Else #If its a File { $TargetFileURL = $TargetFolder.ServerRelativeURL + $_.DirectoryName.Replace($SourceFolderPath,[string]::Empty).Replace("\","/") +"/"+$_.Name $SourceFilePath = $_.FullName
Write-host -f Yellow "Uploading File '$_' to URL "$TargetFileURL #Get the file from disk $FileStream = ([System.IO.FileInfo] (Get-Item $SourceFilePath)).OpenRead()
#Upload the File to SharePoint Library's Folder $FileCreationInfo = New-Object Microsoft.SharePoint.Client.FileCreationInformation $FileCreationInfo.Overwrite = $true $FileCreationInfo.ContentStream = $FileStream $FileCreationInfo.URL = $TargetFileURL $FileUploaded = $TargetFolder.Files.Add($FileCreationInfo)
$Ctx.ExecuteQuery() #Close file stream $FileStream.Close()
#Update Metadata of the File $FileProperties = $FileUploaded.ListItemAllFields $FileProperties["Created"] = [datetime]$_.CreationTime $FileProperties["Modified"] =[datetime]$_.LastWriteTime $FileProperties.Update() $Ctx.ExecuteQuery() Write-host "File '$TargetFileURL' Uploaded Successfully!" -ForegroundColor Green } } }
#Set parameter values $SiteURL="https://Crescent.sharepoint.com/sites/marketing"$TargetLibraryName="Documents"$SourceFolderPath="\\Cre-LT575\Salaudeen\Project Documents"
#Call the function to Upload All files & folders from network Fileshare to SharePoint Online Migrate-FileShareToSPO -SiteURL $SiteURL -SourceFolderPath $SourceFolderPath -TargetLibraryName $TargetLibraryName
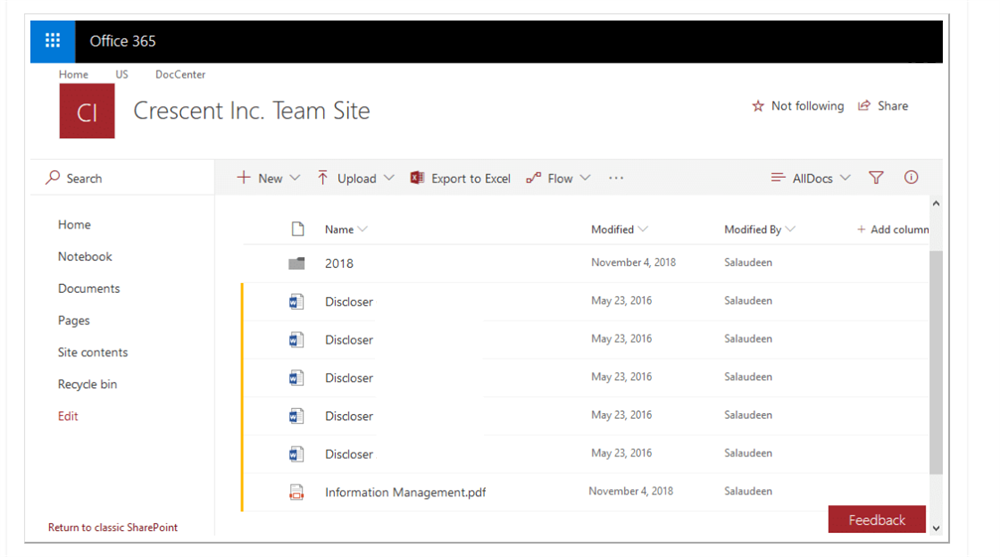
Step 3: Then the PowerShell script will upload all data from the network to your SharePoint Online document library.
Way 2: Migrate Data from File Server to SharePoint Online
If you are frustrated about the first method, then you can take advantage of another service to achieve the goal. Simply, you can download the data from file server and then upload it to SharePoint via a third-party service – MultCloud. In case you don’t know how to download files and folders from a File Server, you can visit that hyperlink.
MultCloud is a brilliant and popular cloud file manager that allows users to manage multiple cloud drives, such as Google Drive, Google Photos, OneDrive, Dropbox, Flickr, MEGA, Amazon S3, NAS, SharePoint, Wasabi, and so on. It enables users to perform the same features that they can perform on the official website of each cloud. For instance:
- Users are allowed to upload files to SharePoint, share a document on Google Drive, and sync Google Photos to a PC.
- Users are able to manage different cloud storage services in only one place with only one login. In this way, they don’t need to shift cloud accounts frequently.
So, how to migrate data from File Server to SharePoint Online via MultCloud? Follow the operations in the following content.
Tip: Before beginning, you have to make sure you’ve downloaded the data from File Server to your local computer. Then, you can refer to the steps below.
Step 1: Register an account of MultCloud by your email. Or, you can use the Facebook account or Google account to sign in directly.
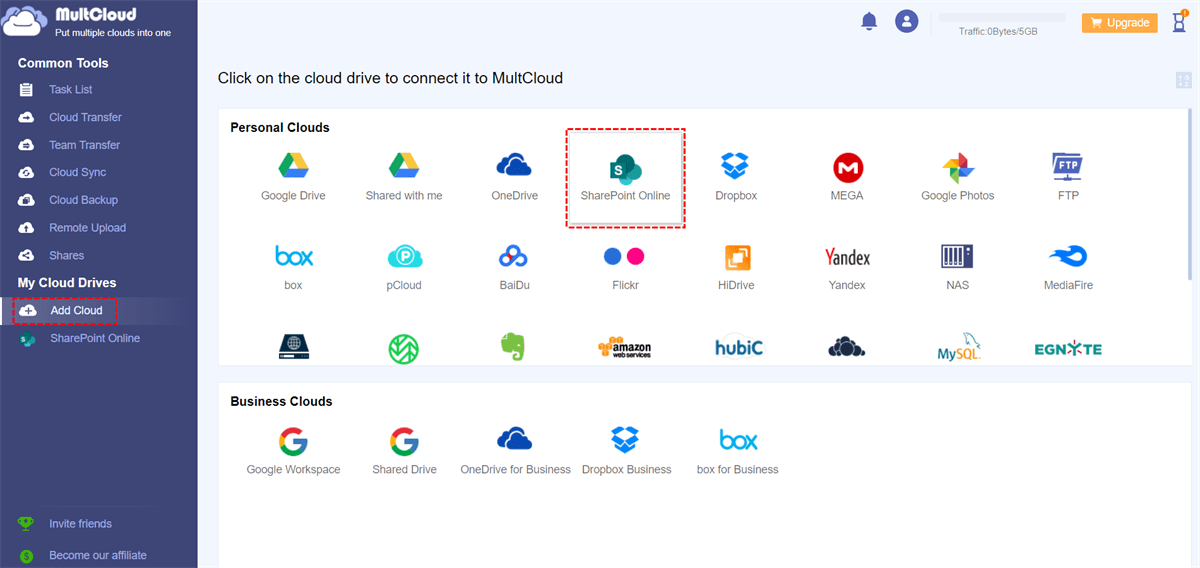
Step 2: Now, head to Add Cloud. And you will view what cloud services MultCloud supports in total. Then, hit SharePoint to add and grant MultCloud permission.
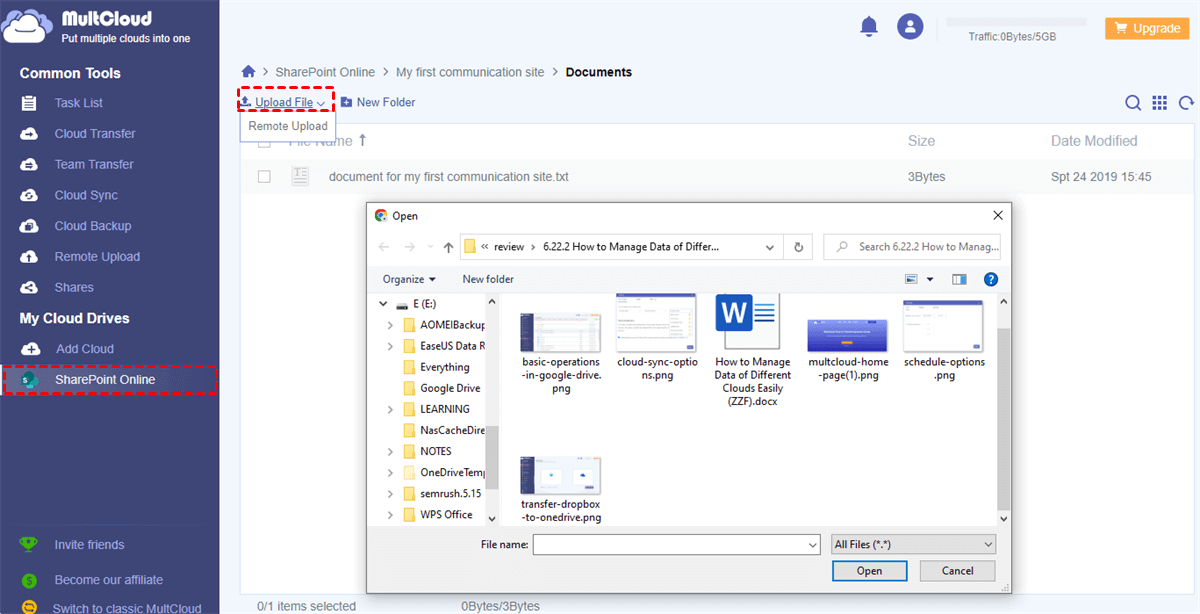
Step 3: Next, jump to SharePoint > Communication Site > Documents. And Upload File to SharePoint. Or you can drag and drop what you’ve downloaded from File Server to MultCloud.
This is how to transfer files from File Server to SharePoint Online via MultCloud. Anyway, if you are tired of programming codes, you can try this method.
What other features MultCloud can offer you?
Thankfully, MultCloud doesn’t just offer such basic features. Instead, it allows users to perform many professional features when they want to migrate data between cloud drives, including transferring, syncing, and backing up.
These advanced features are of great importance when users want to move files from SharePoint to another cloud, such as OneDrive, Google Drive, Dropbox, etc. MultCloud can move data between cloud drives directly and quickly. For example, if you plan to transfer an S3 bucket to another account, the Cloud Transfer feature of MultCloud can help you. When it comes to syncing files across clouds, you have 9 sync options to choose from, including one-way sync and two-way sync.
Then how about backing up files from one cloud to another? MultCloud makes it easy and direct to back up photos and documents across cloud accounts. Once you back up, you can restore the backup without any effort. For instance, you can backup Google Photos to Synology NAS without downloading and uploading manually.

- User-Friendly: MultCloud has a simple interface, making it easy for new starters to begin the transfer, sync, and backup tasks.
- Efficient: MultCloud offers an industry-leading transfer/sync/backup speed, so large files can be moved between clouds in a hurry.
- Automatic: MultCloud allows you to make scheduled tasks, and files can be moved at regular intervals.
Way 3: Turn to Microsoft SharePoint Migration Tool
Migrating large volumes of documents from file shares to SharePoint Online has always been a challenging task. If you only know the manual download-and-upload method, this following content is for you. Microsoft has introduced its own free tool to migrate files to SharePoint. In this post, we aim to outline the procedure for migrating file shares to SharePoint Online using the Microsoft SharePoint Migration Tool.
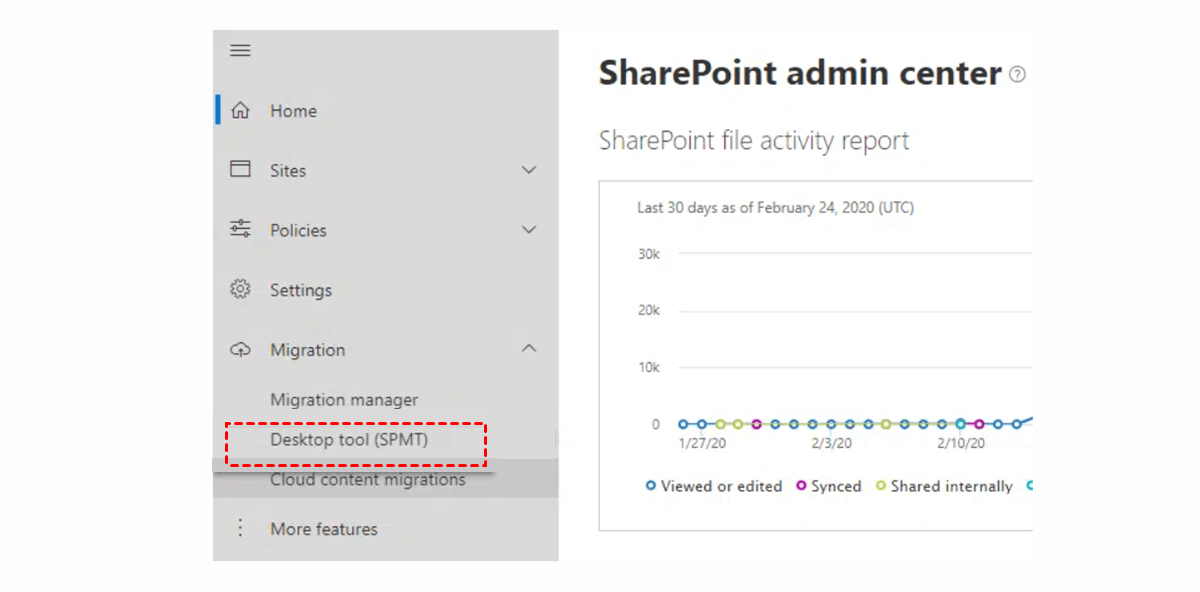
Step 1: Download this tool. You can go to Office 365 App Launcher > Admin > SharePoint Admin Center > SharePoint.
Step 2: Navigate to the Desktop tool (SPMT) option under the Migration menu. (SPMT stands for SharePoint Migration Tool).
Step 3: Click on the Download tool button to acquire the software. After downloading, install the Microsoft SharePoint Migration Tool on your computer by double-clicking the downloaded file. Next, you will need to log in to the tool using your Office 365 credentials.
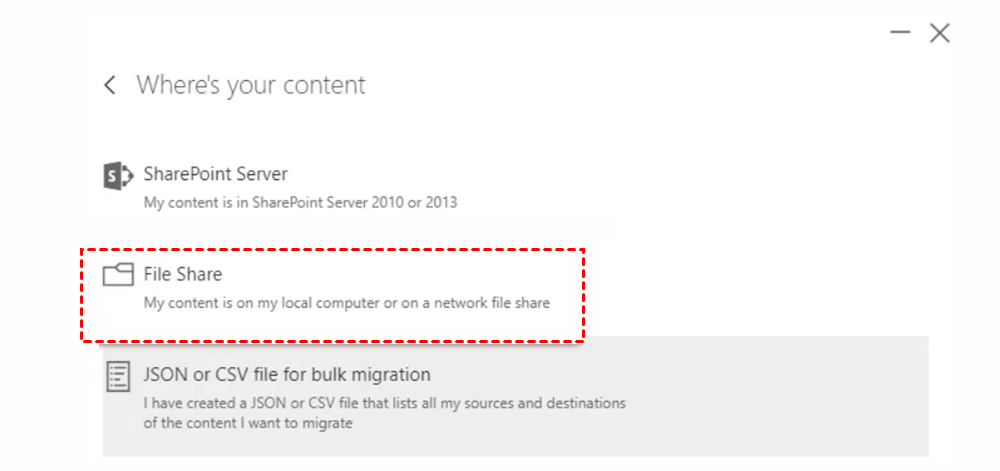
Step 4: Launch the app and Start your first migration. On the following screen, you can select the source of your files. You have the option to migrate from the old SharePoint on-premises environment as well. However, in our case, we want to migrate file shares to SharePoint Online that are stored on local or network drives. Therefore, on this screen, choose FileShare.
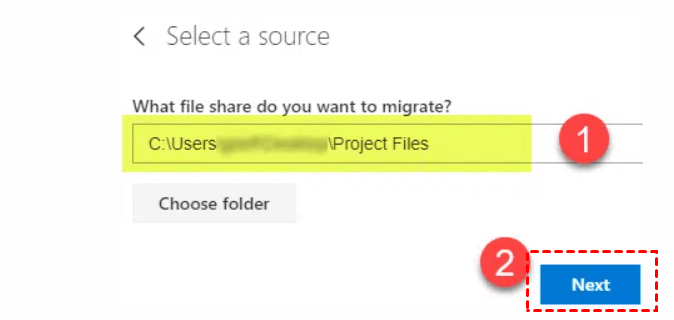
Step 5: In the next screen, choose the source of your files, specifically the top-level folder you intend to migrate. This can be a folder located on your C:Drive or a network drive. Then, click Next.
Step 6: In the following screen, paste the URL of the SharePoint site where you intend to migrate your files.
Note: Please take note of the URL provided above. Ensure that you paste the website's URL, not that of a specific page.
Step 7: After entering the correct URL, it will generate a list of all document libraries present on the site. Select the library to which you intend to migrate. And hit the Next button.
Step 8: On the following screen, you have the option to provide a name for your migration and then click Next.
Step 9: On the subsequent screen, simply click the Migrate button. You can also select View all settings if you wish to make changes to some advanced options, but if you're conducting a basic migration, you can stick with the default settings. Then, you can observe the live progress of the migration on your screen. When it is finished, you will get a confirmation message.
Step 10: You have the option to Save it in case you need to perform incremental migrations later, or you can access detailed migration reports by clicking on View reports.
In the End
So, you’ve learned 3 effective methods to migrate data from File Server to SharePoint Online. What is the best way to migrate file server to SharePoint Online for you? Then you can try the method. Anyway, if you turn to MultCloud, it will reduce the burden and improves efficiency when you are struggling with managing multiple cloud accounts and services.
MultCloud Supports Clouds
-
Google Drive
-
Google Workspace
-
OneDrive
-
OneDrive for Business
-
SharePoint
-
Dropbox
-
Dropbox Business
-
MEGA
-
Google Photos
-
iCloud Photos
-
FTP
-
box
-
box for Business
-
pCloud
-
Baidu
-
Flickr
-
HiDrive
-
Yandex
-
NAS
-
WebDAV
-
MediaFire
-
iCloud Drive
-
WEB.DE
-
Evernote
-
Amazon S3
-
Wasabi
-
ownCloud
-
MySQL
-
Egnyte
-
Putio
-
ADrive
-
SugarSync
-
Backblaze
-
CloudMe
-
MyDrive
-
Cubby
