Quick Search:
Preface
Keeping track of several accounts on the ever changing social media landscape can be like trying to juggle chainsaws on fire. Though Meta owns both Facebook and Instagram, you may occasionally want a fresh start despite their smooth integration. You can have more control over your online presence by unlinking these accounts, giving you the ability to customize content and audience engagement to fit the particular advantages of each platform.
Deciding to Unlink: Weighing the Pros and Cons
Before diving into the unlinking process, it's wise to consider the advantages and disadvantages:
Benefits of Unlinking
- Content Freedom: Unlinking empowers you to curate content specific to each platform. Perhaps you share travelogues on Instagram and political commentary on Facebook. Maintaining separate accounts allows for targeted engagement and avoids alienating audiences with irrelevant content.
- Audience Management: Each platform attracts a distinct user base. Unlinking lets you tailor your voice and message to resonate better with each demographic. You can be the witty meme master on Instagram and the industry thought leader on Facebook, all without blurring the lines.
- Privacy Control: Unlinking offers a layer of privacy. You can choose what information you share on each platform. For example, you might keep your Instagram private while maintaining a public Facebook profile for professional networking.
Drawbacks to Consider
- Disrupted Workflow: If you're accustomed to cross-posting content, unlinking might disrupt your workflow. You'll need to create and schedule posts independently for each platform.
- Loss of Automatic Sharing: Unlinking disables automatic sharing between accounts. You'll need to manually share posts if you wish to appear on both platforms.
Ultimately, the decision to unlink is personal. Consider your social media goals and how much control you desire over your online presence.
Understanding the Accounts Center
The Accounts Center acts as a central hub for managing your connected Facebook and Instagram accounts. It allows you to view and manage login information, control cross-platform sharing, and, most importantly for our current mission, unlink your accounts.
- What is Accounts Center? Imagine it as a digital command center for your Meta accounts. You can access it from either Facebook or Instagram settings.
- How Does Accounts Center Connect Facebook and Instagram? The Accounts Center facilitates a seamless connection between your accounts, allowing for features like single sign-on (logging into both platforms with one set of credentials) and automatic sharing of posts.
How to Unlink Facebook and Instagram Accounts | Full Guide
Ready to take the plunge and unlink your accounts? Here's a step-by-step guide to navigate the process with ease:
Way 1. Unlinking from the Instagram App
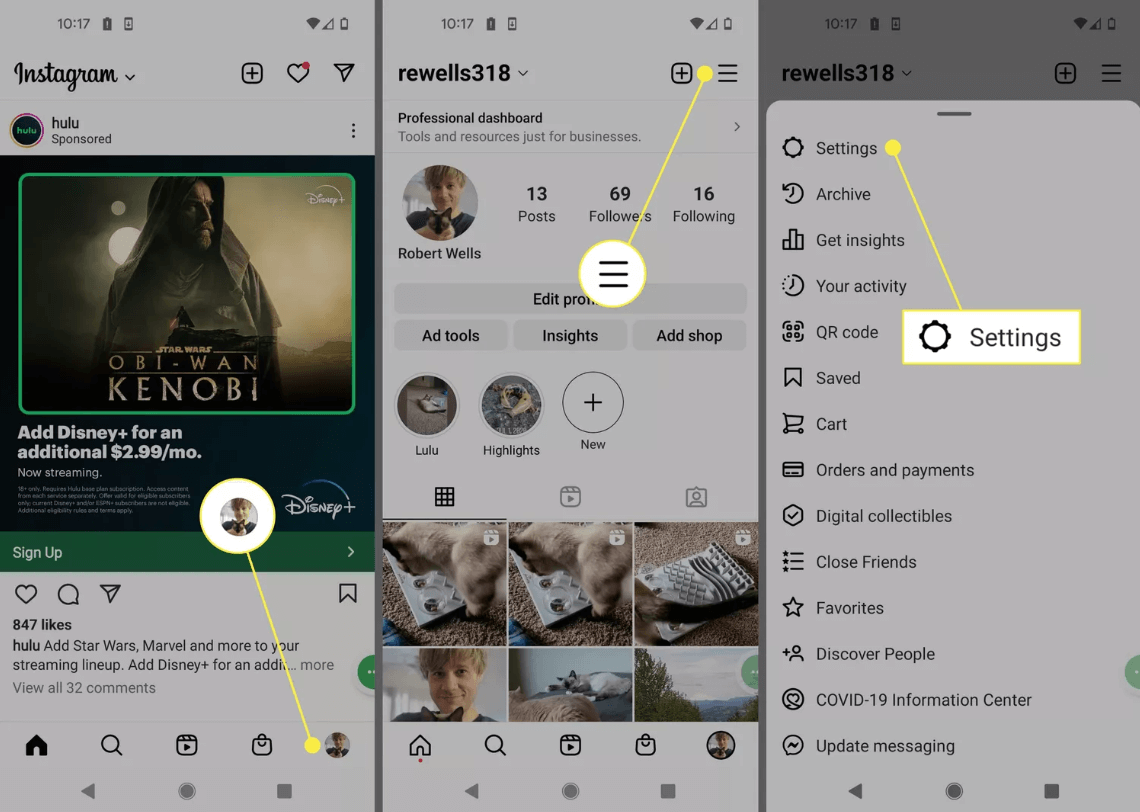
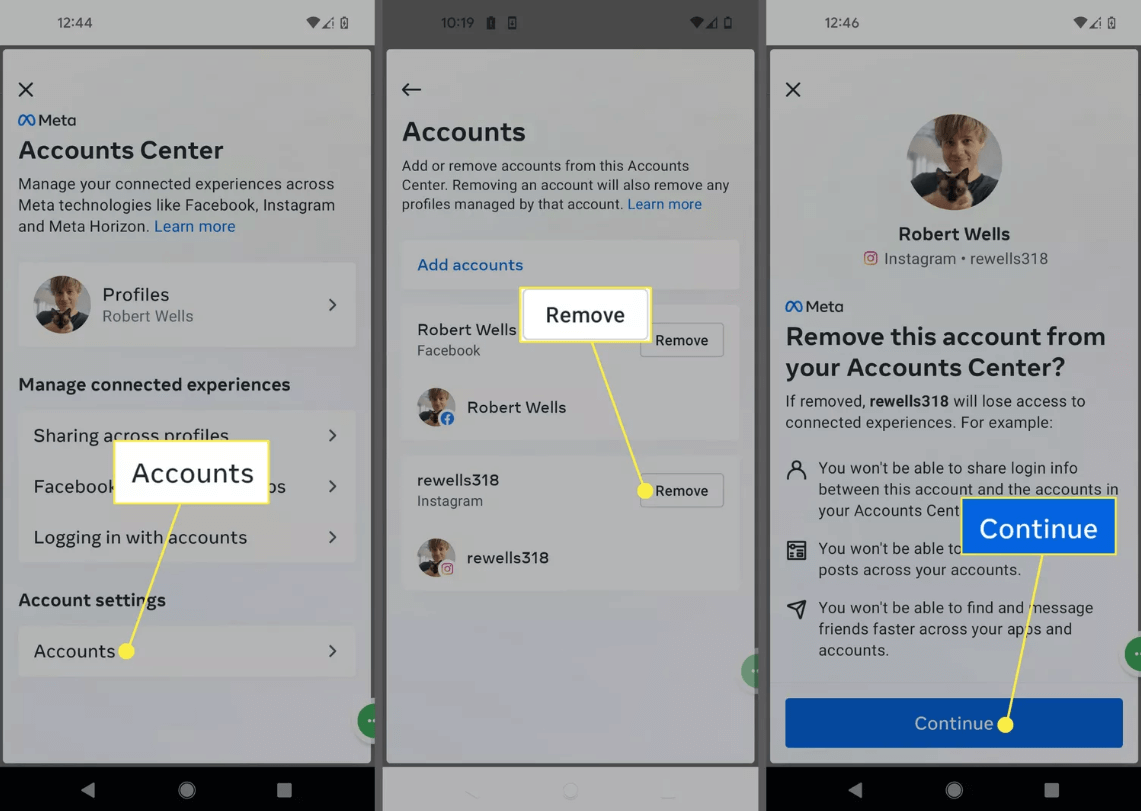
1. Navigating to Settings: Open the Instagram app and tap your profile picture in the bottom right corner. Then, tap the three horizontal lines (hamburger menu) in the top right corner. Scroll down and tap "Settings".
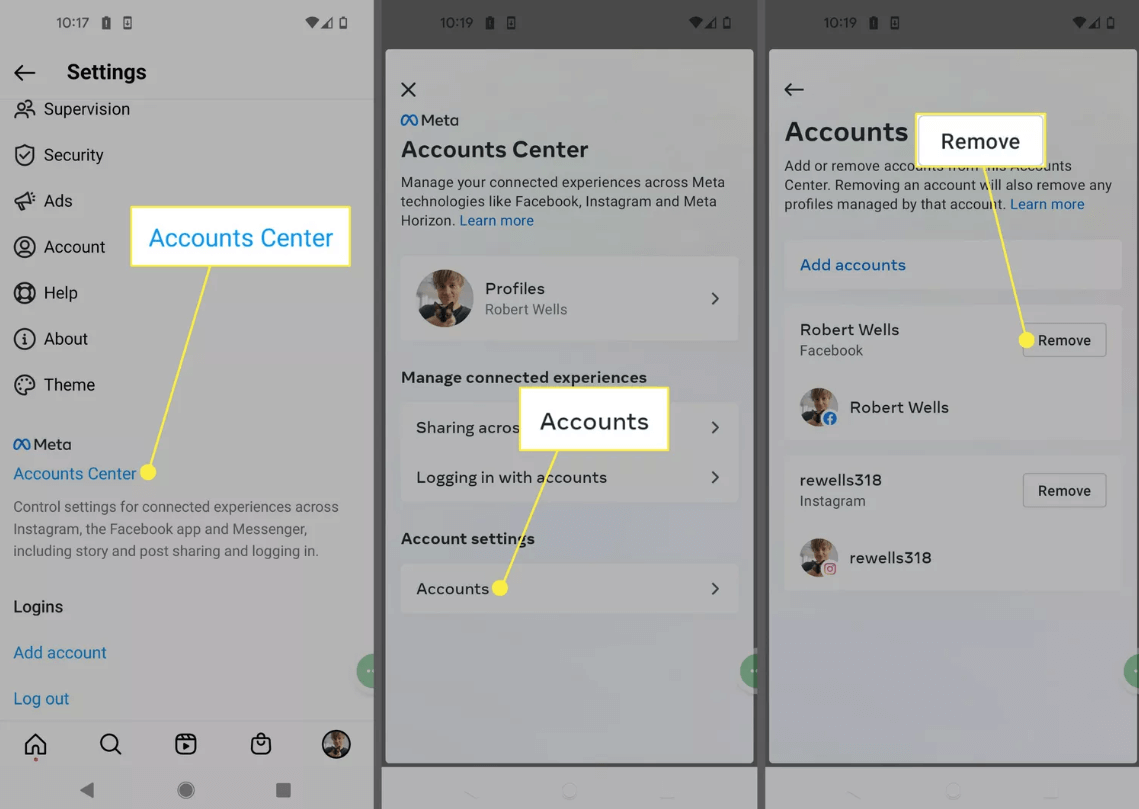
2. Accessing Accounts Center: From the Settings menu, select "Account" and then "Accounts Center".
3. Selecting Accounts for Removal: Within Accounts Center, navigate to "Accounts" and locate the Facebook account you wish to unlink. Tap "Remove" next to the Facebook account.
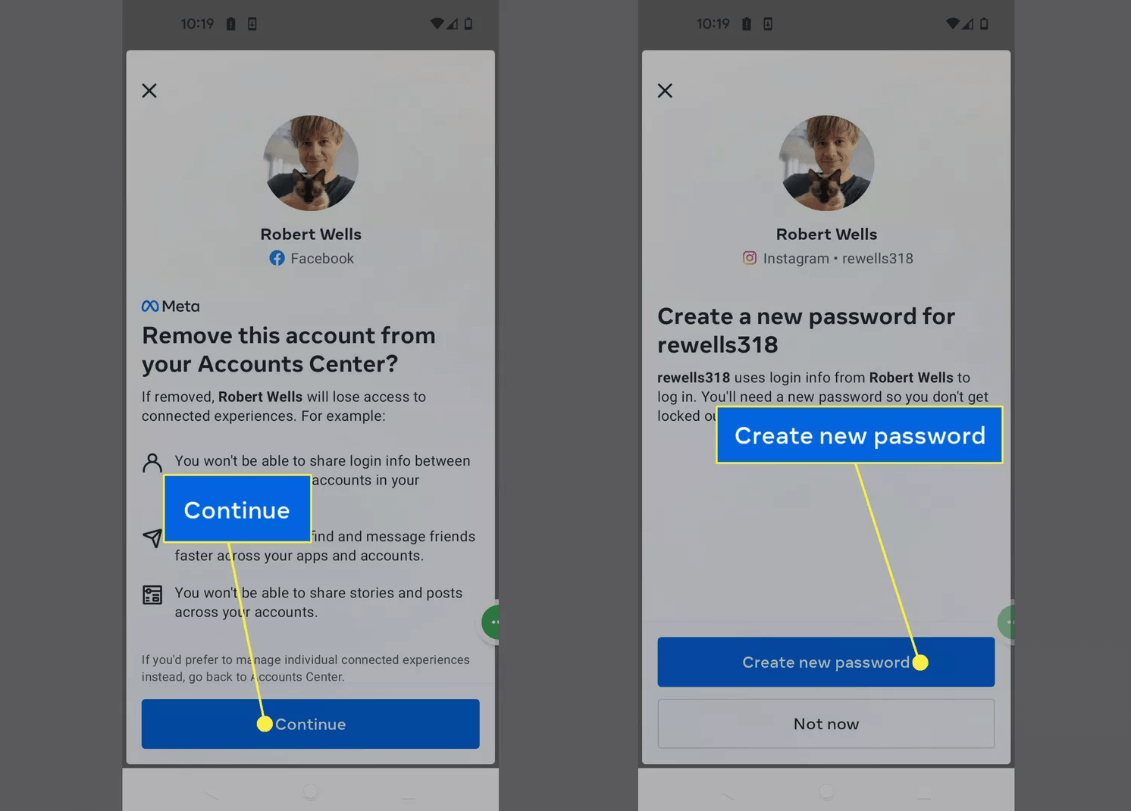
4. Confirming Unlink: A confirmation message will pop up. Carefully review the information about what you might lose by unlinking (such as the ability to log in with Facebook credentials) and then tap "Continue" to proceed.
5. Security Measure: If your Facebook and Instagram accounts share the same password, you'll be prompted to change one of the passwords for enhanced security.
Way 2. Unlinking from the Facebook App
The process for unlinking from the Facebook app is remarkably similar:
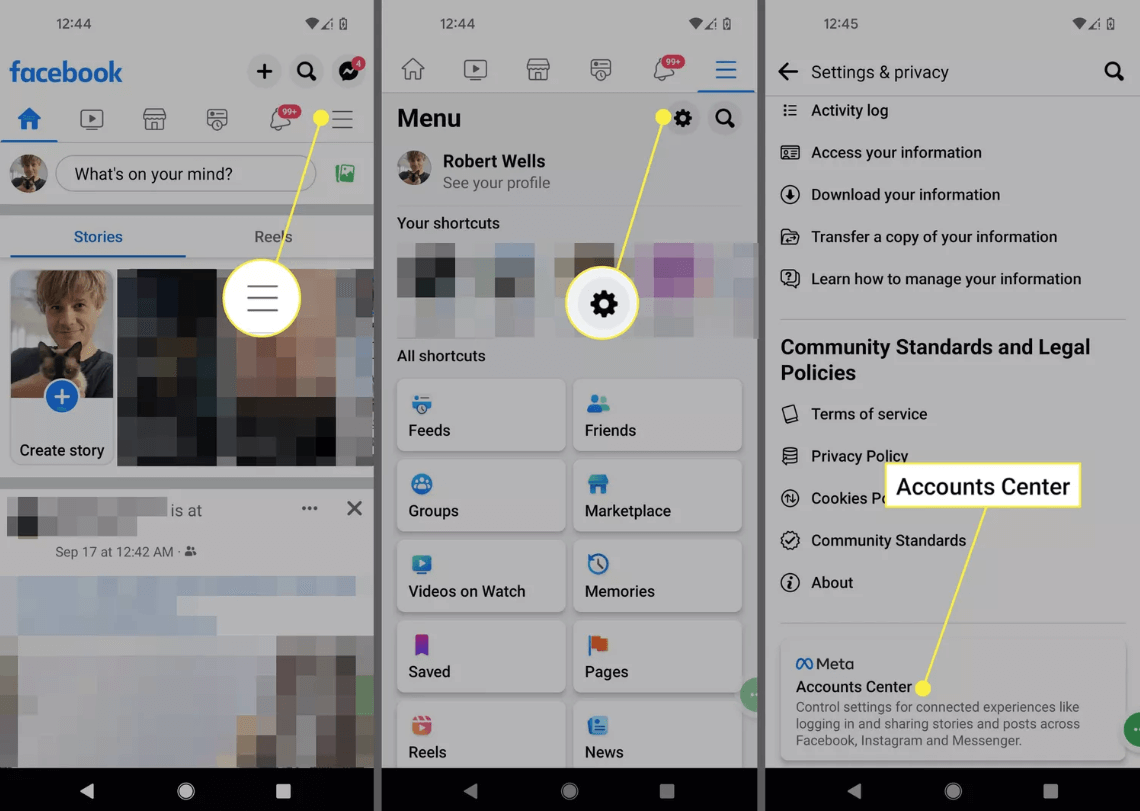
1. Following Similar Navigation Steps: Open the Facebook app and tap the three horizontal lines menu. Scroll down and select "Settings & Privacy", then tap "Settings".
2. Locate Accounts Center: Navigate down the Settings menu and tap "Accounts Center".
3. Accessing Accounts: Within Accounts Center, select "Accounts" to view your linked accounts.
4. Unlinking the Target Account: Locate your Instagram account and tap "Remove" next to it. Confirm your choice by tapping "Continue" after reviewing the information about potential consequences.
Important Note: Regardless of the app you use for unlinking, remember to review the confirmation message before proceeding. It outlines what functionalities might be affected by the unlink, such as the ability to log in with Facebook credentials or manage comments and messages across both platforms.
Additional Considerations and Tips
Now that you've successfully unlinked your accounts, here are some additional points to consider:
Sharing Between Unlinked Accounts:
- Sharing Posts Manually: While automatic sharing ceases after unlinking, you can still share content across platforms manually. Simply copy and paste the content (caption and visuals) from one platform and create a new post on the other.
- Disabling Automatic Sharing (Optional): Even if you haven't unlinked your accounts, you might want to disable automatic sharing for specific features. Perhaps you only want to share stories to Facebook but not regular posts. To do this, navigate to the specific post on your Instagram app, tap the three dots (...) in the top right corner, and select "Advanced Settings". Uncheck the box next to "Share to Facebook" to disable automatic sharing for that particular post.
Conclusion
By separating Facebook and Instagram, you may develop unique online personas for each network. You can choose how to manage your social media presence by being aware of the advantages, disadvantages, and the process itself. Recall that it's important to use these tools to improve your communication and online experience, not the other way around.
Bonus Tip: Best Way to Download Images and Videos from Instagram
Do you want to download pictures or videos when browsing Instagram? No need to take screenshots or record screens, just use the professional Image Saver---MultCloud, you can directly download high-definition pictures or videos from Instagram to your local or cloud account.
- ✨Super Easy! No tech skills needed, anyone can grab photos and videos.
- ✨Fast downloads! No waiting around, save stuff quickly.
- ✨Top Quality! Get the best version of the picture or video, just like the original.
- ✨Skip the Ads! (Ideally) No annoying pop-ups to slow you down.
- ✨Free to Use! Save all your favorite content without breaking the bank.
Step 1. Find the content you want to download: Open the Instagram app and locate the image or video you want to save.
Step 2. Copy the link: Tap the three dots (...) above the content and select "Copy Link".
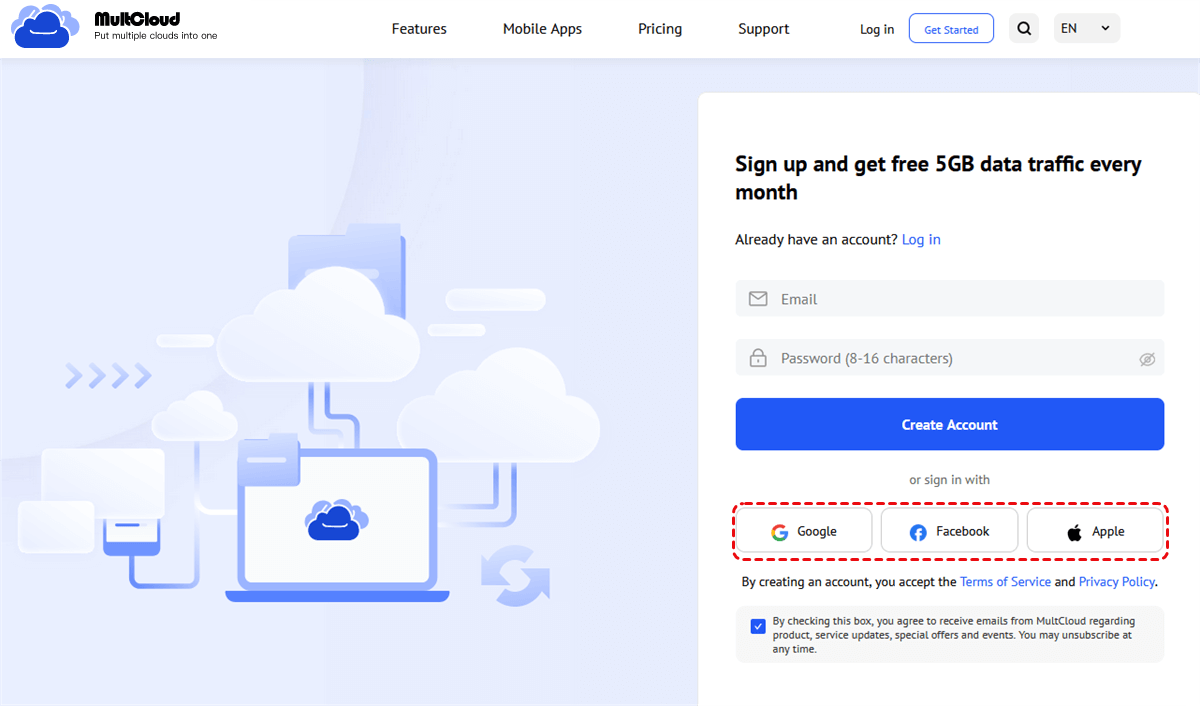
Step 3. Enter MultCloud: Go to the MultCloud homepage, register an account using your email address and log in. If you find it troublesome, you can also log in directly using Google, Facebook or Apple ID.
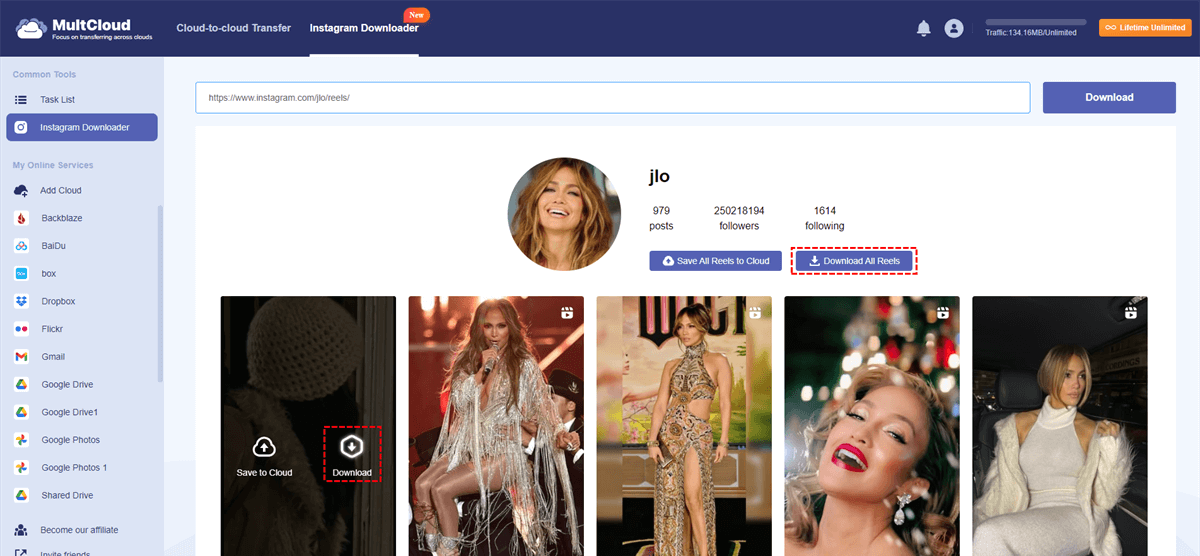
Step 4. Paste the copied link: Once you enter MultCloud, find the input field from the "Instagram Downloader". Paste the link you copied from Instagram.
Step 5. Download the content: MultCloud will analyze the link and list all images and videos from this link. Then choose the appropriate download options.
- Download a Single File: Hover over a single file and select the download icon.
- Download All Files: Click "Download All Posts" on the top to download all files included in the link.
MultCloud Supports Clouds
-
Google Drive
-
Google Workspace
-
OneDrive
-
OneDrive for Business
-
SharePoint
-
Dropbox
-
Dropbox Business
-
MEGA
-
Google Photos
-
iCloud Photos
-
FTP
-
box
-
box for Business
-
pCloud
-
Baidu
-
Flickr
-
HiDrive
-
Yandex
-
NAS
-
WebDAV
-
MediaFire
-
iCloud Drive
-
WEB.DE
-
Evernote
-
Amazon S3
-
Wasabi
-
ownCloud
-
MySQL
-
Egnyte
-
Putio
-
ADrive
-
SugarSync
-
Backblaze
-
CloudMe
-
MyDrive
-
Cubby
