Quick Search:
Why Sync SharePoint to Local Computer?
SharePoint Online is a practical collaboration service launched by Microsoft. It not only allows you to create sites and upload documents to work with others, but also enables you to connect it with other Office tools such as OneNote, OneDrive, and so on. By using this service, users can access and manage their data from any devices, including phones, computers, laptops, and more.
However, it’s very important to sync SharePoint to a local computer since sometimes you may find the internet connection isn’t stable and it’s tough to access the data on SharePoint online. Meanwhile, to add a layer of protecting data, it’s essential to back up important data on your local devices. So, in this article, we offer you a useful tutorial to sync SharePoint to desktop on Mac/Windows.
How to Sync SharePoint to Local Computer
Actually, SharePoint Online offers the sync feature by itself, so users can simply take advantage of that feature. The steps to achieve the syncing task are very easy and efficient. Now, you can follow the operations in the following part. After reading, you can have a try by yourself.
Step 1: Head to your Office 365 on a browser and then go to SharePoint on the left-hand sidebar.
Step 2: Now, go to Communication Site > Document. Then locate the file/files/folder/folders that you want to sync. Or, if you want to sync the whole data on Document, you can browse to Documents, and then press the Sync tab on the upper side ribbon.
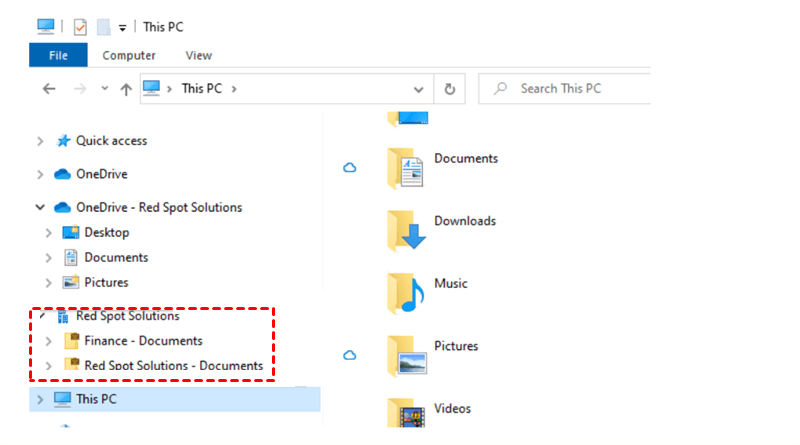
Step 3: Then you will be asked to open OneDrive, and you should confirm by pressing the Open tab. Then, you can go to your File Explorer and what you’ve synced from SharePoint will be displayed on the list of OneDrive.
See, you will only need to perform 3 steps and the SharePoint files can be synced to your computer easily. Similarly, if you want to learn how to sync SharePoint to a laptop, you can follow the same steps.
Tip: As for syncing time, it depends on how large your files are. If they are too large, then you will need more time to wait for the syncing finished.
Bonus Tip: How to Sync SharePoint to Another Cloud
You've learned how to sync SharePoint to local computer. As you can see from the content above, the way to accomplish this is simple and easy. However, what if the problem of “SharePoint sync not working” happens? In this situation, what should you do? Thankfully, you can sync SharePoint to another cloud. Likewise, it can help you collaborate with others and make a backup on another cloud.
Nevertheless, how to sync files from SharePoint to another cloud effortlessly? Before professional third-party services came into being, many would perform the download-and-upload method. But that’s too time-consuming. Nowadays, users can utilize specialized and smart cloud sync service – MultCloud.
MultCloud is a reliable and excellent cloud sync service for users to sync data from one cloud to another seamlessly. At present, users can add many different and popular cloud drives on MultCloud, including SharePoint, OneDrive, OneDrive for Business, Dropbox, Dropbox Business, MEGA, Wasabi, Flickr, Google Photos, Google Drive, and so on.
Meanwhile, MultCloud doesn’t have any limitation on how many cloud accounts/services that MultCloud can add. So, users can add as many cloud drives as they like. And then, they can migrate data between each other in a hassle-free way. There are some detailed benefits:
- Easy to Operate. Unlike competitors, MultCloud is easy to use. The main features are shown on the left-side taskbar and users can sync data between cloud drives without reading long tutorials.
- Smart Sync Models. There are 9 professional and practical sync models, including “Mirror Sync”, “Move Sync”, “Update Sync”, “Cumulative Sync”, “Real-Time Sync”, and so on. For instance, users can sync a network drive to SharePoint in real-time.
- Industrial Syncing Speed. MultCloud owns the quickest speed when users sync data between cloud services. That’s to say, even though you have a large number of files, they can be synced between cloud drives quickly and seamlessly.
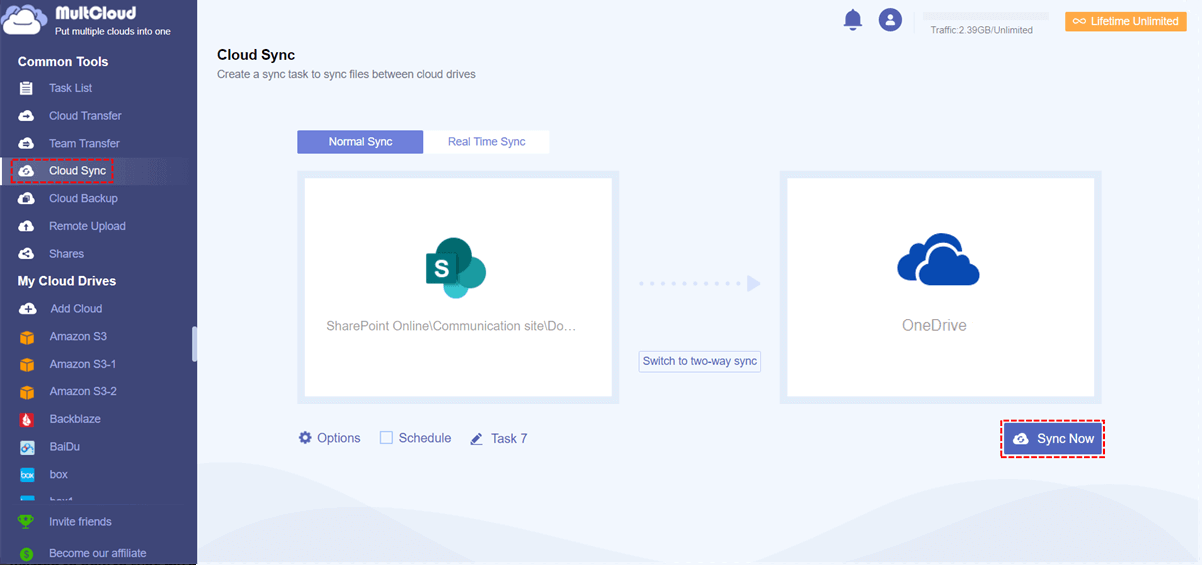
Now, you can go through the steps below to learn how to sync SharePoint to another cloud via MultCloud. Here, we take syncing SharePoint to OneDrive as an example.
Step 1: Sign in to your MultCloud account. If you don’t have an account, you can sign up one for free.
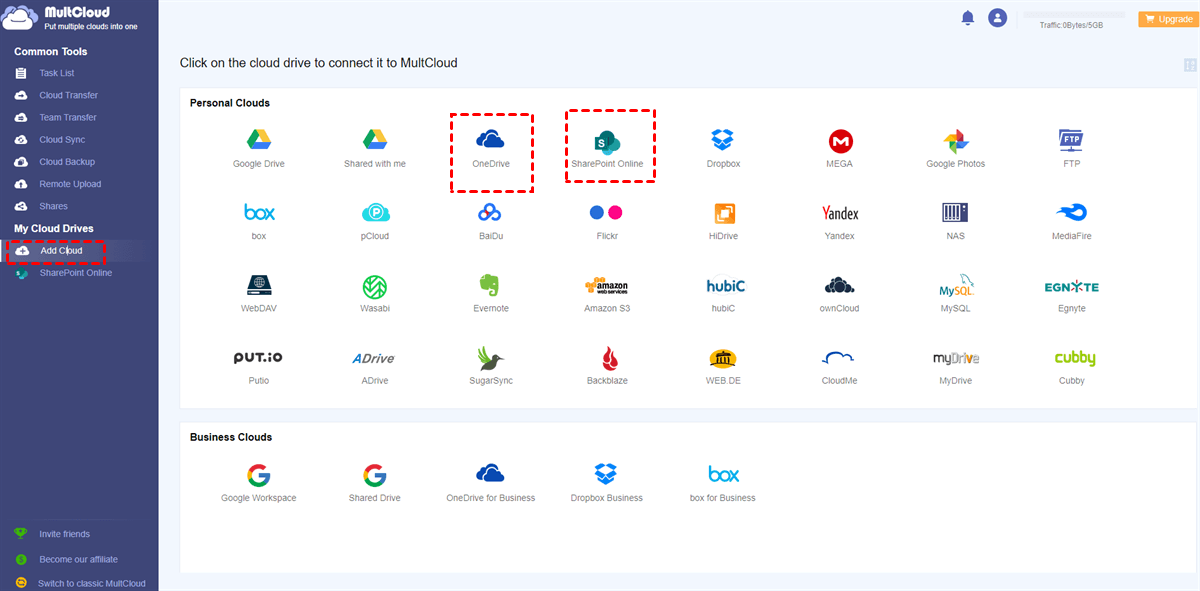
Step 2: Hit the Add Cloud tab on the left-side ribbon. Then click on the SharePoint icon to add. Later, preform the same steps to add OneDrive.
Step 3: Now, press the Cloud Sync button on the left navigation bar. Tap the first box to choose SharePoint and the second box to choose OneDrive. Finally, tap the Sync Now button.
This is how to sync from cloud to cloud via MultCloud. Anyway, it’s very simple and efficient to accomplish the sync task via MultCloud.
Warm Tip: You are allowed to make schedule sync tasks by pressing the Schedule button. In this way, the data can be synced at a regular time, daily, weekly, or monthly.
Conclusion
After reading the whole text, you now understand how to sync SharePoint to local computer. In a word, the Sync feature on SharePoint is the best and most efficient way to deliver the goal. Meanwhile, if you find the syncing on SharePoint isn’t working, you can sync SharePoint to another cloud via MultCloud.
MultCloud not only enables you to sync data between clouds, but also allows you to transfer and back up data across cloud drives. For example, when you are willing to backup Dropbox to another cloud, the Cloud Backup feature of MultCloud can work it out efficiently.
MultCloud Supports Clouds
-
Google Drive
-
Google Workspace
-
OneDrive
-
OneDrive for Business
-
SharePoint
-
Dropbox
-
Dropbox Business
-
MEGA
-
Google Photos
-
iCloud Photos
-
FTP
-
box
-
box for Business
-
pCloud
-
Baidu
-
Flickr
-
HiDrive
-
Yandex
-
NAS
-
WebDAV
-
MediaFire
-
iCloud Drive
-
WEB.DE
-
Evernote
-
Amazon S3
-
Wasabi
-
ownCloud
-
MySQL
-
Egnyte
-
Putio
-
ADrive
-
SugarSync
-
Backblaze
-
CloudMe
-
MyDrive
-
Cubby
