Quick Search:
User Case: How to Send Large Files through Outlook?
"Now, I need to send a pdf file to other people through Outlook, but during the operation, I get a message that the file is too large. Can anyone tell me how to send a large pdf file through outlook, thank you very much!"
Whether you're emailing in Outlook on the desktop or via Outlook.com, you'll run into size limitations when trying to attach large files. Outlook does not allow you to send messages larger than 20 MB through a web-based email service such as Outlook.com or Gmail. So, what do you do when you need to send a large file to someone right away?
How to Send Large Files through Outlook [3 Free Ways]
You can send directly through Outlook when the file size does not exceed 20 MB. When the file exceeds 20 MB, you have 3 options:
- Reducing the size of the pictures in the document;
- Compressing the entire file into a ZIP file and sending it as an attachment via Outlook;
- Creating a sharable link by uploading the file to OneDrive first, then sending the link through Outlook.
Solution 1: Reduce the Image Size in the File
If you're using the Outlook application on your computer and want to share a large photo, you can tell Outlook to shrink the image when you send it.
Step 1: To attach a file to an Outlook message, click the paperclip icon at the top of the new message, select "Browse this PC", select the file, and click "Open".
Step 2: Click the "File" menu and select "Info". The "File" menu you need to click is the menu on New Mail, not the menu at the top of Outlook.
Step 3: Once expanded, you will see the "Info" menu option at the top of the "File" menu. Select "Resize large images when I send this message".
Step 4: Click the back button to return to your email. Now that you've told Outlook to reduce the size of the attached image, you should be able to send the message correctly.
If you can't get an image small enough to send this way, you can send multiple emails (each with some images attached) or compress them as a whole into a zip file.
Solution 2: Compress the File before Sending
If the file (or group of files) you're sending is too large to attach to an email, you can reduce the size of the file by compressing it into a ZIP file. The recipient can then unzip the file to see what's inside.
Step 1: Open File Explorer (Windows) or Finder (Mac).
- To open Windows File Explorer, click the folder icon in the taskbar, or press Windows key + E.
- To open the macOS Finder, click the two-color smiley face icon on the Dock.
- Some mail servers do not allow you to attach ZIP files to emails. If you get an error about attaching a ZIP file, try using OneDrive instead.
Step 2: Go to the folder where the large files are saved. For example, if your large file is a photo, you can open the Photos or Pictures folder.
Step 3: Select the files you want to compress. To select multiple files, hold down the Control (PC) or Command (Mac) key as you click each file.
Step 4: Add the selected files or folders to the compressed (zipped) file or folder.
These steps will vary slightly depending on your operating system:
- Windows: Right-click the selected files, select "Send to" on the menu, and then select "Compressed (zipped) folder".
- macOS: Press Control while clicking a selected file and choose "Compress" from the menu.
Step 4: Check the size of the new ZIP file. After zipping the file into a ZIP, a new file with a ".zip" extension will appear in the same folder where you are.
You need to make sure it's less than 10 MB if you're sending it through Microsoft Exchange Server, or 20 MB if you're sending it through most other types of mail servers. Here's how to check its size:
- If you are using a Mac, click the "File" menu and select "Get Summary Information".
- If you are using Windows, right-click the file and select "Properties".
Step 5: Attach the ZIP file to the email in Outlook. You can do this using the desktop version of Outlook or Outlook.com on the web. Just click the paperclip icon at the top of the message, select "Browse this Computer" or "Browse this PC", select the file, and click "Open". If the file is smaller than the maximum, the message will be sent normally.
Solution 3: Create a Sharable Link via OneDrive
If you still can't send the mail after zipping the file, or Outlook won't let you attach the ZIP file to the email, you can try uploading the file to OneDrive or another cloud drive, then create a sharable link, and finally send the link through Outlook.
Step 1: Log in to https://www.onedrive.com.
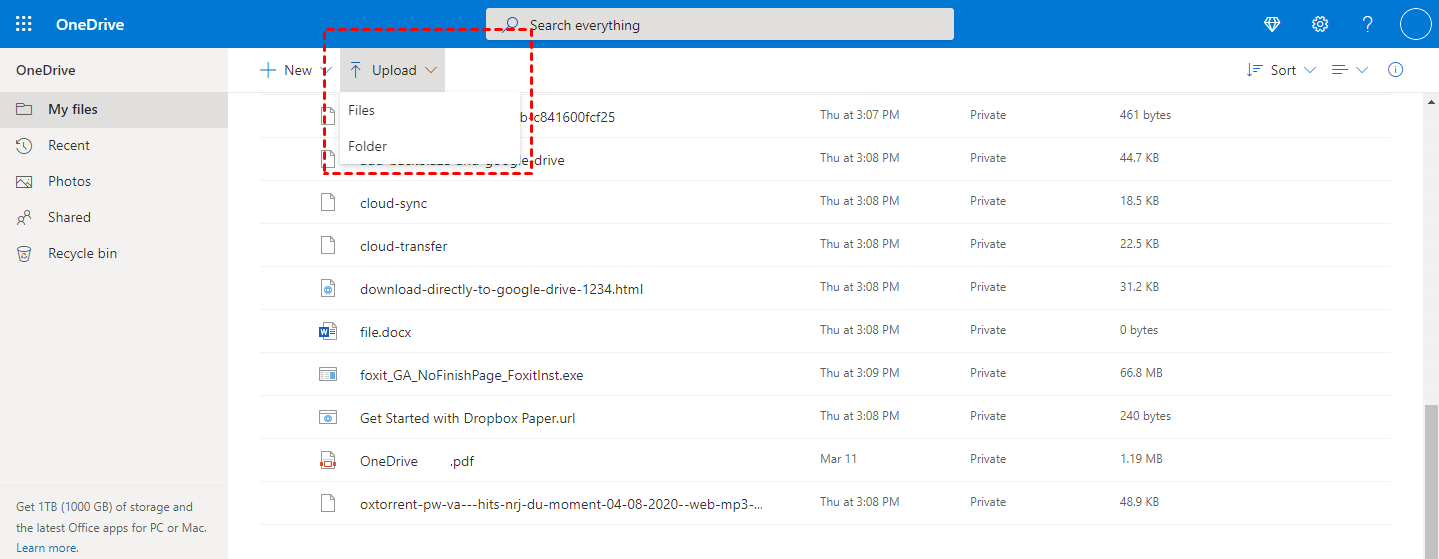
Step 2: Click the "Upload" button which is at the top of the file list. Select the large file and click "Open" to upload the file to OneDrive. You can check your progress in the top right corner of OneDrive.
Notes:
- Since email servers limit the size of attachments, you will need to upload the file to a cloud service and paste a link to the file in the email.
- With a free Microsoft account, you get 5 GB of OneDrive space for free. If you subscribe to Microsoft 365, you will have 1TB of space and can upload files up to 250 GB. You can also upload files to Dropbox or Google Drive instead of OneDrive if you prefer.
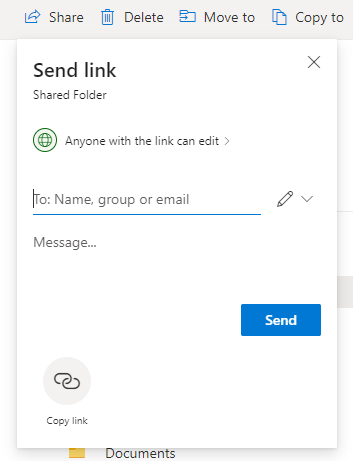
Step 3: Select the uploaded file and click "Share". You will see it in the upper left corner of the file list.
Step 4: Click the "Copy link" to save the corresponding link of the large file to your computer's clipboard.
Step 5: Paste the file link into the email in Outlook. Whether you're using Outlook.com on the web or the Outlook app on your computer, you can paste the copied URL into the body of the message. Just right-click in the message where you want to insert the link and select "Paste".
Step 6: Send the message. When recipients receive the mail, they will be able to download the large file by clicking the link you included.
Alternative Way: Directly Sharing Large Files with OneDrive Privately
Emailing files is pretty simple, and as simple as it is, there are a few reasons why you should stop emailing files. The reasons are as follows:
- Slow down your network and email servers and increase your storage costs: When sending large files through an email service, it can clog your company's entire network and email servers. Also, large file attachments in emails will continuously consume local storage, which will invisibly increase your storage costs.
- There is a security risk: When you email a file, you have no control over others' access to the file, with whom it is shared, and how it is stored.
- Difficult to view and manage: When you use email to send and share files, it can be difficult for users who receive the email to find the right file and manage it easily.
And sharing files through services like OneDrive, Dropbox, and Google Drive avoids these problems. Sharing files using a cloud storage service gives you greater control and can provide you with an audit log that lets you see who accessed the file and when.
Meanwhile, if you agree to work with shared folders on services like OneDrive, Dropbox, and Google Drive, it's easier to see if a file is up-to-date, or if someone is working on it. So, you can totally share documents with OneDrive and forgo sending and sharing large files through Outlook.
When using OneDrive to share files, you can use this multiple cloud storage manager --- MultCloud to share files privately, because MultCloud supports Public Share, Private Share, and Source Share, where Private Share can help you share large files with OneDrive privately.
Step 1: Sign up with your name and email. Then click "Create Account". You can also authorize login directly with your Google and Facebook accounts.
Step 2: Click "Add Cloud" under the "My Cloud Drives" sidebar menu. Then select the OneDrive icon on the left. Then allow MultCloud to access your OneDrive in the pop-up window.
Notes:
- If you want to add more cloud storage accounts to MultCloud, just repeat steps 2 and 3 above to manage multiple cloud storage accounts directly.
- If you want to share large files from other cloud accounts, just click on the cloud you added earlier in the "My Cloud Drives" list and select the folder you want to share.
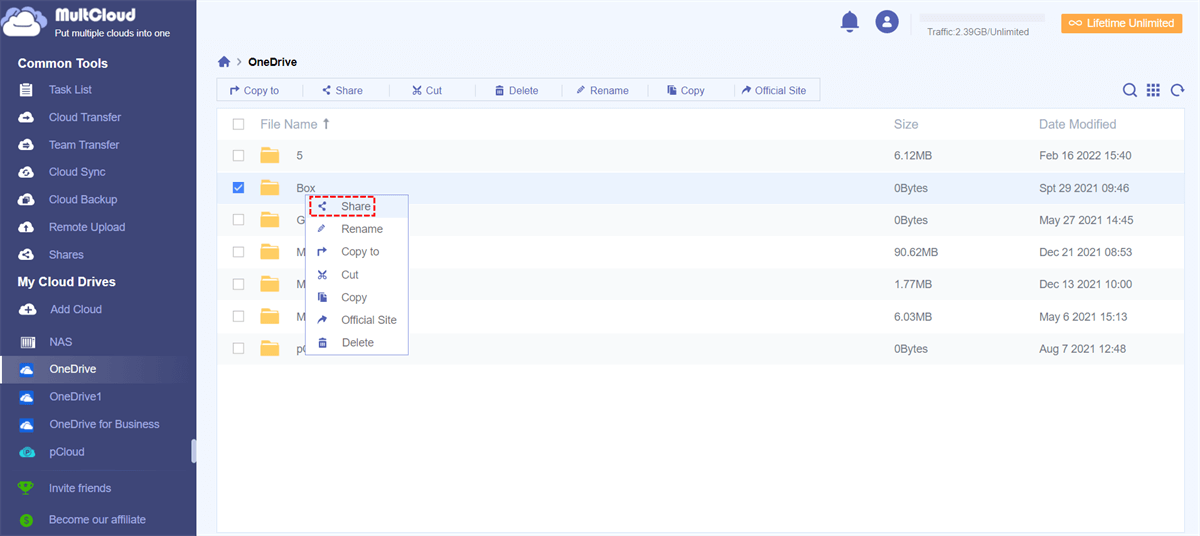
Step 3: Check the box in front of the file or folder. Then right-click and select "Share".
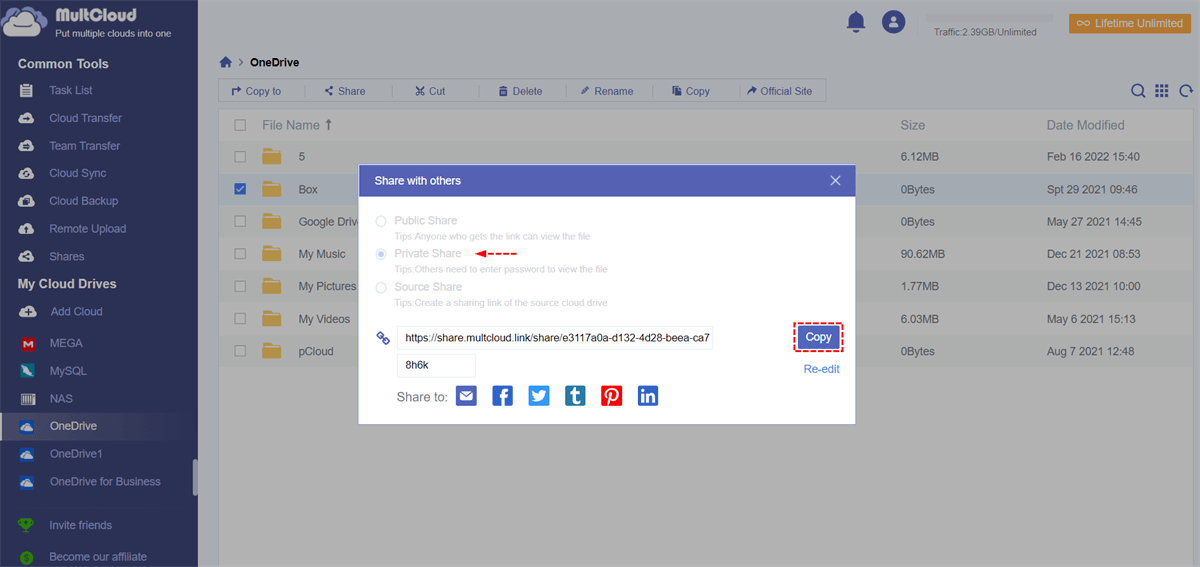
Step 4: Select a sharing mode in the pop-up window. Then click the purple button "Create Share". To share your files more securely, you can choose the "Private Share" mode.
Step 5: Copy the link and share. You can also share links via email, Facebook, Twitter and other social media.
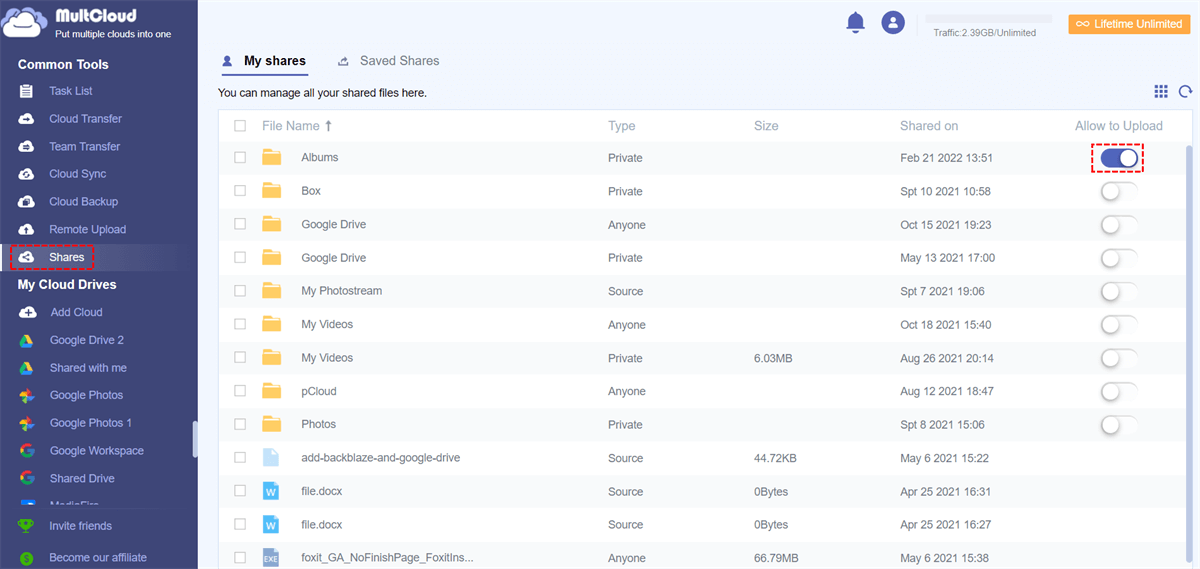
Notes: The whole thing can be done on any device with a browser. After sharing, you can manage all your shared content in the "Shares" interface, and you can also grant or revoke upload permissions for the person who gets the content.
Conclusion
Regarding how to send large files through Outlook, you can use the way of resizing image size, compressing all files or using cloud drive to create a sharable link. For security and cost-related reasons, you can share your private files or folders directly using cloud drives such as OneDrive.
When sharing, you can try MultCloud's private sharing feature. In this way, after the password is set, the user needs the password to get the shared content. In addition, if you are also interested in other features offered by MultCloud (such as Cloud Transfer, Team Transfer, Cloud Sync, Cloud Backup, Remote Upload), you can also use Cloud Sync to sync OneDrive with Dropbox for easy management of your cloud files.
MultCloud Supports Clouds
-
Google Drive
-
Google Workspace
-
OneDrive
-
OneDrive for Business
-
SharePoint
-
Dropbox
-
Dropbox Business
-
MEGA
-
Google Photos
-
iCloud Photos
-
FTP
-
box
-
box for Business
-
pCloud
-
Baidu
-
Flickr
-
HiDrive
-
Yandex
-
NAS
-
WebDAV
-
MediaFire
-
iCloud Drive
-
WEB.DE
-
Evernote
-
Amazon S3
-
Wasabi
-
ownCloud
-
MySQL
-
Egnyte
-
Putio
-
ADrive
-
SugarSync
-
Backblaze
-
CloudMe
-
MyDrive
-
Cubby


