Quick Search:
What Is the Purpose of a SharePoint List?
SharePoint Online offers many practical features for organizations to collaborate with office staffs easily. For example, the Lists is one of the most popular services in SharePoint, which allows users to manage different information flexibly.
SharePoint List allows users to create a list from scratch or utilize the available templates. After creating a list, users can add columns and display data effectively. However, there are still many users who don’t know how they can create a SharePoint list in Office 365 quickly. So, in today’s article, you will learn the detailed steps to add a new SharePoint list with ease.
How to Create a SharePoint List
The way to create a SharePoint list is very simple. And now, you can follow the instructions below to get started:
Step 1: Log in to your Office 365 on the web, then head to SharePoint directly.
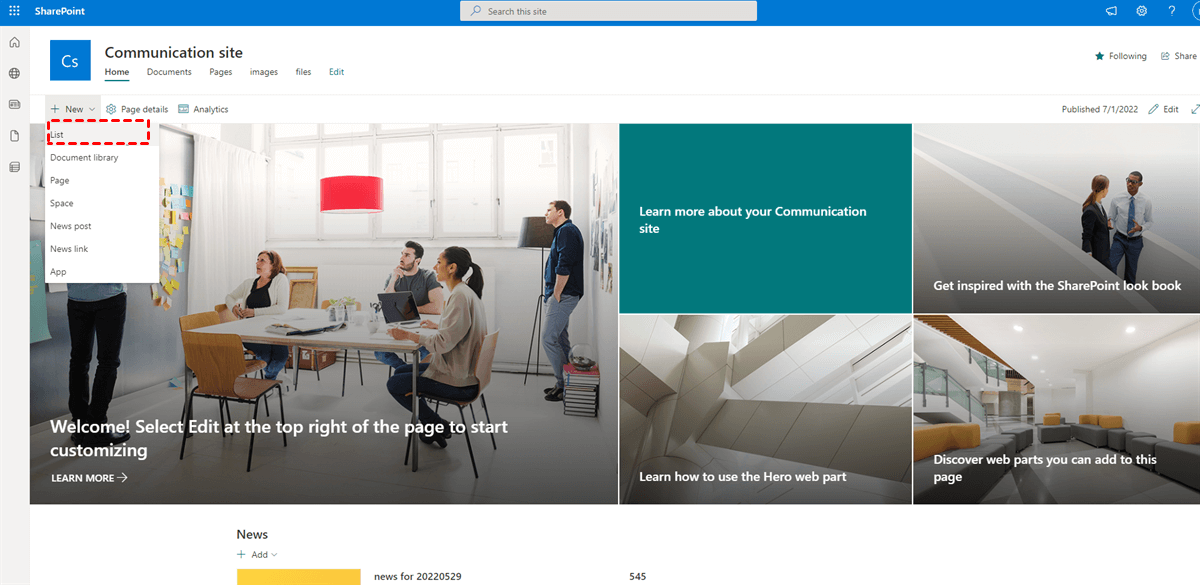
Step 2: Choose the site where you want to create a list. Let’s take Communication site as an example here. Next, you need to click on the New button on the left upper side to select List.
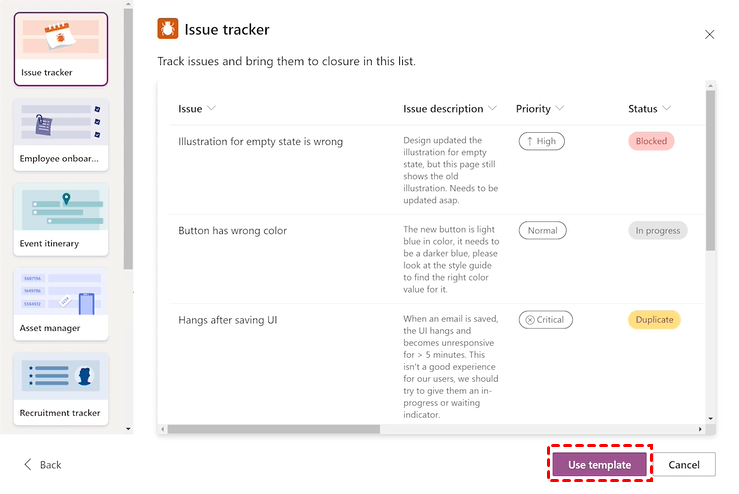
Step 3: Then you can Create a list or use the Templates.
There, we take Templates for example. If you choose to use Issue Tracker, you will see an overview of this template. Next, you can press the Use Template button.
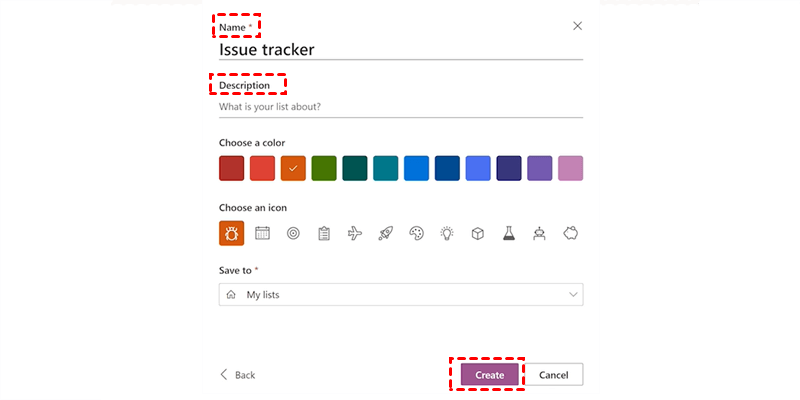
Step 4: Now, add the list Name, Description, Choose a color, Choose an icon, and Save to the directory where you want. After all is done, tap on the Create tab.
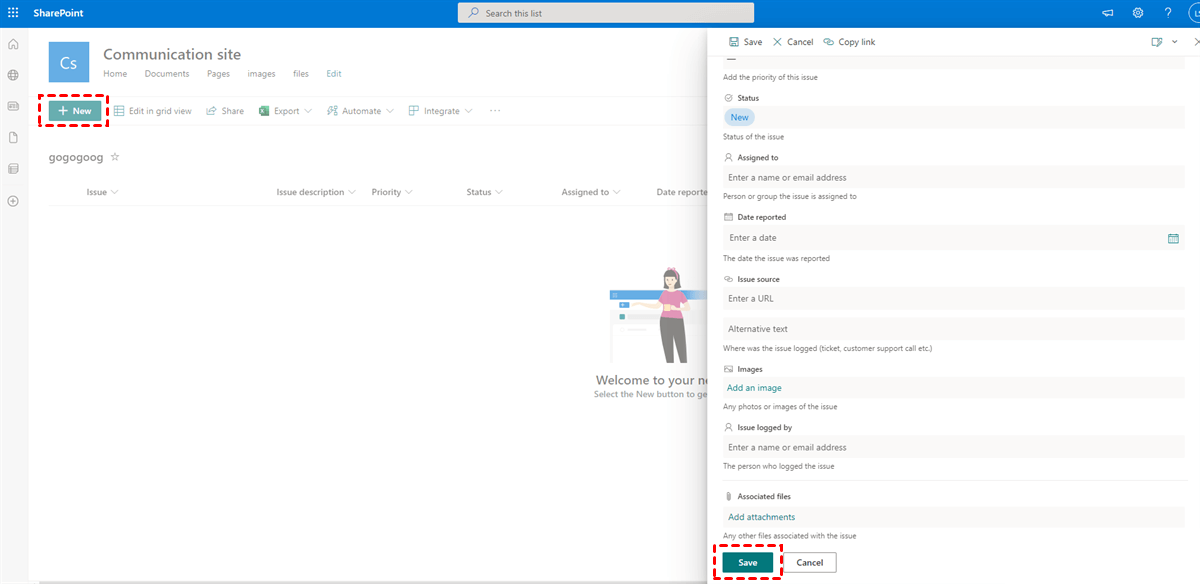
Step 5: Press the New tab and fill the form. Finally, you can Save it.
This is how to create a list on SharePoint. See, it’s easy and simple, isn’t it? And now, you can start to create a list and make online collaboration more efficient.
Bonus Tip: How to Transfer SharePoint to Another Cloud
Although SharePoint is a useful online collaboration service, it sometimes doesn’t work well. Meanwhile, some users have complaint about data loss in SharePoint sites. To avoid such problems, users can turn to other popular and excellent cloud services, such as Google Drive, OneDrive, Dropbox, and so on.
Take Google Drive as an example. It is a smart cloud drive that brings many conveniences for both individuals and businesses. When users want to collaborate with others via Google Drive, users can upload and share documents via a link. Or, users can create a shared folder and ask others to add the data they need to that folder easily.
Besides, Google Drive offers 15GB of free storage space for users to store different types of files, such as videos, audio files, photos, and so on. Moreover, it offers Google Sheets, Slides, and Docs, which are all practical when working with teammates.
So, after learning how to create a SharePoint list in Office 365, we now need to know how to transfer SharePoint to Google Drive in case of data loss in SharePoint. Formerly, users would download files from SharePoint and upload them to Google Drive to accomplish the transfer task. Actually, there is a more flexible and useful way. That is to use a smart transfer service – MultCloud.
As a professional cloud transfer service, MultCloud allows users to migrate various files from one cloud to another efficiently and seamlessly. Different from the traditional way, users can move data between clouds directly without a cumbersome download-and-upload process. Meanwhile, there are many other benefits to use MultCloud to migrate SharePoint to Google Drive, such as:
- Accomplish Transfer Tasks in the Quickest Way. Users will find it very quick to migrate lots of files across clouds via MultCloud since it offers the industry-leading transferring speed. By using MultCloud, users can save lots of time.
- Customized Transfer Tasks Supported. Users are able to make customized transfers. For instance, users can transfer selected files from SharePoint to Google Drive or migrate the entire documents on SharePoint to Google Drive.
- Smart Transfer Tasks Enabled. MultCloud allows users to set up automatic transfer tasks. Specifically, tasks can be run at a regulated time, daily, weekly, or monthly. After setting up, MultCloud will run the tasks in the background.
We’ve learned how great it is to use MultCloud to migrate data from SharePoint to Google Drive. Now, you can refer to the following content to learn the operations to accomplish the transfer task.
Step 1: Sign up for an account on the website of MultCloud for free. Or, you can directly log in with your Facebook or Google account.
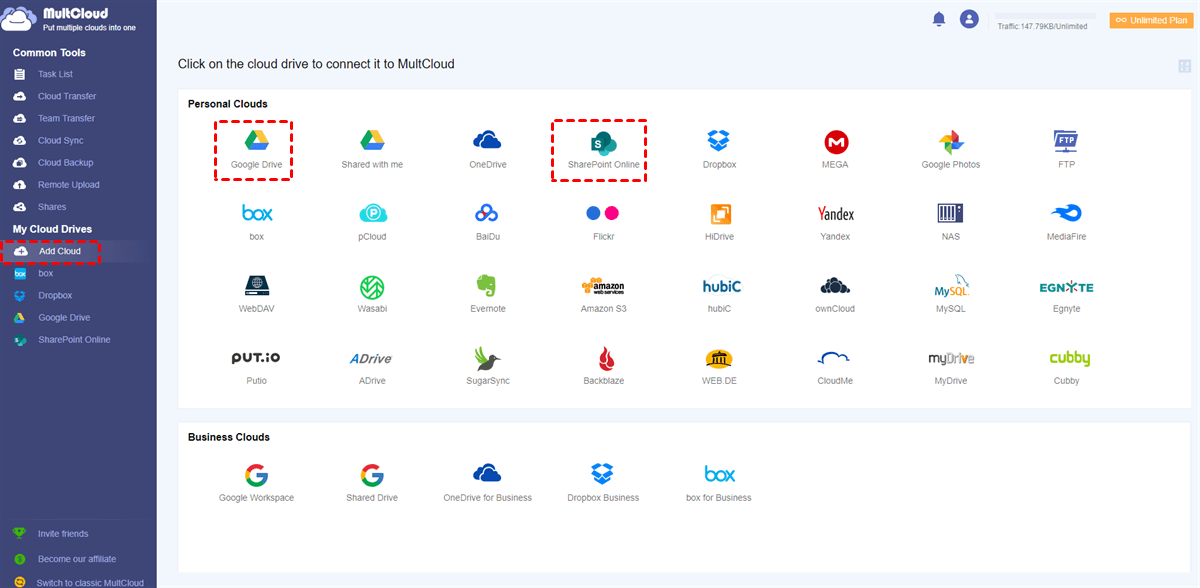
Step 2: Head to Add Cloud on the left, and add SharePoint and Google Drive by clicking their icons and following the instruction on the next screen.
Step 3: Turn to Cloud Transfer under Common Tools, choose SharePoint Online as the source cloud and Google Drive as the target cloud. Next, start the task by clicking on the Transfer Now button.
As you can see, the way to transfer files from SharePoint to Google Drive is very easy. Similarly, you can transfer S3 bucket to another account in only 3 steps.
In the End
This all about how to create a SharePoint list in teams. And you can follow the steps shown to you in the first part of this post. Meanwhile, when you want to transfer data from one cloud to another, you can utilize a cloud-to-cloud transfer service named MultCloud, which can help you move files directly and effortlessly.
At the same time, you can enjoy other beneficial features such as Cloud Sync, Cloud Backup, Remote Upload, etc. So, you can feel free to sync and backup files between cloud services. When syncing data, you have 9 sync models to choose, such as Mirror Sync, Move Sync, Cumulative Sync, Real-Time Sync, and so on.
When backing up data, MultCloud allows you to restore files easily without spending a penny. This is very useful and cost-effective, especially when the files are missing on your source and target cloud services.
MultCloud Supports Clouds
-
Google Drive
-
Google Workspace
-
OneDrive
-
OneDrive for Business
-
SharePoint
-
Dropbox
-
Dropbox Business
-
MEGA
-
Google Photos
-
iCloud Photos
-
FTP
-
box
-
box for Business
-
pCloud
-
Baidu
-
Flickr
-
HiDrive
-
Yandex
-
NAS
-
WebDAV
-
MediaFire
-
iCloud Drive
-
WEB.DE
-
Evernote
-
Amazon S3
-
Wasabi
-
ownCloud
-
MySQL
-
Egnyte
-
Putio
-
ADrive
-
SugarSync
-
Backblaze
-
CloudMe
-
MyDrive
-
Cubby
