Content Overview:
About IDrive
IDrive is a cloud backup service that offers secure cloud storage for personal and business use. It allows you to back up your data from multiple devices, Windows, macOS, Linux, iOS, and Android, ensuring that important files are safe, accessible, and recoverable in case of data loss. It offers only 5GB of free cloud space, 30 versions for backed up files, 256-bit AES encryption to store files safely.
However, some users would like to delete files from IDrive account. How do I delete files from IDrive? Don’t worry, here you can find the reasons and solutions to delete files from IDrive.
Why Delete Files from IDrive?
Before deleting files from IDrive, let's explore why you might need to delete files from IDrive. Here are some detailed reasons:
✔️ Organizational Efficiency: Keeping your files organized is essential for productivity. Removing redundant or outdated files can help you maintain a streamlined and efficient file structure.
✔️ Data Security: Sensitive information that is no longer needed should be deleted to prevent unauthorized access.
✔️ Data Retention Policies: Many organizations have data retention policies that require the deletion of files after a certain period.
✔️ Reducing Costs: IDrive offers various storage plans, and exceeding your storage limit can lead to additional costs. Deleting unnecessary files can help you stay within your plan’s limits and avoid extra charges.
Backup IDrive Files In Case of Data Loss
Everything should have a backup copy, including IDrive files. Thus, It’s highly recommended to backup precious IDrive files matter to you. How to backup IDrive files easily? Fortunately, the comprehensive web-based multiple cloud storage manager - MultCloud can help you a lot. Why? Check the following benefits:
- Direct backup. It allows you to backup files from cloud to cloud directly.
- A wide range of cloud services. MultCloud allows you to add 30+ mainstream clouds, like Google Drive, Dropbox, OneDrive, IDrive e2, Icedrive, ownCloud, pCloud, iCloud Drive, iCloud Photos, 4shared, Amazon S3, SharePoint Online, Google Workspace, etc.
- Unlimited backup versions. It allows you to keep unlimited backup versions so that you can restore files to any version that you keep.
- Strong security. It deploys 256-bit AES encryption, a standard OAuth authorization system to keep your files and privacy safe.
Therefore, how to backup IDrive e2 files to OneDrive with MultCloud:
1. Please create a MultCloud account, and then log in to MultCloud Dashboard.
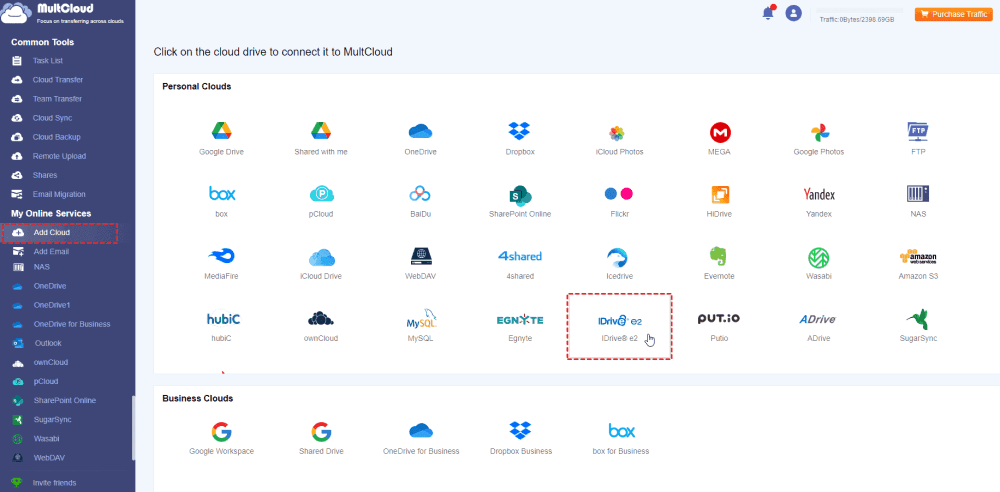
2. Click Add Cloud > IDrive e2, then follow the guide to add. Then add OneDrive in the same procedure.
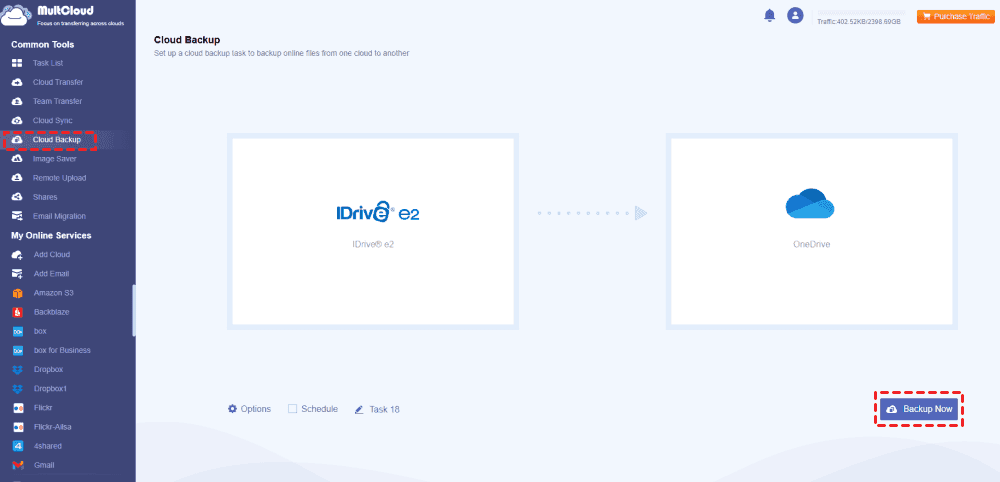
3. Select Cloud Backup, Hit FILES TO BACKUP to choose IDrive e2, WHERE TO SAVE BACKUP to choose OneDrive.
4. Finally, hit Backup Now to backup IDrive e2 to OneDrive directly.
Tips before backing up:
- Hit Options, you can enjoy Email and Filter. Once you enable Email notification, you can get email alert about the backup result. You can use Filter to choose certain files you’d prefer.
- You can enable Schedule, set up Daily, Weekly, Monthly or other time you’d like to backup.
- To enjoy all premium features, you can subscribe to a MultCloud advanced plan to enjoy. These premium features include Filter, Schedule, faster backup speed, and more.

- Smart Share: Share cloud files via public, private, or source mode.
- One-key Move: Quick data transfer, sync, and backup among clouds.
- Email Archive: Protect emails to other clouds or local disks.
- Remote upload: Effectively save web files to clouds via URL.
- Save Webpages as PDF/PNG: Keep them locally or online.
- Safe: Full-time 256-bit AES and OAuth authorization protections.
- Easy: Access and manage all clouds in one place with one login.
- Extensive: 30+ clouds and on-premise services are supported.
How to Delete Files from IDrive | 3 Ways
Now, let’s look at three effective solutions to help you accomplish this task. Each solution includes step-by-step instructions to guide you through the process.
Solution 1. Using the IDrive Web Interface
The IDrive web interface is a convenient way to manage your files, including deleting them. This solution is ideal for users who prefer a graphical user interface and need to delete files quickly.
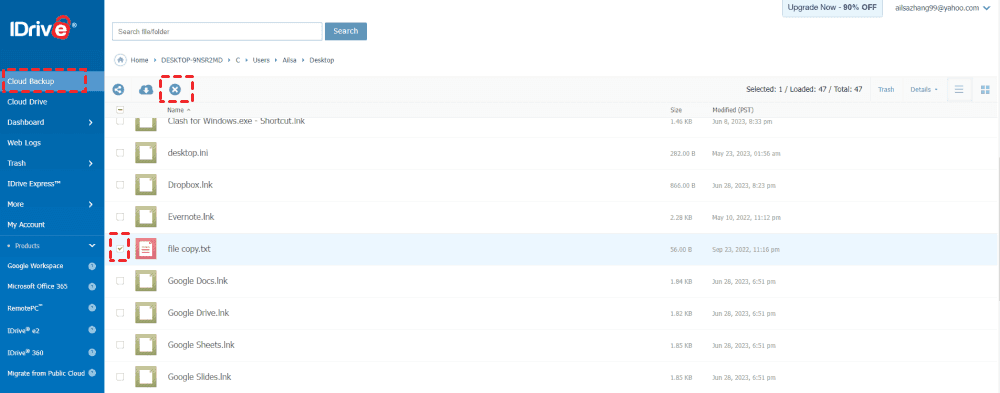
1. Open your web browser and navigate to the IDrive website. Log in using your username and password.
2. Once logged in, go to the "Cloud Backup", "Cloud Drive", or "Dashboard" and choose all the files and folders stored in your IDrive account that you want to delete.
Tip: You can select multiple files by holding down the Ctrl key (Cmd key on Mac) while clicking on each file.
3. After selecting the files, click on the "Delete" button usually found at the top of the file list. Confirm the deletion when prompted.
4. To permanently delete the deleted files, navigate to the Trash folder and select "Empty Trash".
Tip: Regularly check and empty your Trash folder to ensure that deleted files are permanently removed and not taking up storage space.
So, you can use this way to delete files from IDrive backup.
Solution 2. Using the IDrive Desktop Application
The IDrive desktop application offers a more integrated experience for managing your files. This solution is useful for users who prefer working directly from their computer.
1. Launch the IDrive desktop application on your computer. If you don’t have it installed, you can download it from the IDrive website.
2. In the application, click on the "Backup" tab to view your backed-up files.
3. Browse through the list of backed-up files and folders. Select the ones you want to delete by checking the boxes next to each file.
4. Click on the "Delete" button located at the bottom of the window. Confirm the deletion in the dialog box that appears.
5. To ensure the files are completely removed, go to the "Trash" tab in the application and select "Empty Trash".
Tip: Use the search function within the IDrive application to quickly locate files you want to delete, especially if you have a large number of files.
Solution 3. Delete IDrive Files with MultCloud
Besides the above solutions to delete files from IDrive, you can use MultCloud to delete them effectively. Here is how it works:
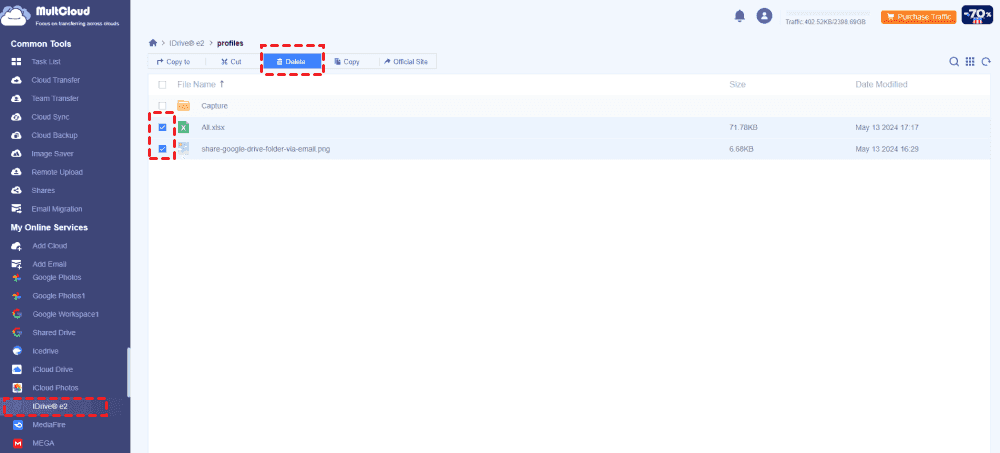
1. Ensure you have added IDrive e2 to MultCloud. Then click IDrive e2 from the left side after adding.
2. Find and tick the files, choose Delete from the top menu.
3. Press the Delete(*) to confirm the deletion.
The End
By following these solutions, you can effectively manage and delete files from your IDrive account, keeping your storage organized and efficient. Remember to regularly review your files and delete any that are no longer needed to maintain optimal performance and security.
If you want to abandon the IDrive account and change to other clouds, you can migrate IDrive e2 to other clouds directly before deleting the IDrive account.
MultCloud Supports Clouds
-
Google Drive
-
Google Workspace
-
OneDrive
-
OneDrive for Business
-
SharePoint
-
Dropbox
-
Dropbox Business
-
MEGA
-
Google Photos
-
iCloud Photos
-
FTP
-
box
-
box for Business
-
pCloud
-
Baidu
-
Flickr
-
HiDrive
-
Yandex
-
NAS
-
WebDAV
-
MediaFire
-
iCloud Drive
-
WEB.DE
-
Evernote
-
Amazon S3
-
Wasabi
-
ownCloud
-
MySQL
-
Egnyte
-
Putio
-
ADrive
-
SugarSync
-
Backblaze
-
CloudMe
-
MyDrive
-
Cubby
