Quick Search:
User Case:Only Want to Sync Specific Folders on My Other Device
I have all my files in Dropbox on my PC. I want to "some" of them, not all of them on my laptop. When I downloaded Dropbox on the laptop, I ended with "all" files on the laptop. Can someone please let me know how to remove those files I don't want on the laptop? Or do I have to start all over? And then if I have to start all over, how do I only get the files I want? Thank you!
- Question from Dropbox Community
What Is Dropbox Selective Sync?
Selective sync on Dropbox is a special feature in the Dropbox desktop app, which enables users to choose which folders to be saved to local computers. Thus, users can select frequently used ones to be synced locally to free up hard drive space. For those folders that haven’t been chosen, they are still stored online and users can access them on Dropbox.com.
There are some notes you should know before enabling the selective sync feature. For example, it only allows you to choose folders. So, if you want to select files, you need to move them into a folder first. Meanwhile, the selective sync preferences you select are unique to each computer and won’t affect other computers you use with Dropbox.
So, how do I use selective sync in Dropbox? We will break down the troublesome steps for you in the following part. No matter whether you want to use selective sync on Dropbox personal or team accounts, you can refer to the operations below.
Tip: What is the difference between Selective Sync and Smart Sync in Dropbox? Dropbox Smart Sync allows you to access all of your files and folders without taking up space on your local device.
How to Make Dropbox Selective Sync [Personal]
How do I selectively sync Dropbox personal account? The way to enable selective sync is simple. Before getting started, you should install the Dropbox desktop app on your computer. Then, you can follow the steps below:
Step 1: Launch Dropbox and sign in with your Dropbox account.
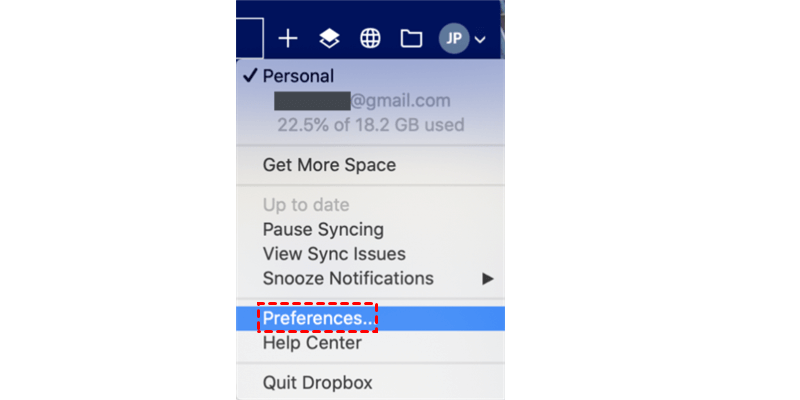
Step 2: Click on your avatar image and tap the Preferences button.
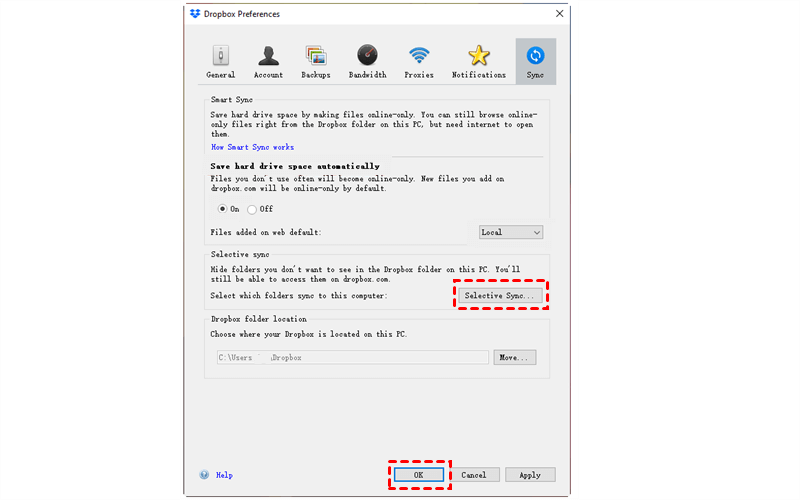
Step 3: Tap the Sync tab on the upper ribbon, then hit the Selective Sync button.
Step 4: Select which folders to stay on your computer by ticking the checkbox. Folders that aren’t been chosen will not be synced to your local computer, but will still exist on Dropbox cloud. After selecting, click on Update to continue.
By doing so, the selected folders will be synced to your computer automatically. When you want to access them, you can head to your Dropbox folder on your file explorer quickly. If you find the Dropbox selective sync not removing folders issue, you can restart the app or check the internet connection.
Tip:
What is problem with selective sync in Dropbox? When a selective sync conflict happens, the following steps typically give rise to it:
- You used the selective sync feature of the Dropbox desktop app to delete a folder from your computer's hard drive.
-
Subsequently, you generated a new folder on your computer in the identical location as the original folder, bearing the same name.
How to Make Dropbox Selective Sync [Team]
How to use Dropbox selective sync in a Team? If you are an admin, you can also set up selective sync tasks. By default, all folders shared with team members will be synced to team members’ computers automatically. If an admin wants to sync selected folders to team members, follow the operations in the following part.
Step 1: Sign in to your Dropbox admin credentials on the web.
Step 2: Press Admin console on the left navigation bar.
Step 3: Head to Content > the … icon next to any folder.
Step 4: Tap the Change sync default tab. Then tick the circle next to Don’t sync automatically so that the folder won’t be synced automatically to new team members’ computers.
Tip: No matter you want to make Dropbox selective sync on Mac or Windows, you can follow the methods above.
Bonus Tip: How to Sync Dropbox to Another Account
We’ve learned how to use Dropbox selective sync from the cloud to a local computer. Now, we will focus on selective syncing between 2 Dropbox accounts. There are many causes to syncing files between 2 Dropbox accounts. For example, you want to organize different data for different accounts. No matter what the reason is, the question is how to sync data between 2 Dropbox accounts efficiently.
Unlike the download-and-upload method, you can take advantage of a third-party service that is specialized in cloud-to-cloud sync. In this case, MultCloud stands out in many aspects. It is a web-based service for cloud management and organization. By using this tool, users will be able to manage multiple cloud drives on one platform.
Users can enjoy many conveniences if they take advantage of MultCloud, for instance:
- More than 30 Leading Cloud Drives Supported. MultCloud supports more than 30 leading and useful cloud services in the market, including iCloud Drive, iCloud Photos, Google Drive, Google Photos, Dropbox, OneDrive, Dropbox Business, MEGA, OneDrive for Business, Google Workspace, and so on.
- Sync Files at Regular Intervals. Users are allowed to set up scheduled sync tasks based on their requirements. Specifically, they can choose to run tasks at a regulated time, daily, weekly, or monthly. After setting, MultCloud will start the task automatically. For instance, you can sync SharePoint with Google Drive daily.
- 9 Sync Modes to Choose from. MultCloud gives users 9 practical and smart sync modes to choose from, and each sync mode has its own benefits, which could meet users’ needs in many aspects. There are “Move Sync”, “Cumulative Sync”, “Mirror Sync”, “Real-Time Sync”, and so on.
Now, refer to the steps below to learn how to sync data between 2 Dropbox accounts via MultCloud:
Step 1: Create an account on MultCloud for free. Then sign in with your account.
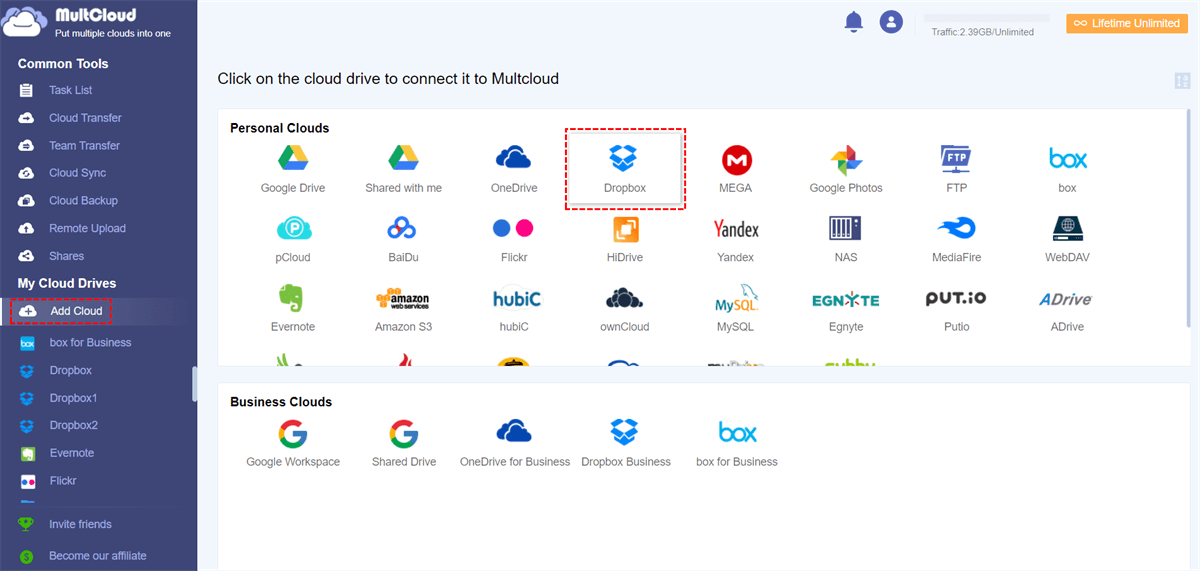
Step 2: Click on Add Cloud on the left sidebar. Then tap Dropbox to add and grant MultCloud permission. Next, add another Dropbox account by following the same way.
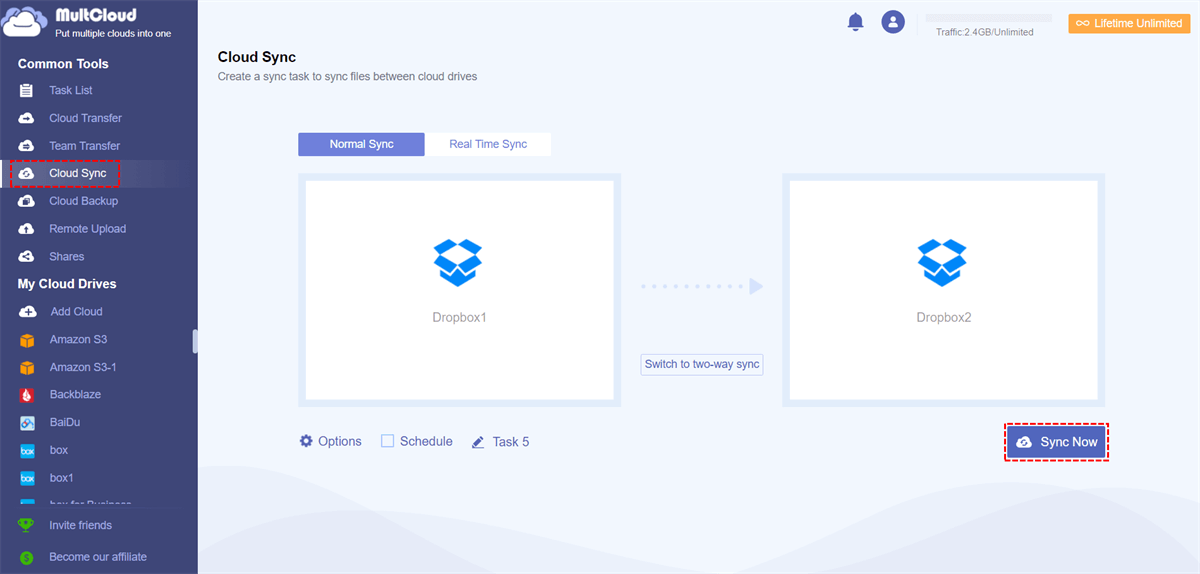
Step 3: Then, go to Cloud Sync under Common Tools on the left-upper side. Then select the folder/folders on one Dropbox account as the source directory and another Dropbox account as the target directory. Finally, press the Sync Now button.
As you can see, the way to sync data between 2 cloud drives is very simple on MultCloud. Similarly, if you want to sync Google Drive with Dropbox, you can apply the same steps above and the only difference is the source and target cloud drives.

- Efficient and Direct: MultCloud provides industry-leading syncing speed, facilitating fast and effortless synchronization of folders between cloud services without the need for downloading and uploading.
- Intelligent and Pragmatic.: You have the flexibility to choose from a range of synchronization methods, allowing you to set up automatic synchronization of folders across multiple cloud drives based on your preferences and requirements.
In the End
That’s all about how to use Dropbox selective sync and how to selective sync between Dropbox accounts. Anyway, when you want to make selective sync Dropbox to a computer, no matter whether you are an individual user or team admin, you can refer to the solution mentioned in this post. And when it comes to syncing between Dropbox, you can choose MultCloud to ease your work.
On top of syncing files between cloud drives, MultCloud also provides you with other practical features, such as transferring and backing up. For instance, when you intend to backup Google Photos to Synology NAS, MultCloud can work it out without any effort. Also, you will find it efficient to download/upload files from URLs to cloud drives directly.
MultCloud Supports Clouds
-
Google Drive
-
Google Workspace
-
OneDrive
-
OneDrive for Business
-
SharePoint
-
Dropbox
-
Dropbox Business
-
MEGA
-
Google Photos
-
iCloud Photos
-
FTP
-
box
-
box for Business
-
pCloud
-
Baidu
-
Flickr
-
HiDrive
-
Yandex
-
NAS
-
WebDAV
-
MediaFire
-
iCloud Drive
-
WEB.DE
-
Evernote
-
Amazon S3
-
Wasabi
-
ownCloud
-
MySQL
-
Egnyte
-
Putio
-
ADrive
-
SugarSync
-
Backblaze
-
CloudMe
-
MyDrive
-
Cubby
