Quick Search:
Introduce
In an era where our lives and work are intertwined with digital devices, data security and backup solutions have never been more critical. Data loss can occur due to various reasons, including hardware failure, accidental deletion, or even cyber threats. Synology NAS provides a robust platform to keep your data safe, and in this article, we'll explore how to effectively back up your data from your computer and phone to a Synology NAS.
Why Backup to Synology NAS?
Before backing up data from a computer or phone, let's explore the advantages of using a Synology NAS for your backup needs.
- Data Security: Synology NAS devices are known for their robust security features. When you back up your files to a Synology NAS, you can rest assured that your data is protected from external threats and unauthorized access.
- Centralized Storage: A Synology NAS serves as a centralized storage location, making it convenient to access and manage your files from multiple devices.
- Cost-Effective: Compared to syncing files to OneDrive or other clouds, Synology NAS offers a one-time investment without recurring monthly fees.
How to Backup to Synology NAS from Different Devices?
Whether you're a home user or a business owner, ensuring your data's safety is paramount. Synology NAS is a versatile and cost-effective solution for data backup and storage. However, since different devices correspond to different operating steps, many users do not know how to complete the entire process quickly.
1. Backup to Synology NAS from Windows PC
Backup from Win 11 PC to Synology
"Hi to everyone, I've been using DeltaC.exe to backup my files and folders from my Win 11 PC to Synology NAS for years. Recently, it hasn't been transferring certain file/folder attributes from an SSD over properly, such that it lists all folders over and over again in the task list.
I like DeltaC for its GUI which is fairly simple and straightforward. Perhaps its implementation is now out of date. Are there any modern recommended alternatives to it?"
- Question from https://www.reddit.com/
Backing up files from your Windows PC to a Synology NAS is a straightforward process. You can use Synology's native tools, such as Synology Drive Client.
Step 1. Installing Synology Drive Client
The first step is to download and install Synology Drive Client on your computer. You can find the installation package on the official Synology Download Center.
Step 2. Configuring the Drive Client
Once installed, open the Synology Drive Client and configure it to connect to your Synology NAS (Network Attached Storage) device. Ensure that your NAS is up and running.
Step 3. Selecting Files for Backup
Click "Backup Task", then choose the files and folders you want to back up. Synology Drive Client allows you to customize your backup preferences in "Backup Rules", ensuring you only back up what's important to you.
Step 4. Execute the Backup Task
After configuration, you can check the summary of your backup task in the last step of the wizard. Then click "Done" to confirm.
2. Backup to Synology NAS from Mac
Best way to backup files from pc to nas
"New NAS owner so please be gentle (ds218+). I have various files on my laptop that I use daily spreadsheets, pictures, text docs etc, what I would like is a 1 click or as close to 1 as possible :) to back up these files to my NAS, I want the old files on the NAS overwritten so the latest version/backup is the only version on the NAS.
Do I need to use the Synology drive server or do I need to use hyper backup? an idiot guide/video would be appreciated. Thanks!"
- Question from https://www.reddit.com/
Mac users can also easily configure their devices to back up data to a Synology NAS. The Synology Drive Client also works well on Mac devices, so you can follow the steps above to perform Mac backup to Synology.
3. Backup to Synology NAS from Mobile Devices
Backup iPhone directly to Synology NAS
"I am trying to backup my iPhone directly to Synology NAS using iTunes on my MacBook(Finder). The backup seems to be running for a long time with no end (Running almost for 24 hours now). Any idea on why the backup is taking a long time and if there is any way to speed it up?"
- Question from https://www.reddit.com/
With the right apps and configurations, you can even back up your mobile devices to your Synology NAS, ensuring that your smartphone and tablet data are safe and accessible. Synology provides an App called DS file that provides photo backup and file upload features, so you can use these features to backup files to Synology.
Here, I will show the detailed steps to backup iPhone to Synology. Before using DS file, please make sure your Synology NAS device is running DSM 5.0 or later.
Step 1. Installing DS File App
Download and install the DS File app on your iPhone. You can find the installation package on the official Synology Download Center.
Step 2. Connecting to DS File App
Sign in with your QuickConnect ID and password, secure your connection and use multi-factor authentication.
Step 3. Upload Files to Synology NAS
Go to the "Offline Files" tab and browse to the files you want to upload. You can:
- Tap "…" > "Select" to select multiple items, then click the upload icon.
- Tap "…" and the upload icon to upload a single file.
With "Photo Backup", you can gallery to Synology NAS. If you enable iCloud Photo Library on your phone, you can also backup iCloud Photos to Synology with this feature.
Bonus Tip: Best Way to Backup Synology NAS to Cloud
Are you worried about losing data on your Synology NAS due to hardware damage? Do not be afraid! You can back up your Synology NAS data to a cloud account in advance. Synology's built-in backup function can help you complete the backup operation, but for the convenience of operation, you can try the professional cloud backup tool --- MultCloud.
✔️Easy: The whole process only requires a few steps and is simple and easy to operate.
✔️Automatic: The backup process is fully automatic, no need for you to stay by the device all the time.
✔️Smart: Incremental backups save transfer time.
✔️Offline: Tasks can run even when the page or device is closed.
Below, we take backing up Synology NAS to OneDrive as an example.
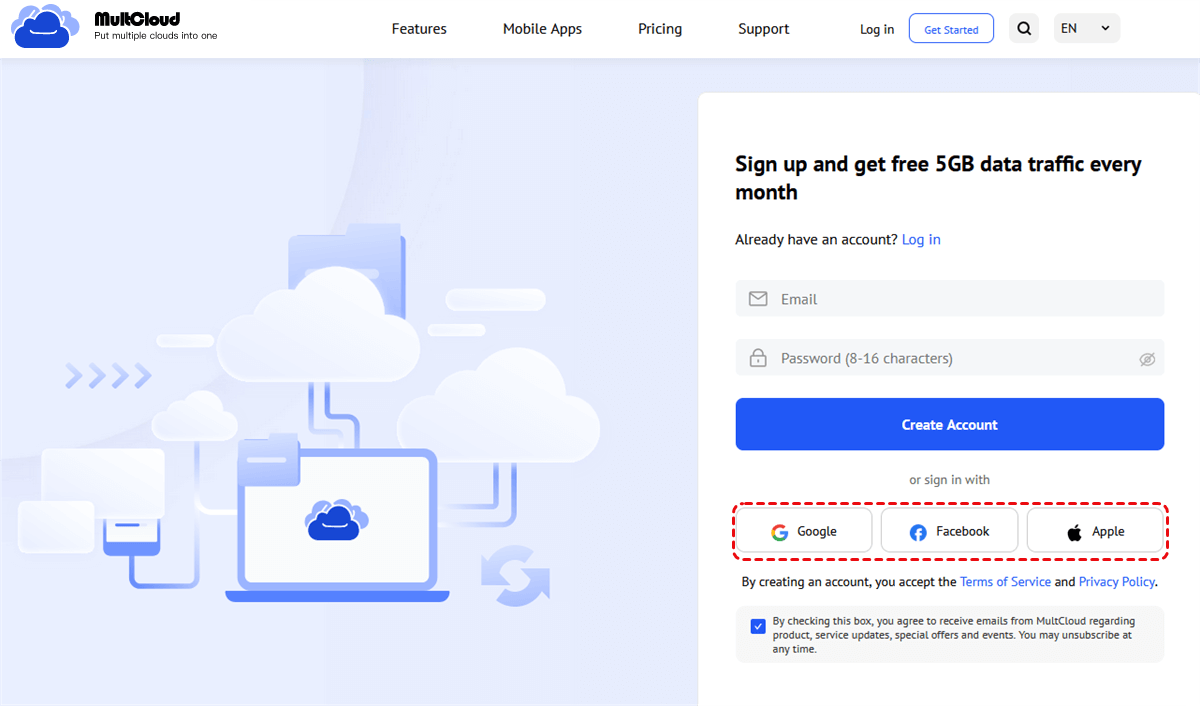
Step 1. Sign up for a MultCloud account. Alternatively, you can log in directly using your Google, Facebook or Apple ID.
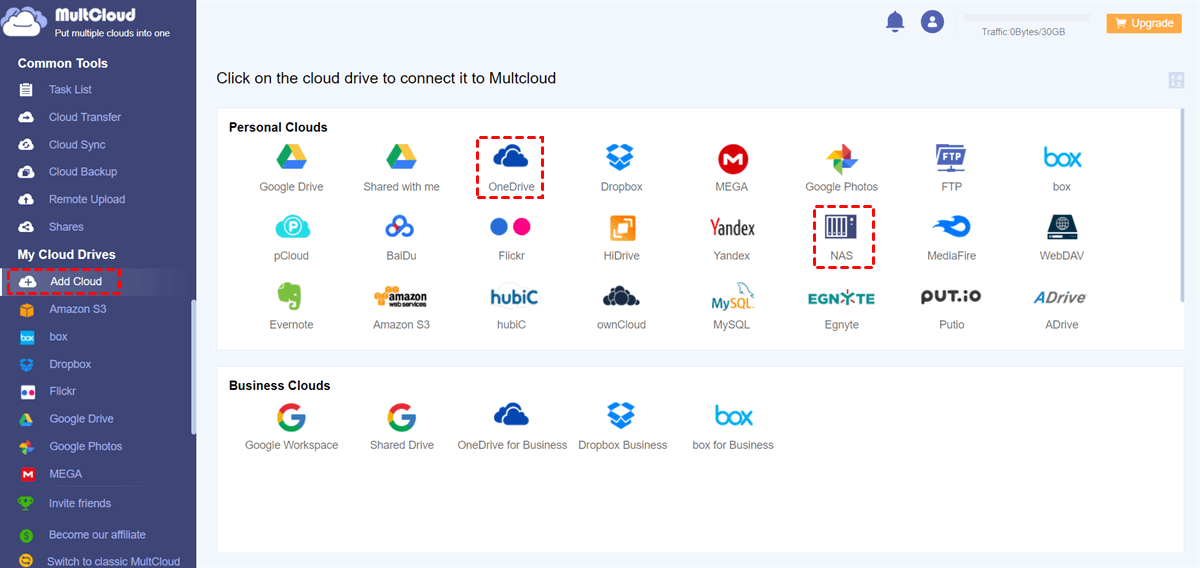
Step 2. Go to "Add Cloud" on the left sidebar and click on the OneDrive icon to grant MultCloud access. When adding a Synology NAS, you need to enable WebDav service on Synology NAS or enable FTP server on Synology NAS in advance.
Step 3. Now, go to "Cloud Backup" in the left sidebar. Then select Synology NAS or a folder within it as the source directory, and OneDrive or a folder within it as the destination directory. Finally, click "Backup Now" to start the task.
You only need to follow 3 steps to back up files from your Synology NAS to OneDrive. Seems simple and efficient, right? On the contrary, backing up OneDrive to Synology NAS can also be achieved using this service, you just need to reselect the source and destination.
Conclusion
In conclusion, backup to Synology NAS is a smart and secure way to safeguard your data. Don't wait until it's too late. Invest in a Synology NAS, follow the best practices outlined in this article, and ensure your data is protected.
MultCloud Supports Clouds
-
Google Drive
-
Google Workspace
-
OneDrive
-
OneDrive for Business
-
SharePoint
-
Dropbox
-
Dropbox Business
-
MEGA
-
Google Photos
-
iCloud Photos
-
FTP
-
box
-
box for Business
-
pCloud
-
Baidu
-
Flickr
-
HiDrive
-
Yandex
-
NAS
-
WebDAV
-
MediaFire
-
iCloud Drive
-
WEB.DE
-
Evernote
-
Amazon S3
-
Wasabi
-
ownCloud
-
MySQL
-
Egnyte
-
Putio
-
ADrive
-
SugarSync
-
Backblaze
-
CloudMe
-
MyDrive
-
Cubby


