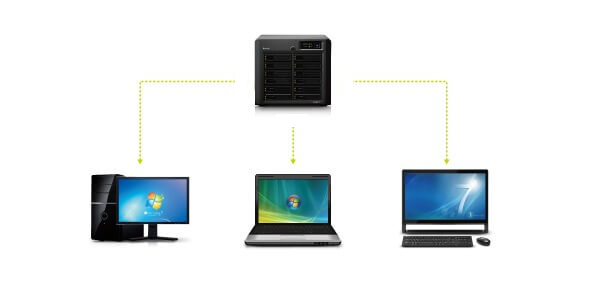
Why Backup Synology to PC?
NAS is a dedicated storage device connected to a network, allowing multiple users and devices to access and share data efficiently. It is a useful strategy to backup Synology NAS to computer for several reasons:
- Data Redundancy: It provides an additional layer of data redundancy. If something happens to your NAS, like hardware failure or data corruption, having a copy on your PC ensures your data's safety.
- Protection from NAS Failure: NAS devices can fail or experience issues and data recovery can be costly or impossible. A PC backup ensures that you have access to critical data even if your NAS encounters problems.
- Offline Access: Having a copy of your data on your PC allows you to access your files even when you're not connected to your local network or the internet. This is especially helpful if you need to work on files remotely.
- Faster Recovery: In case of data loss or accidental deletion, recovering data from your PC backup can be quicker than restoring it from a remote backup service or the cloud.
- Version Control: PC backups can store multiple versions of your files, which can be helpful if you need to revert to an earlier version of a document or recover a file that was changed or deleted.
Backup Synology to PC via AOMEI Backupper
AOMEI Backupper is a well-rounded backup and recovery software for Windows operating systems, including the latest Windows 11. It has Backup, Sync, Restore, and Clone functions. For Synology backup PC, the Backup function is the best choice. See how useful AOMEI Backupper is with the steps below.
Step 1: Download and launch AOMEI Backupper on your PC.
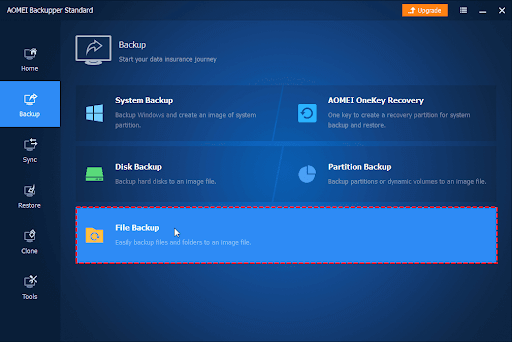
Step 2: Choose “Backup” in the left bar and select “File Backup” among the backup modes.
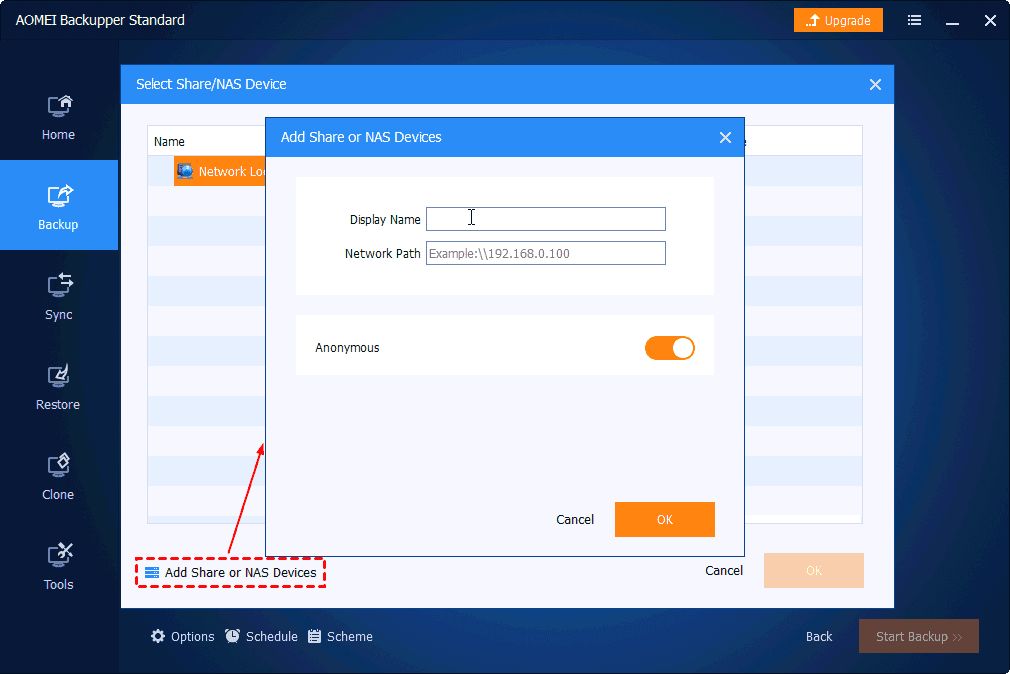
Step 3: Click “Add Folder” or “Add File” in terms of your needs. Then choose “Share/NAS”, click “Add Share or NAS Devices”, enter your NAS certification, and tap on “OK”.
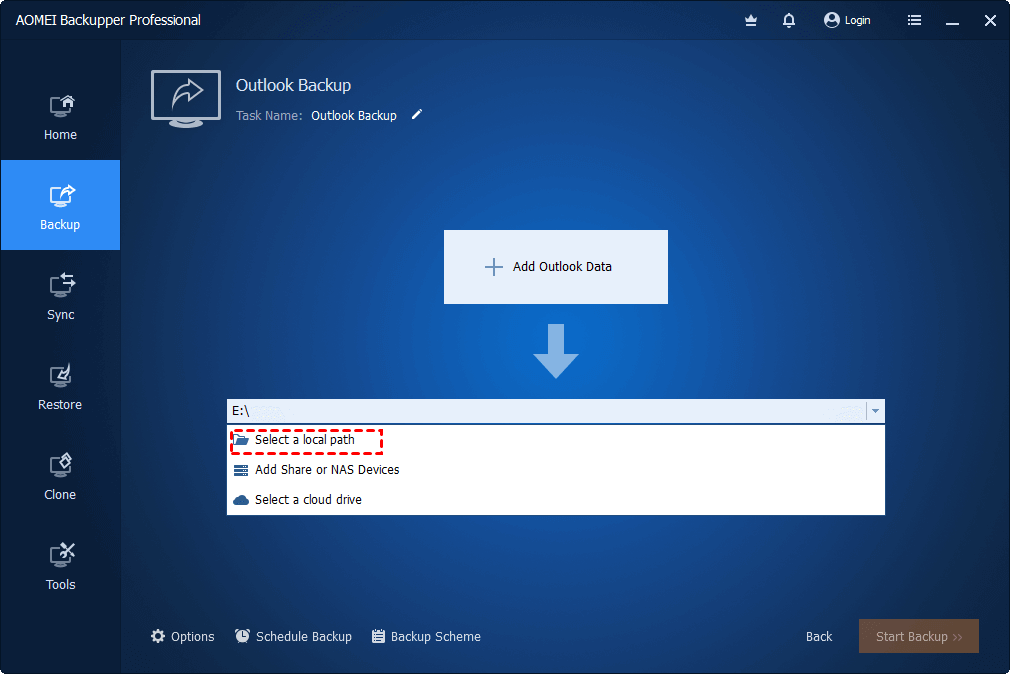
Step 4: Click the lower blank bar and choose “Select a local path”. Then you can choose where to store your Synology NAS files on your PC and click “Open” to save the destination.
Step 5: Tap on the “Start Backup” button in the lower-right corner to backup Synology to PC.
Note:
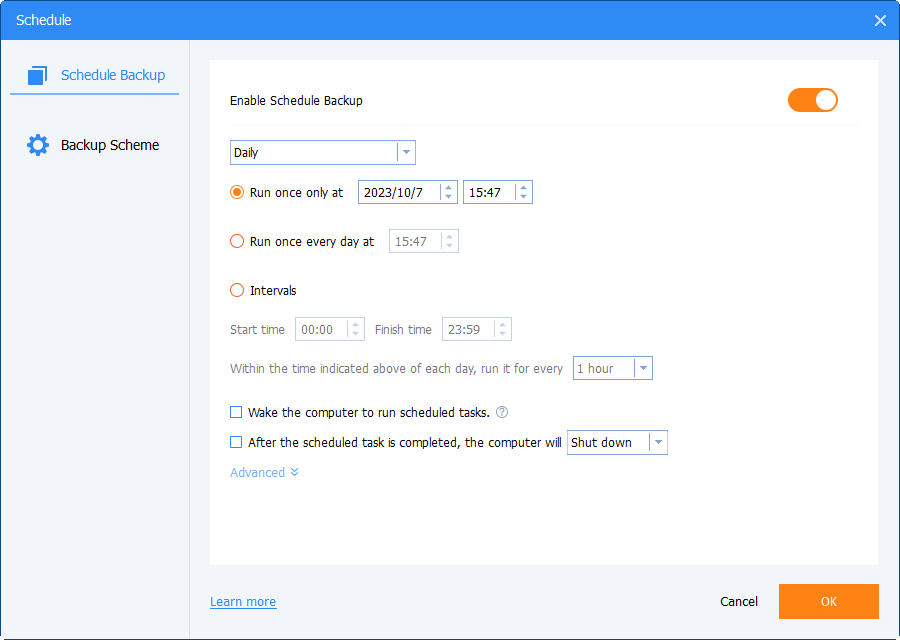
- You can schedule the backup process and make it run regularly by clicking “Schedule Backup” and switching on the “Enable Schedule Backup” button.
- The “Backup Scheme” allows you to choose backup methods like Incremental Backup, Full Backup, or Differential Backup. You can also order this task to full backup once after some incremental or differential backups.
- If you want to use the paid features or register this premium account on other computers, you can check the paid plans and purchase the right one.
Backup Synology to PC via MultCloud
If you don’t like to download apps to your computer, you can use MultCloud instead. MultCloud can be used on any web browser as long as there is a network connection. Although MultCloud specializes in cloud-to-cloud transfer, it can also be used for cloud-to-local transfer since it has a downloading function. If you don’t have extra demands but just backup and restore, using MultCloud is also a recommended way.
Like AOMEI Backupper, MultCloud also has various functions like Cloud Transfer, Cloud Sync, Cloud Backup, Shares, Remote Upload, and Email Migration. Basic operations like copying, deleting, downloading, and uploading files to a cloud are also designed on MultCloud.
Steps for backing up Synology to PC by MultCloud Download are shown below.
Step 1: Enter MultCloud and get a MultCloud account.
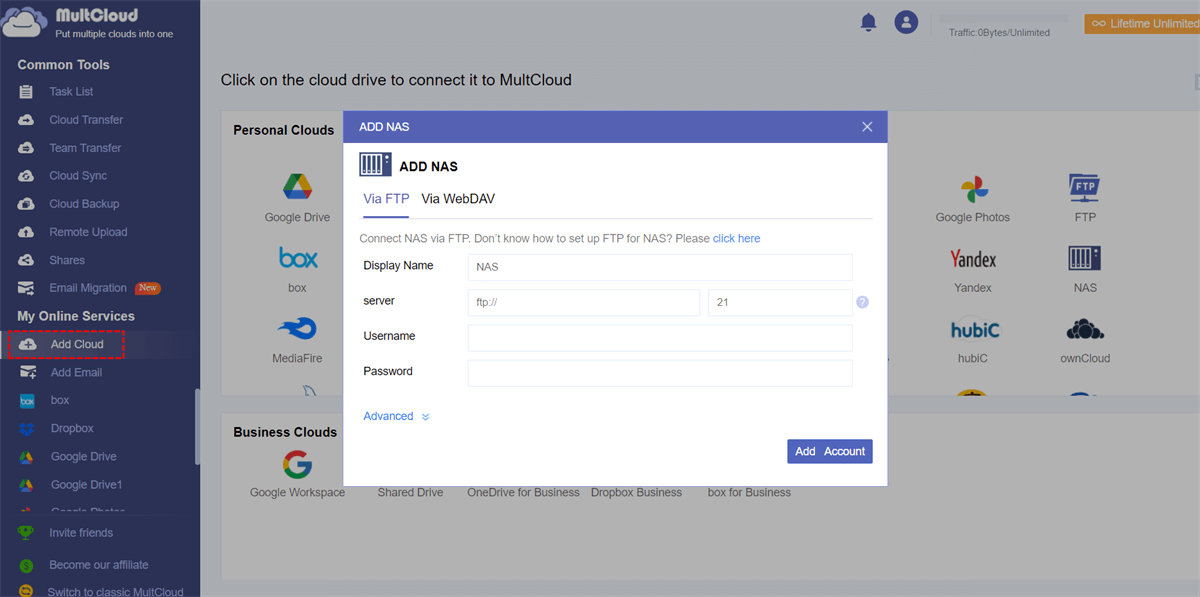
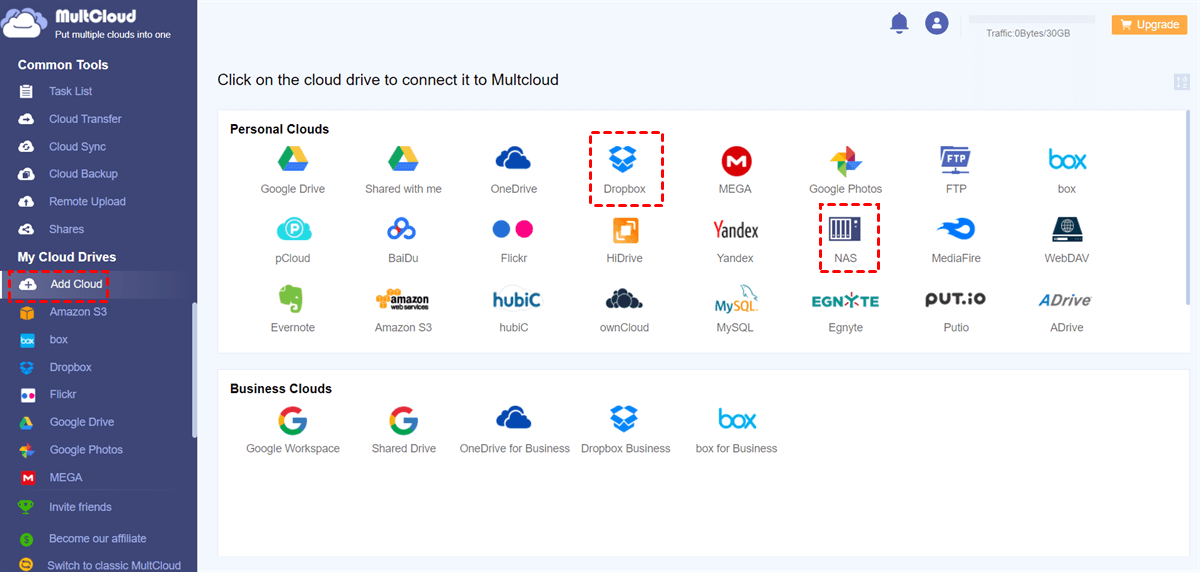
Step 2: Add Synology NAS to MultCloud. When you add a cloud, you will click “Add Cloud” in the left bar and then choose the cloud icon in the right part. Then log in to the cloud account and accept MultCloud’s access.
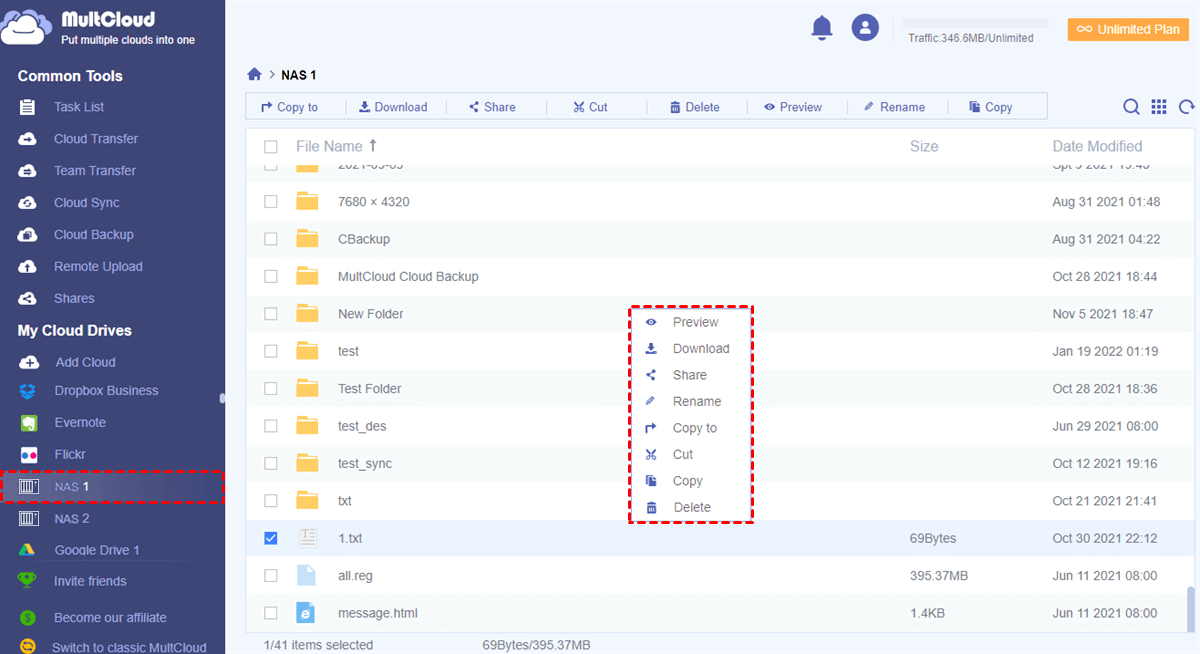
Step 3: Open NAS on MultCloud, choose the files you want to backup, and click "Download" in the upper (or right-click the selected file then choose "Download") to save them to your PC.
Bonus Tip: Backup NAS to a Cloud via MultCloud
You can backup NAS to Google Drive, OneDrive, or another cloud. But here we will show the steps for using Cloud Backup to backup NAS to Dropbox as an example.
Step 1: Add NAS and Dropbox to MultCloud.
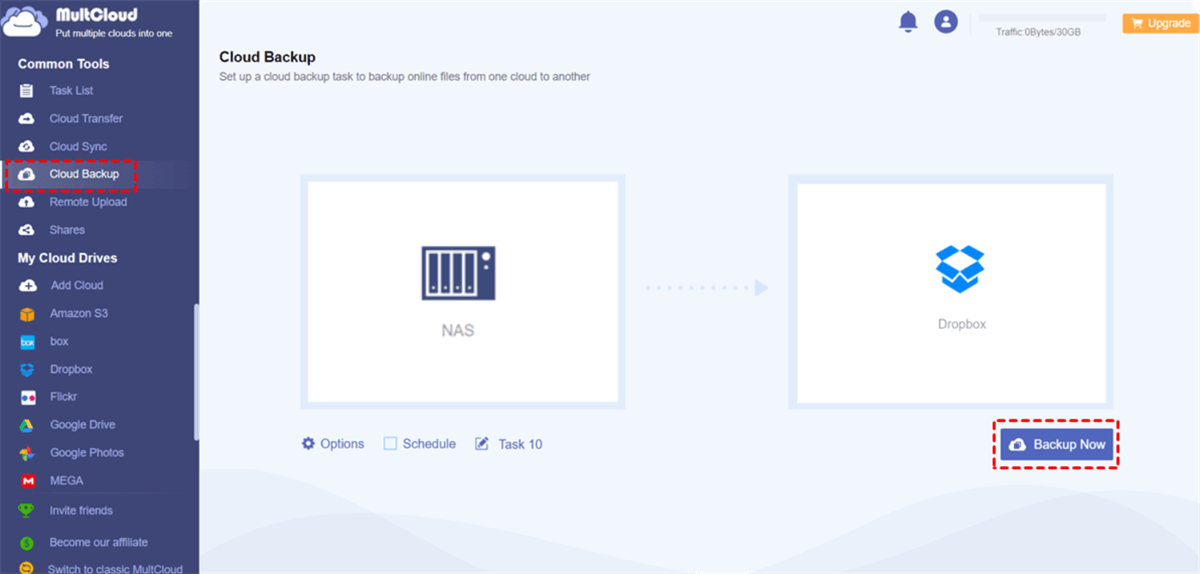
Step 2: Click “Cloud Backup” and choose NAS and Dropbox in the FROM and TO boxes. Then open “Options” and “Schedule” if you need to select your desired files or set a backup frequency. After all the settings, click on “Backup Now” to initiate the task.
Note:
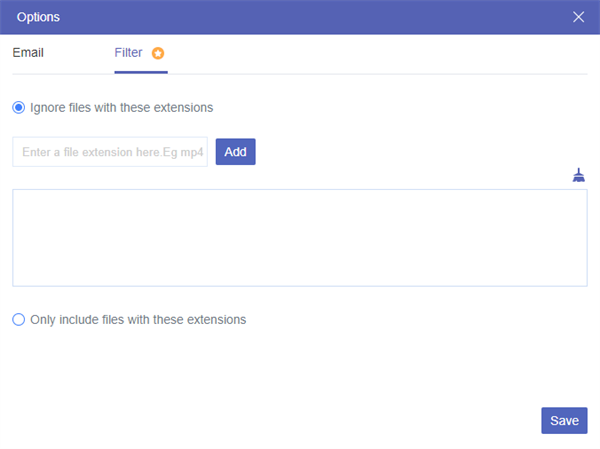
- When you open “Options”, you will see “Email” and “Filter”. If you check “Email”, you will receive an email telling you that the backup task is completed. The “Filter” is used to pick out files with their extensions. You can choose to only backup the selected files or not backup these files.
- If you have a huge demand for file backup and have to backup many files every month, you may consider upgrading your MultCloud plan to get more traffic and enjoy more paid features.
Conclusion
In this post, we've explored two effective methods to backup Synology to PC. Whether you prefer AOMEI Backupper or MultCloud solutions, ensuring your data's integrity is as simple as a backup NAS to a PC.
However, if you don't like to download apps, MultCloud may suit you better. Also, you can use MultCloud's other functions to manage your clouds with one app. For example, you can use Cloud Sync to integrate NAS with SharePoint Online.
Can you backup Synology NAS to external hard drive?
Do I need to backup Synology NAS?
Why is a NAS not a backup?
MultCloud Supports Clouds
-
Google Drive
-
Google Workspace
-
OneDrive
-
OneDrive for Business
-
SharePoint
-
Dropbox
-
Dropbox Business
-
MEGA
-
Google Photos
-
iCloud Photos
-
FTP
-
box
-
box for Business
-
pCloud
-
Baidu
-
Flickr
-
HiDrive
-
Yandex
-
NAS
-
WebDAV
-
MediaFire
-
iCloud Drive
-
WEB.DE
-
Evernote
-
Amazon S3
-
Wasabi
-
ownCloud
-
MySQL
-
Egnyte
-
Putio
-
ADrive
-
SugarSync
-
Backblaze
-
CloudMe
-
MyDrive
-
Cubby
