Quick Navigation:
Why Back up PC to Synology NAS?
To keep your files safe on your computer, you can backup PC to Synology NAS for the following reasons:
✅ Centralized management. Generally speaking, Synology NAS provides greater storage space for you instead of the limited storage on your computer and meets most of the demands.
✅ Keep version history. Synology NAS keeps the versions of your files, which allows you to restore to any version that you keep. On the other hand, your computer only keeps the latest version of the file.
✅ Remote access. Synology NAS allows you to remote access these files as long as you have an Internet connection. And you can't access files on the computer if you do not take the computer with you.
Thus, how to backup Windows PC to Synology NAS easily and quickly? Keep reading the following content to find the solution that suits you best.
Best Way to Backup PC to Synology NAS via MultCloud
To perform Synology backup files from PC effectively, here we introduce the best free way to backup PC to Synology NAS, the comprehensive web-based multi-cloud storage manager - MultCloud.
- MultCloud supports 30+ clouds and services, including NAS (Synology, QNAP), FTP/SFTP/FTPS, iCloud Drive, iCloud Photos, Google Drive, and other mainstream clouds on the market.
- You can upload files to Synology NAS, iCloud Drive, and many more.
- There is no file size limit while uploading files.
- There is no need to download anything to backup PC to Synology NAS.
So, try the following simple steps to backup my PC to Synology NAS with MultCloud.
4 Steps to Backup PC to Synology NAS
1. Create a MultCloud account and log in.
2. Click Add Cloud > NAS, and input the credentials about Synology NAS, including Synology Server, Port, Username, Pasword to add.
3. Synology NAS will be listed automatically, click Upload File.
4. Select the files on your Windows 10/11 computer, and hit Open to backup files from PC to Synology NAS.
Besides, you can move files from Synology NAS to Google Drive, Dropbox, OneDrive, or other clouds to manage files more easily if you prefer.

- Smart Share: Share cloud files via public, private, or source mode.
- One-key Move: Quick data transfer, sync, and backup among clouds.
- Email Archive: Protect emails to other clouds or local disks.
- Remote upload: Effectively save web files to clouds via URL.
- Safe: Full-time 256-bit AES and OAuth authorization protections.
- Easy: Access and manage all clouds in one place with one login.
- Extensive: 30+ clouds and on-premise services are supported.
Backup PC to Synology NAS via Synology Drive Client
On the other hand, Synology NAS provides you with the Synology Drive Client to backup PC to Synology NAS, but it's too complicated to configure for ordinary users. But you can try the following steps to backup Windows 10/11 to Synology NAS with Synology Drive Client if you're interested:
1. Please download the Synology Drive Client from the Synology Download Center according to your Product Type, Synology Product, and OS Version, then go to the Desktop Utilities, and click Download behind the Synology Drive Client.
2. Install and run the Synology Drive Client on your computer, hit Start Now.
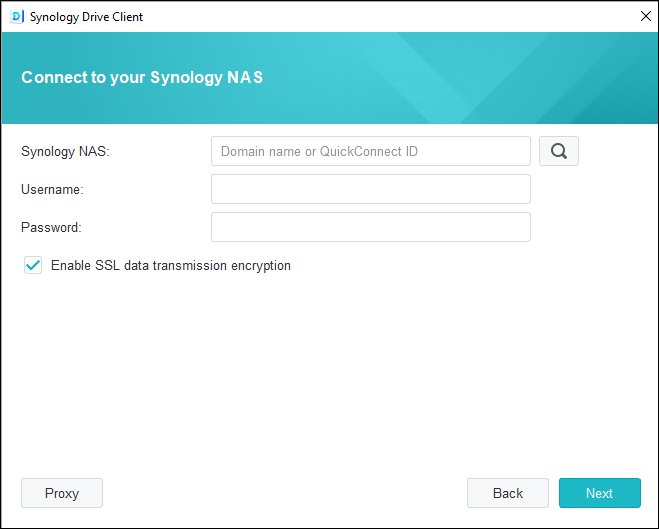
3. Please input the Synology NAS Domain name, QuickConnect ID, or IP address, Username, and Password, and click Next.
Tip: You can also click the search icon behind the box to search all Synology NAS on your LAN, then choose the Synology NAS you prefer.
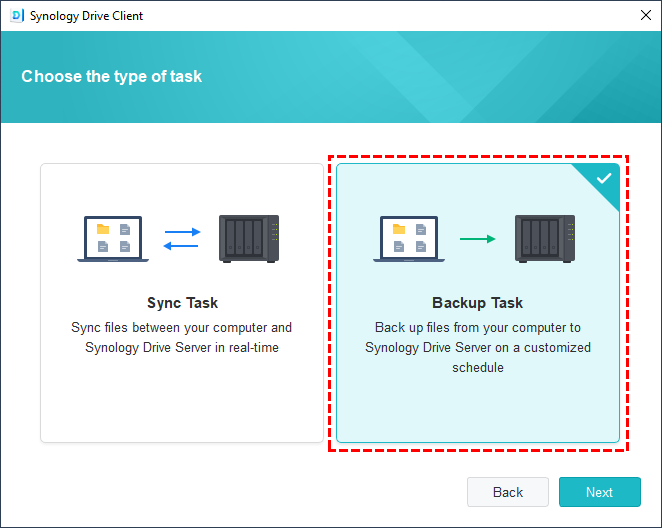
4. Choose Backup Task, and hit Next.
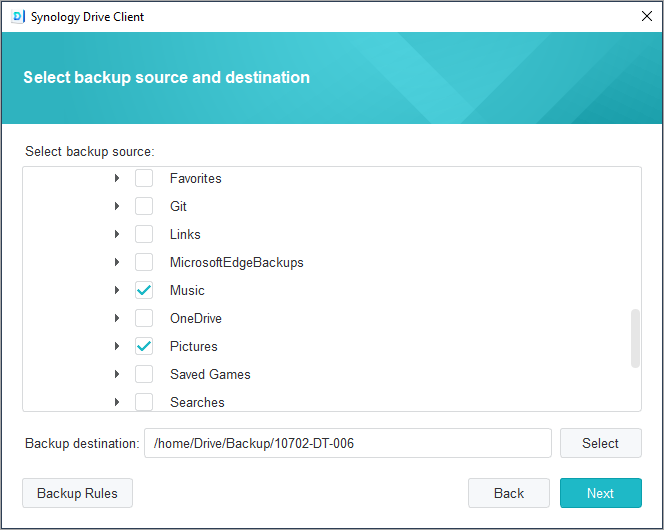
5. Tick the PC folders and files as the backup source, and a folder in Synology NAS as the target, and hit Next.
6. Configure Backup Rules, like the max file size, the filenames or file extensions you won't to backup, and others, click Apply.
7. Hit Next.
8. Choose Continuous backup, Manual backup, or Scheduled backup according to your needs, and hit Next.
9. Set up the backup Schedule, and hit Next.
10. Press Done to confirm the settings of your Synology backup folder from PC.
Limitation: From these operations, it's so complicated to configure to backup PC to Synology NAS.
Backup PC to Synology NAS with Synology Hyper Backup
1. Please ensure you have installed Synology Hyper Backup on your Synology DiskStation Package Center.
2. Click Open to run Hyper Backup.
3. Choose Folders and Packages, hit Next.
4. Select Local Shared Folder or USB, and click Next.
5. Choose Multiple versions, or Single version, and press Next.
6. Select a shared folder in Synology as the destination, and click Next.
7. Choose computer data and applications to backup, and press Next.
8. Set up the backup settings, like enable task notification, compress backup data, enable backup schedule, and more, and hit Next.
9. Configure the rotation settings, and hit Next.
10. Preview the settings of Synology NAS PC backup, and press Done to confirm.
Limitation: It's not recommended to back up PC to Synology NAS because of the complex settings.
Besides, you can use Synology Hyper Backup to backup Synology NAS to Dropbox with ease, or other clouds you're using.
The End
Compared with these three ways to backup PC to Synology NAS, MultCloud is the easiest way to upload files to Synology DiskStation from your computer. Although you can use other two ways to complete the task, you have to stand the pain of the complex configurations.
On the other hand, you can enjoy some advanced features in Synology Drive Client and Synology Hyper Backup, like encryption, compression, scheduled backup, and more.
Besides, you can try the fastest way to transfer files between two Synology NAS for smooth migration.
MultCloud Supports Clouds
-
Google Drive
-
Google Workspace
-
OneDrive
-
OneDrive for Business
-
SharePoint
-
Dropbox
-
Dropbox Business
-
MEGA
-
Google Photos
-
iCloud Photos
-
FTP
-
box
-
box for Business
-
pCloud
-
Baidu
-
Flickr
-
HiDrive
-
Yandex
-
NAS
-
WebDAV
-
MediaFire
-
iCloud Drive
-
WEB.DE
-
Evernote
-
Amazon S3
-
Wasabi
-
ownCloud
-
MySQL
-
Egnyte
-
Putio
-
ADrive
-
SugarSync
-
Backblaze
-
CloudMe
-
MyDrive
-
Cubby


