A Brief about Google Alerts and Why Disable It
Google Alerts is designed to be a convenient way to keep track of relevant information without having to manually search for it. Whenever new information related to your specific search terms appears online, you will receive notifications. But if you find that the alerts are cluttering your inbox or becoming irrelevant, you may want to consider disabling them.
How Google Alerts can be a burden:
- Overwhelming Volume: If you've created too many alerts, your inbox can quickly become flooded with notifications, making it difficult to find important emails.
- Irrelevant Content: Over time, your interests may change, and the alerts you initially set up may no longer be relevant. This can lead to a cluttered inbox and wasted time.
- Privacy Concerns: Some people may be concerned about the amount of personal information that Google collects through their alerts.
Benefits of disabling unnecessary alerts:
- Declutter Your Inbox: Reduce the number of emails you receive, making it easier to find important messages.
- Improve Focus: Avoid distractions from irrelevant notifications and stay focused on your tasks.
- Protect Your Privacy: Limit the amount of data Google collects about your interests.
How to Turn Off Google Alerts in Gmail for a Clutter-Free Inbox
Disabling Google Alerts can help you declutter your Gmail inbox and focus on the messages that matter most to you. Here's a step-by-step guide on how to turn off these alerts:
Way 1. Disable Google Alerts in Gmail
Step 1. Access Google Alerts: Go to the Google Alerts website (alerts.google.com) and log in with your Google account.
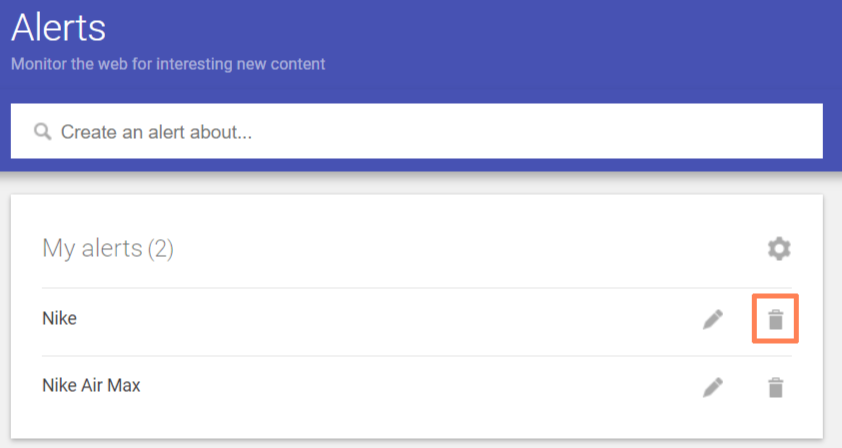
Step 2. Manage Your Alerts: Click on the "Manage" button to view your active alerts.
Step 3. Select the Alert: Choose the specific alert you want to disable.
Step 4. Disable the Alert: Click on the "Delete" button next to the alert.This will permanently disable the alert and stop sending notifications to your Gmail inbox.
Way 2. Disable Desktop Notification in Gmail
Apart from deleting the alert in the website, we can also manually turn off the desktop notification in Gmail Setting.
Step 1. On your computer, open Gmail.
Step 2. In the top right, click Settings -> See all settings.
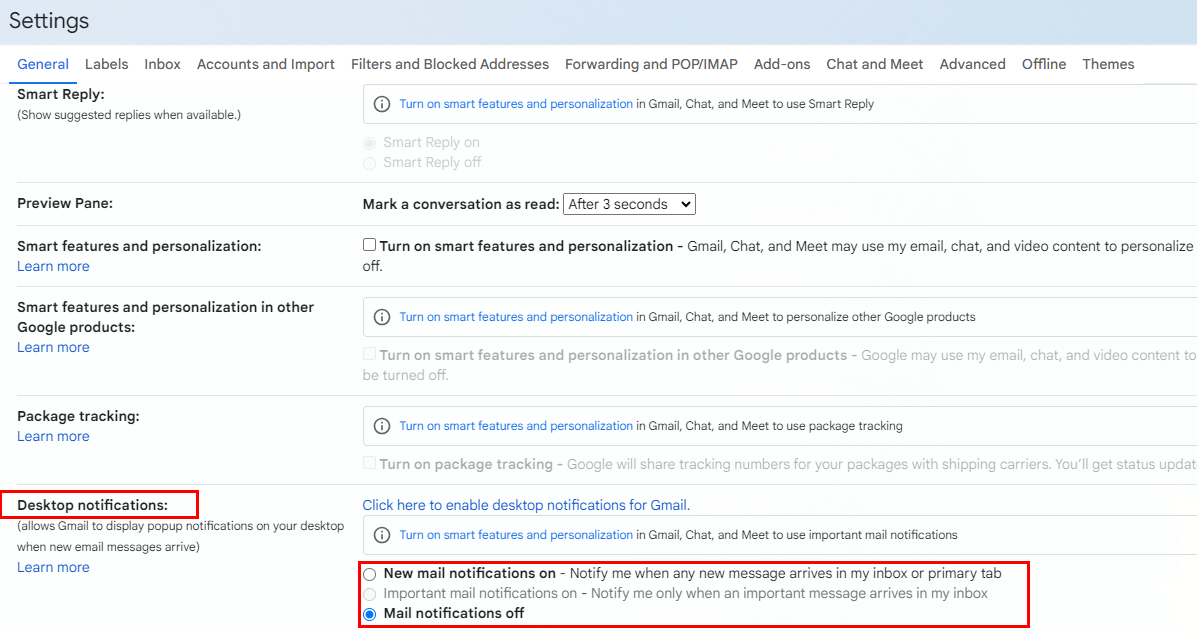
Step 3. In the "General" Tab, scroll down to the "Desktop notifications" section.
Step 4. Select New mail notifications on, or Mail notifications off.
Step 5. At the bottom of the page, click Save Changes.
Common Issues When Trying to Stop Google Alerts in Gmail
Although the steps of turning of Google alert and notification seem to be simple, some unexpected common issues you might encounter. Below are some examples and how to tackle with them effectively based on others' experience:
- Network Connectivity: Ensure that you have a stable internet connection when trying to manage Google Alerts. A poor connection can cause errors or prevent you from accessing the service.
- Alert Frequency: If you're still receiving alerts despite deleting them, check the alert frequency settings. Some alerts may be set to send notifications daily or weekly, even after they've been marked as deleted. To disable the alert completely, ensure that the frequency is set to "Never."
- Multiple Accounts: If you have multiple Google accounts, it's possible that an alert from one account might be appearing in another. Verify that you're logged into the correct account when managing your alerts.
- Browser Extensions: Some browser extensions can interfere with Google Alerts. Try disabling any relevant extensions to see if this resolves the issue.
Bonus Tip: How to Manage and Back up Gmail Emails
This article addresses the question “how to turn off google alerts in Gmail?”. If you’re considering backing up your Gmail, MultCloud can be extremely useful. Trusted by over 3 million users, MultCloud is a multi-cloud management tool that facilitates the transfer or synchronization of files between various cloud services.
For instance, you can save your Gmail emails as PDFs to your computer or cloud drives, such as Google Drive, OneDrive, or Dropbox, in bulk. MultCloud also enables you to access and manage all your cloud or Email accounts via a single application. Currently, it supports more than 30 different cloud services, including Google Drive, OneDrive, Dropbox, Box, Google Photos, iCloud Photos, FTP, WebDav, and more.

- Email Migration: Convert emails to PDF and save to local or even cloud.
- Cloud Transfer: Move one cloud data to another without download and re-upload.
- Cloud Sync: Sync data across clouds seamlessly in real time.
- Cloud Backup: Dynamically backup and restore files between clouds.
- Share: Private and password protect share cloud data to others.
- Automatic: Set up a schedule to make task automatically run as preferred.
- Offline: Transfer, sync or backup cloud data online without going through local.
- Efficient: Access and manage all your clouds with a single login.
MultCloud Supports Clouds
-
Google Drive
-
Google Workspace
-
OneDrive
-
OneDrive for Business
-
SharePoint
-
Dropbox
-
Dropbox Business
-
MEGA
-
Google Photos
-
iCloud Photos
-
FTP
-
box
-
box for Business
-
pCloud
-
Baidu
-
Flickr
-
HiDrive
-
Yandex
-
NAS
-
WebDAV
-
MediaFire
-
iCloud Drive
-
WEB.DE
-
Evernote
-
Amazon S3
-
Wasabi
-
ownCloud
-
MySQL
-
Egnyte
-
Putio
-
ADrive
-
SugarSync
-
Backblaze
-
CloudMe
-
MyDrive
-
Cubby


