Preface
When it comes to managing your digital photos, Google Photos is a popular app for storing and organizing your special moments. However, its built-in automatic features can sometimes have unexpected results, especially when it comes to storage limitations and privacy protections. This guide will explore many reasons to turn off Google Photos auto-upload and provide methods that work across devices.
Why Stop Google Photos from Automatically Uploading?
Users may want to find a way to prevent Google Photos from auto-uploading their photos for some effective reasons. Below, we will look at some of the key ones.
- Optimizing Storage Usage: At first glance, Google's free storage (15GB) will soon be filled with high-resolution photos and videos. Disabling auto-upload gives users more control over their storage capacity and meets their needs.
- Save Cellular Data: Using a cellular data connection to upload photos allows you to quickly use up valuable data. Disabling auto-upload prevents random data usage and ensures that uploads only happen when connected to a Wi-Fi network.
- Data Security: Not all photos should be stored in the cloud. If auto-upload is disabled, users have complete control over the content uploaded to Google Photos. This is an added layer of privacy control.
- Managing Selective Collections: For photo backups, some users will choose Selective Collections. Turning off auto-uploading allows you to carefully select the photos to store online and only show the most precious memories in Google Photos.
- Temporary Photo Processing: Sometimes photos capture fleeting moments that you don't intend to keep forever. If you turn off auto-uploading, these random photos will not be uploaded to Google Photos and can save valuable cloud storage space.
- Prevent Duplicate Data: Automatically uploading photos from Google Photos can cause unnecessary duplication if you have backups from elsewhere. Turning off auto-uploading will simplify your saving plan and eliminate unnecessary risks.
- Maintaining Internet Bandwidth: Auto-uploading can disrupt online browsing and other activities on limited bandwidth platforms. When auto-uploading is disabled, it will only upload when there is sufficient Internet bandwidth.
How to Stop Google Photos from Automatically Uploading
Now that you know why auto-uploading should be disabled, let's see how you can do it on different devices.
Solution 1: Turn off Auto-upload on Mobile Devices
This method will fix the problem directly from your smartphone. Here's how to prevent Google Photos from automatically uploading to your iPhone or Android device:
Android:
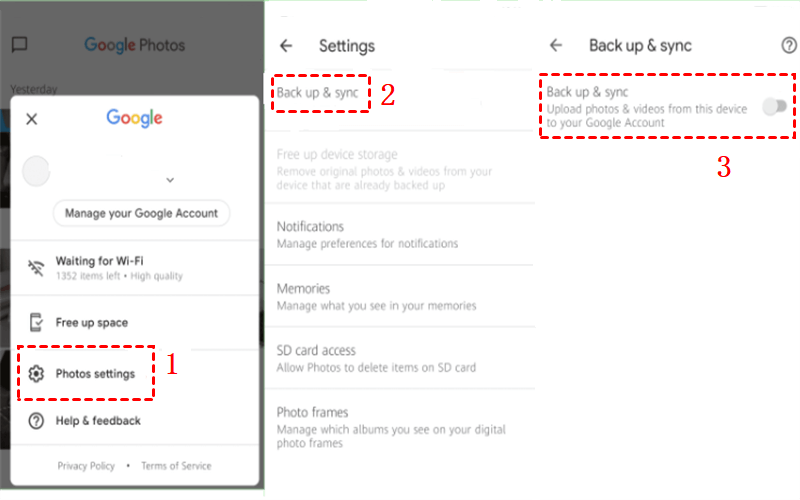
1. Open the Google Photos app.
2. Go to the top right corner of the screen and tap on your default photo or profile picture.
3. Select "Photo settings" before turning on "Back up & sync".
4. Find the switch next to "Back up & sync" and then toggle it back to the off position to turn it off.
iPhone:
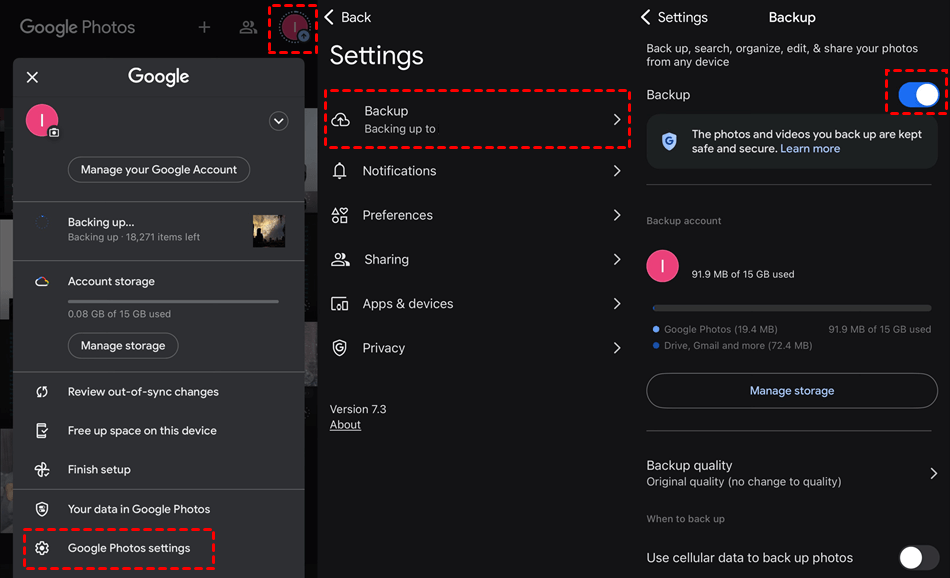
1. Open the Google Photos app.
2. Click on your default photo or profile picture in the top right corner.
3. Select "Google Photos settings" and then "Backup".
4. Find the switch next to "Backup" and then toggle it back to the off position to turn it off.
Tip: After turning off auto-upload, consider whether you can manually upload and save some photos to Google Photos.
Solution 2: Pause Automatically Backup and Sync on Desktop
If you're using Google Drive on your desktop (Drive for Desktop), this will prevent automatic uploads of Google Photos
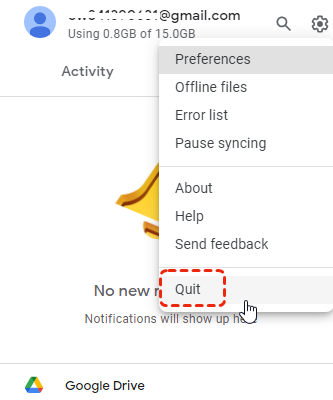
1. Tap the Google Drive app icon in the menu bar (Mac) or taskbar (Windows).
2. Click on the gear icon and select "Quit".
3. This will temporarily stop all files uploaded to Google Photos on your computer.
Solution 3: Stop Google Drive Backing up Desktop Photos
If you have Drive for Desktop on your computer, you can also choose to not sync desktop photos and videos to Google.
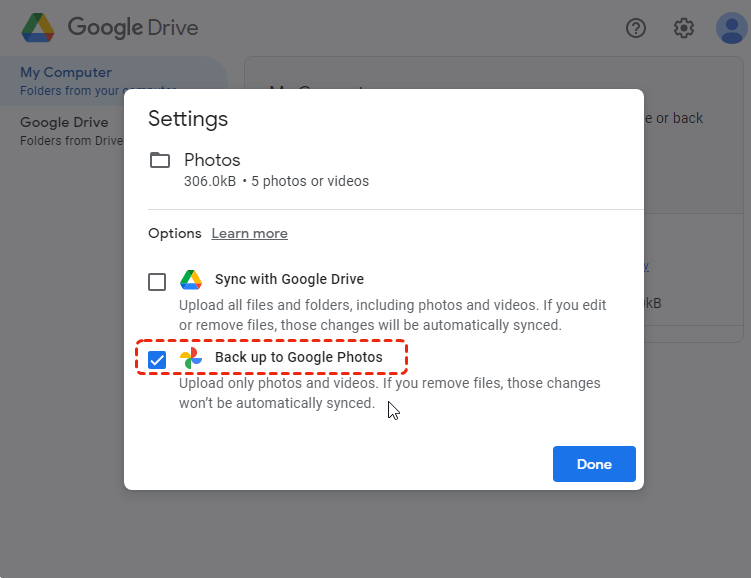
1. Open the Drive for Desktop app on your computer.
2. Click the gear icon and choose "Preferences" in the dropdown menu.
3. Choose the "My Computer" section and click "Google Drive". Then, uncheck the "Back up to Google Photos" option and your computer photos and videos will not be uploaded to Google Photos automatically.
Solution 4: Turn off Automatic Uploads for Specific Folders (Only for Android)
Let's take a look at a situation where you want to stop your Android device from automatically uploading files to a specific folder. Here's how this happens:
1. Open the Google Photos app.
2. Tap on the "Library" tab at the bottom of the screen.
3. Select "Folders" and find the files you want to turn off automatic uploads.
4. Tap on the folder and select "Show folder device view".
5. Open the file manager on your device, find the Folders feature, and uncheck "Auto backup" (the exact words may differ based on your device).
Tip: Unfortunately, iPhones currently don't allow you to turn off automatic uploads for specific folders.
Beyond Disabling: Advanced Techniques and Considerations
While turning off automatic uploads is a useful tool, it's not the only management option for Google Photos. Here are some special tricks and things to consider:
1. Use the Data Storage Manager tool
You can make the most of your storage space. The Google Photos Storage Manager tool doesn't completely turn off automatic uploads. Here's how to do it.
► The "High Quality" upload option saves a lot of storage space by slightly reducing the image resolution. However, it maintains a quality that most users can accept.
► The "Free Up Space" tool can remove files from your device's storage while maintaining online access. It does this by recognizing what photos and videos were previously backed up.
2. Use Non-traditional Backup Options
There are probably other options for backing up photos besides Google Photos. Consider these possibilities.
► Local storage: Despite the full control and offline access, backing up images directly to your device's internal storage or external SD card is less convenient than cloud storage.
► Other cloud storage services: Consider other cloud storage companies that offer image backup features, such as backing up photos to Dropbox or OneDrive.
3. Scheduling Uploads
Automatic uploads are convenient, but they may not always be the best option. Consider these options.
► Upload photos manually: When using Wi-Fi, upload your photos manually to ensure you have control over what happens when you upload.
► Specified uploads: You can set a specific time for uploads to occur in a third-party app with a specified upload feature.
Bonus Tip: Transfer or Sync Files between Google Photos and Other Cloud Services
This article addresses the question "How to stop Google Photos from automatically uploading". If you're considering migrating files from your current cloud service to Google Photos, or vice versa, MultCloud can be extremely useful. Trusted by over 3 million users, MultCloud is a multi-cloud management tool that facilitates the transfer or synchronization of files between various cloud services.
For instance, it allows for seamless file transfers from cloud drives like Google Photos to iCloud Photos without the need to download and then re-upload files. MultCloud also enables you to access and manage all your cloud accounts via a single application. Currently, it supports more than 30 different cloud services, including Google Drive, OneDrive, Dropbox, Box, Google Photos, iCloud Photos, FTP, WebDAV, and more.

- Cloud Transfer: MultCloud can transfer files from one cloud service to another directly without downloading and re-uploading.
- Cloud Sync: With MultCloud, you can easily sync two folders between different cloud services in real-time.
- Cloud Backup: You can backup and restore data between different cloud services automatically.
- Instagram Downloader: MultCloud can help you download Instagram videos, photos, reels, and stories to local device or remotely upload them to your clouds.
- Email Migration: You can directly back up and save Gmail emails as PDFs to your computer or cloud drive in bulk.
- Manage all cloud accounts in one place: Connect all your clouds to MultCloud and you'll find it so easy to access and manage multiple cloud storage files with a single login.
Conclusion
The best solution on how to stop Google Photos from automatically uploading depends on your needs and preferences. Learn why automatic uploads should be turned off and explore the different options. Manage your photo storage and see if Google Photos can help you instead of compromising your digital photo management plan. Remember, there is no one-size-fits-all approach. Use a variety of methods and find the balance that works best for you. Keep your priceless memories safe and easily accessible.
MultCloud Supports Clouds
-
Google Drive
-
Google Workspace
-
OneDrive
-
OneDrive for Business
-
SharePoint
-
Dropbox
-
Dropbox Business
-
MEGA
-
Google Photos
-
iCloud Photos
-
FTP
-
box
-
box for Business
-
pCloud
-
Baidu
-
Flickr
-
HiDrive
-
Yandex
-
NAS
-
WebDAV
-
MediaFire
-
iCloud Drive
-
WEB.DE
-
Evernote
-
Amazon S3
-
Wasabi
-
ownCloud
-
MySQL
-
Egnyte
-
Putio
-
ADrive
-
SugarSync
-
Backblaze
-
CloudMe
-
MyDrive
-
Cubby


