Understanding Vacation Settings in Outlook
Vacation Settings, commonly referred to as Automatic Replies in Microsoft Outlook, allow you to inform people that you are unavailable to respond to emails during a specific period. This feature is especially useful for vacations, holidays, or extended absences. By enabling vacation notifications in Outlook, you can:
- Set Clear Expectations: Inform your contacts that you'll be unavailable, preventing unnecessary follow-ups and ensuring they know when to expect a response.
- Maintain Professionalism: Provide a polite and informative message, leaving a positive impression on your contacts.
- Optimize Your Workload: Reduce the number of incoming messages and distractions during your time off, allowing you to truly relax and recharge.
How to Set Vacation on Outlook for Auto-Replies
To effectively set up a vacation responder on Outlook, follow these steps:
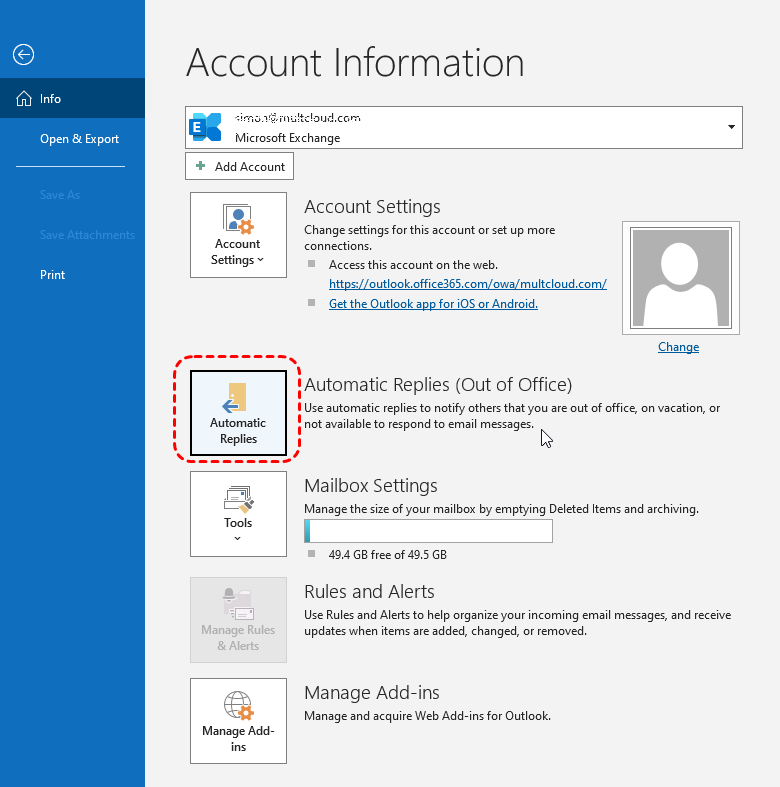
Step 1. Access the Options: Open Outlook and go to "File" > "Options."
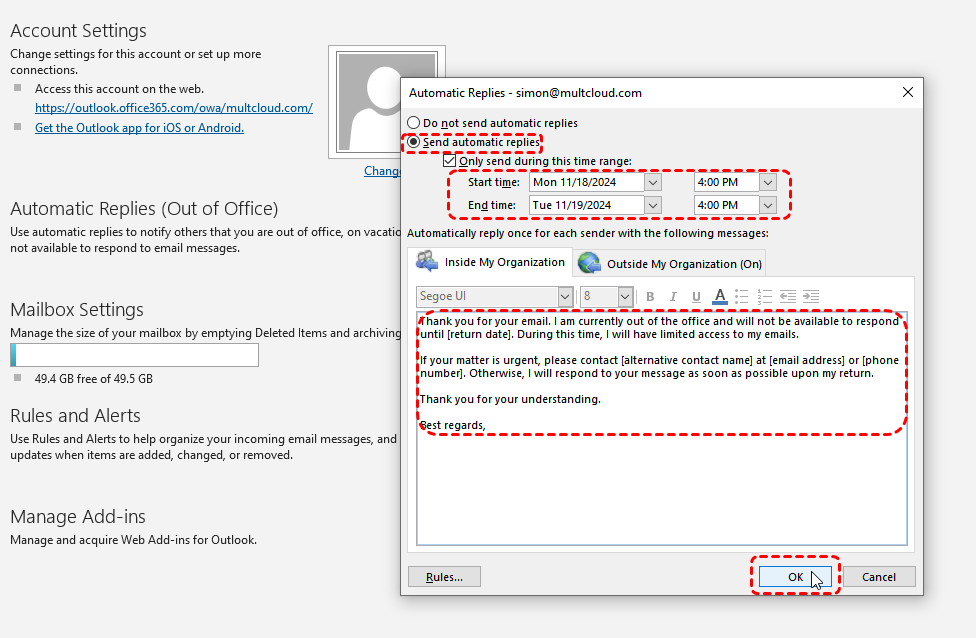
Step 2. Configure Auto-Reply: Select "Automatic Replies" and check the box to enable it.
Step 3. Set Start and End Dates: Specify the duration of your vacation.
Step 4. Compose Your Message: Craft a clear and concise message to be sent to your contacts. Include information about your absence, expected return date, and who to contact for urgent matters.
Step 5. Customize Replies: Choose whether to send replies to internal or external contacts or both. You can tailor your message to specific groups of people, such as colleagues or clients.
Step 6. Save and Enable: Click "OK" to save your settings and activate the vacation responder.
- ★Tips for Crafting Effective Vacation Messages:
- Be Clear and Concise: State your absence clearly and provide a specific return date.
- Provide Contact Information: If necessary, specify who to contact for urgent matters.
- Set Expectations: Indicate whether you'll be checking emails periodically or completely unavailable.
- Maintain a Professional Tone: Keep your message polite and professional.
Guide For those who are using New Outlook version
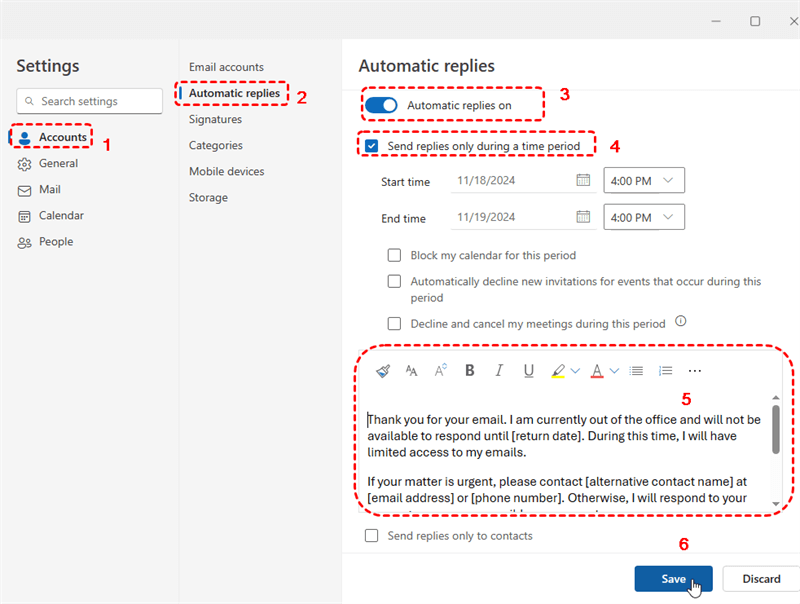
Step 1. Access Outlook Settings: Click on the gear icon on the top right corner of the Outlook interface.
Step 2. Select Automatic Replies: Choose "Automatic Replies" from the options.
Step 3. Enable Automatic Replies: Toggle the "Send automatic replies" button to the "On" position if it has been disabled.
Step 4. Specify a Time Range: Tick the box next to "Send replies during a time period" (which allows you to adjust the time range).
Step 5. Write the body message and click on "Save."
Best Practices for Seamless Communication During Time Off
To ensure a smooth transition and minimize disruptions, consider these best practices:
- Plan Ahead: Schedule important tasks, delegate responsibilities, and set up out-of-office messages before you leave.
- Clear Communication: Provide clear instructions to colleagues who will be handling your workload, including contact information for urgent matters.
- Limited Check-ins: If necessary, check your email or messages occasionally, but limit your availability to avoid stress and distractions.
- Relax and Recharge: Fully immerse yourself in your vacation, prioritizing rest, relaxation, and activities that rejuvenate you.
Bonus Tip: How to Manage and Back up Outlook Emails
This article explains “how to set vacation in Outlook?”. If you’re considering backing up your Outlook, MultCloud can be extremely useful. Trusted by over 3 million users, MultCloud is a multi-cloud management tool that facilitates the transfer or synchronization of files between various cloud services.
For instance, you can save your Outlook emails as PDFs to your computer or cloud drives, such as Google Drive, OneDrive, or Dropbox, in bulk. MultCloud also enables you to access and manage all your cloud or Email accounts via a single application. Currently, it supports more than 30 different cloud services, including Google Drive, OneDrive, Dropbox, Box, Google Photos, iCloud Photos, FTP, WebDav, and more.

- Cloud Transfer: MultCloud can transfer files from one cloud service to another directly without downloading and re-uploading.
- Cloud Sync: With MultCloud, you can easily sync two folders between different cloud services in real-time.
- Cloud Backup: You can backup and restore data between different cloud services automatically.
- Instagram Downloader: MultCloud can help you download Instagram videos, photos, reels and stories to local device or remotely upload them to your clouds.
- Email Migration: You can directly back up and save Gmail emails as PDFs to your computer or cloud drive in bulk.
- Manage all cloud accounts in one place: Connect all your clouds to MultCloud and you'll find it so easy to access and manage multiple cloud storage files with a single login.
MultCloud Supports Clouds
-
Google Drive
-
Google Workspace
-
OneDrive
-
OneDrive for Business
-
SharePoint
-
Dropbox
-
Dropbox Business
-
MEGA
-
Google Photos
-
iCloud Photos
-
FTP
-
box
-
box for Business
-
pCloud
-
Baidu
-
Flickr
-
HiDrive
-
Yandex
-
NAS
-
WebDAV
-
MediaFire
-
iCloud Drive
-
WEB.DE
-
Evernote
-
Amazon S3
-
Wasabi
-
ownCloud
-
MySQL
-
Egnyte
-
Putio
-
ADrive
-
SugarSync
-
Backblaze
-
CloudMe
-
MyDrive
-
Cubby


