What is Voting Buttons in Outlook
Voting buttons in Outlook are a convenient feature that allows you to gather quick feedback or make decisions within a group. By adding voting buttons to your emails, you can easily poll recipients and collect their responses directly in the email itself. This eliminates the need for lengthy email chains or separate surveys, saving time and effort for both you and your recipients.
When Need to Set Up Vote Buttons in Outlook
There are numerous scenarios where using voting buttons in Outlook can be beneficial:
- Quick Decision-Making: When you need to make a quick decision within a team, you can use voting buttons to gather input and reach a consensus. For example, you could use voting buttons to decide on a project deadline, choose a meeting time, or select a team leader.
- Gathering Feedback: You can use voting buttons to collect feedback on proposals, ideas, or project plans. For example, you could ask your team to vote on the best approach to a problem, or you could ask your clients to rate their satisfaction with a recent project.
- Scheduling Meetings: You can use voting buttons to poll recipients about their availability for a meeting and find a suitable time for everyone. This can save time and reduce the back-and-forth of scheduling meetings.
- Survey Responses: You can use voting buttons to create simple surveys and collect responses from your recipients. For example, you could use voting buttons to gather feedback on a new product idea or to assess employee satisfaction.
How to Set Up Voting Buttons in Outlook 365 [Classic]
To set up voting buttons in the classic version of Outlook 365, follow these steps:
Step 1. Create a New Email: Start by creating a new email message.
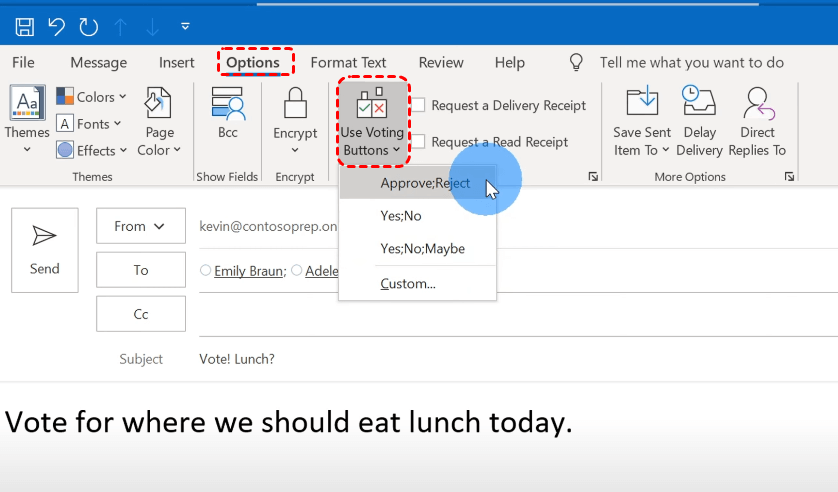
Step 2. Insert a Vote Button: Click the "Options" tab, then Select "Using Voting Buttons" and choose "Custom."
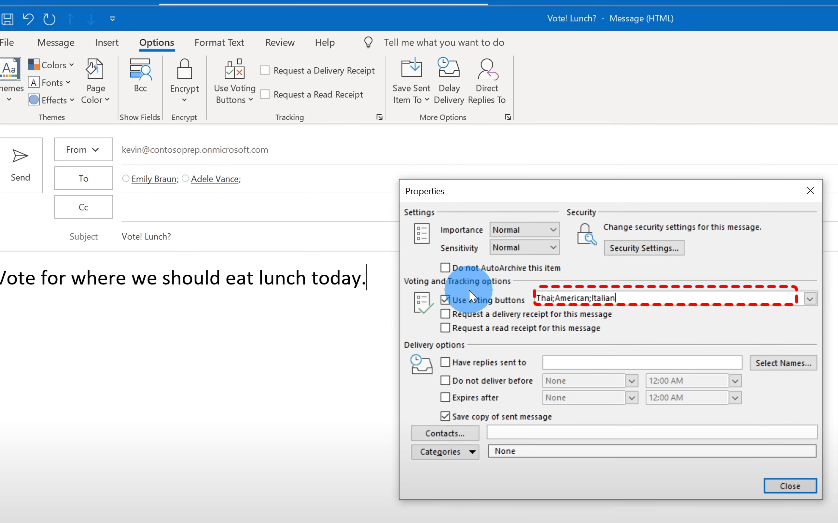
Step 3. Customize Your Voting Options: You can freely name your voting options based on your situation. Or you can directly use the default options if they are perfect for your requirements.
Step 4. Send the Email: Once you've customized the voting options, click "Close" in the Voting Properties window and send the email to your recipients.
Once the recipients receive the email, she or he will be informed by "this message includes voting..." and then vote the options. And you can check the results in the sent email.
How to Set Up Voting Buttons in Outlook 365 [New]
The process of setting up voting buttons in the new version of Outlook 365 is slightly different, we need to turn to the "Poll" feature, instead of "Using Voting Button".
Step 1. Create a New Email: Compose a new email message.
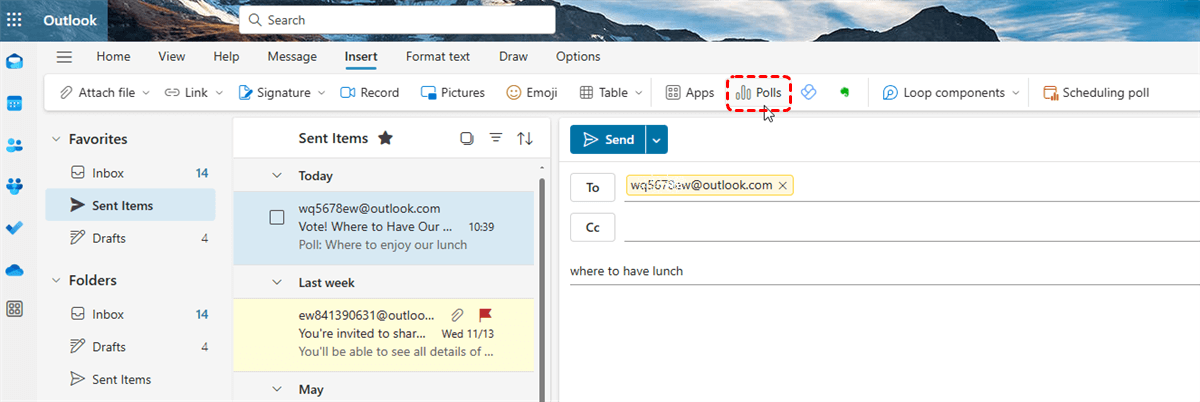
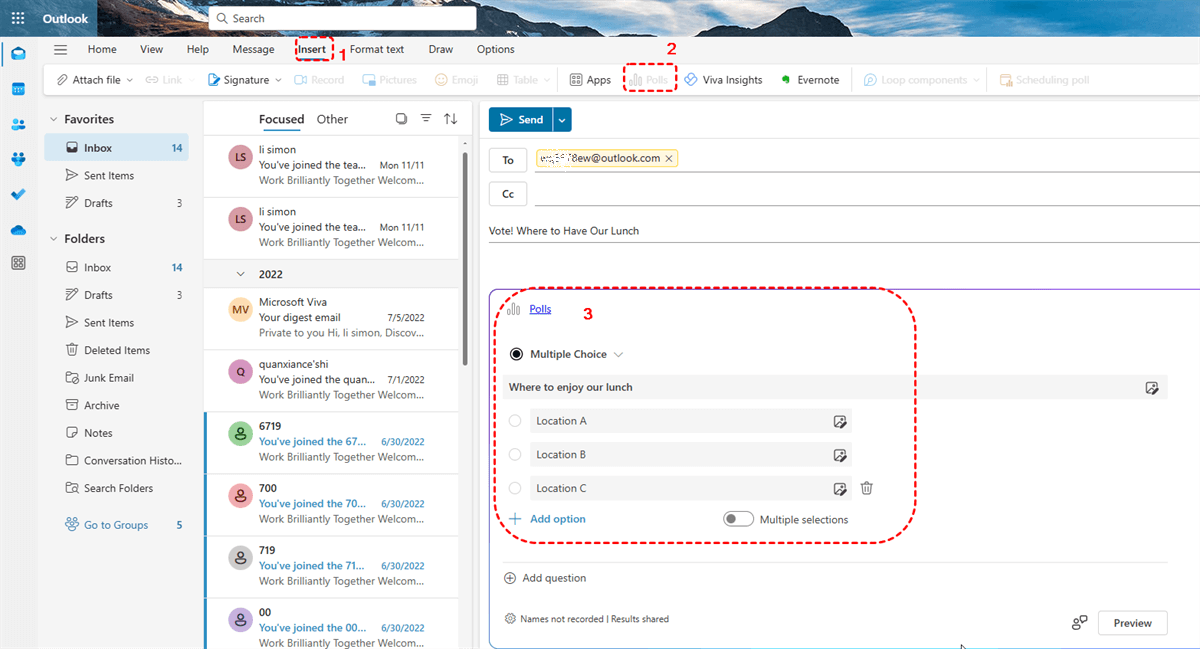
Step 2. Choose "Polls": Click on "Insert" tab and then choose "Polls" button.
Step 3. Then the Polls section will automatically insert into your body message box. Now, you can edit the options as you need.
Step 4. Send the Message: Once you've customized the voting options, send the email to your recipients.
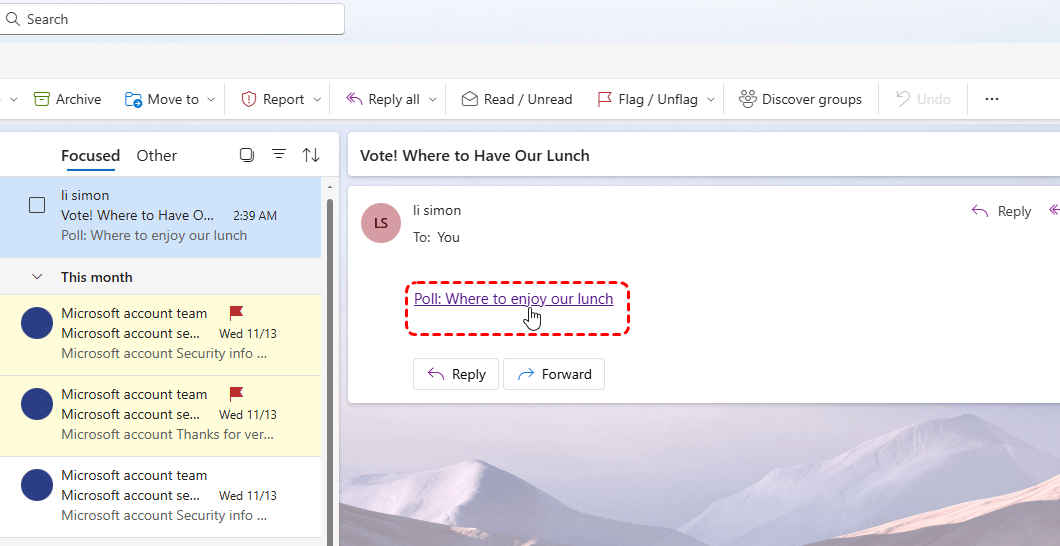
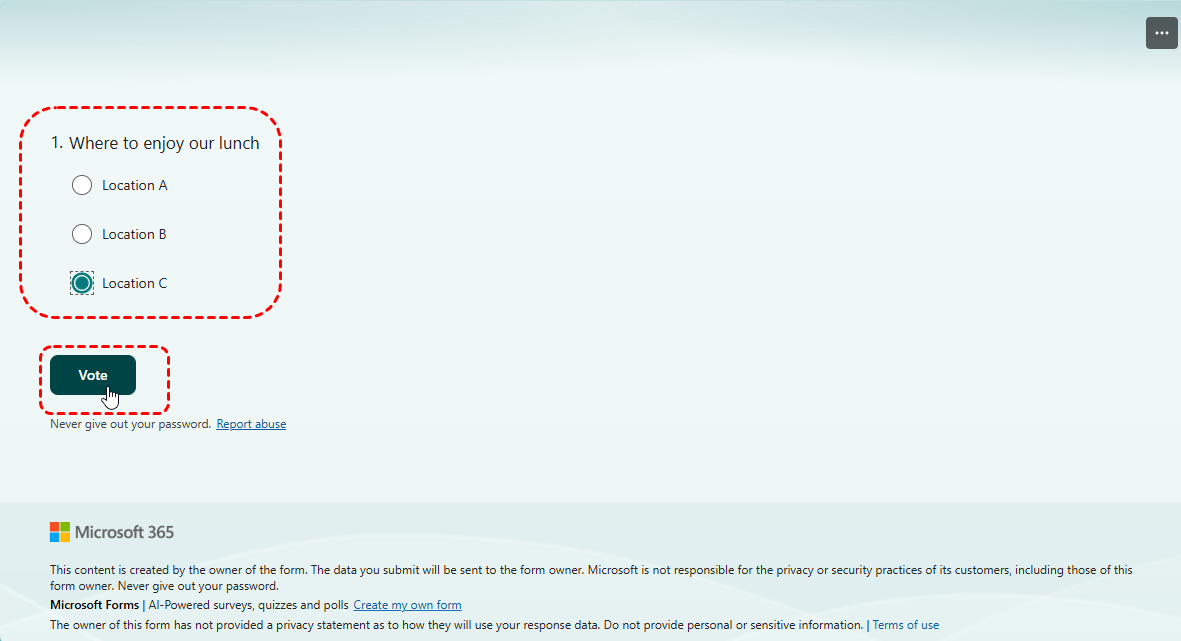
When the recipients get the messages, she or he can click on the Polls link and then submit the poll in the new window.
Conclusion
Voting buttons in Outlook are a powerful tool for efficient decision-making and feedback collection. By understanding how to set up and use voting buttons effectively, you can streamline your workflow and improve collaboration within your team or organization.
Bonus Tip: How to Manage and Back up Outlook Emails
This article addresses the question “how to set up voting buttons in Outlook?”. If you’re considering backing up your Outlook, MultCloud can be extremely useful. Trusted by over 3 million users, MultCloud is a multi-cloud management tool that facilitates the transfer or synchronization of files between various cloud services.
For instance, you can save your Outlook emails as PDFs to your computer or cloud drives, such as Google Drive, OneDrive, or Dropbox, in bulk. MultCloud also enables you to access and manage all your cloud or Email accounts via a single application. Currently, it supports more than 30 different cloud services, including Google Drive, OneDrive, Dropbox, Box, Google Photos, iCloud Photos, FTP, WebDav, and more.

- Cloud Transfer: MultCloud can transfer files from one cloud service to another directly without downloading and re-uploading.
- Cloud Sync: With MultCloud, you can easily sync two folders between different cloud services in real-time.
- Cloud Backup: You can backup and restore data between different cloud services automatically.
- Instagram Downloader: MultCloud can help you download Instagram videos, photos, reels and stories to local device or remotely upload them to your clouds.
- Email Migration: You can directly back up and save Gmail emails as PDFs to your computer or cloud drive in bulk.
- Manage all cloud accounts in one place: Connect all your clouds to MultCloud and you'll find it so easy to access and manage multiple cloud storage files with a single login.
MultCloud Supports Clouds
-
Google Drive
-
Google Workspace
-
OneDrive
-
OneDrive for Business
-
SharePoint
-
Dropbox
-
Dropbox Business
-
MEGA
-
Google Photos
-
iCloud Photos
-
FTP
-
box
-
box for Business
-
pCloud
-
Baidu
-
Flickr
-
HiDrive
-
Yandex
-
NAS
-
WebDAV
-
MediaFire
-
iCloud Drive
-
WEB.DE
-
Evernote
-
Amazon S3
-
Wasabi
-
ownCloud
-
MySQL
-
Egnyte
-
Putio
-
ADrive
-
SugarSync
-
Backblaze
-
CloudMe
-
MyDrive
-
Cubby
