What Are Quick Steps and Why Are They Useful?
Quick Steps are customizable actions in Outlook that streamline your workflow by automating repetitive tasks. They allow you to perform multiple actions with a single click, saving you time and effort. By using Quick Steps, you can:
- Increase Efficiency: Automate repetitive tasks like flagging, moving, or replying to emails.
- Reduce Errors: Minimize mistakes by automating error-prone actions.
- Customize Your Workflow: Tailor Quick Steps to your specific needs and preferences.
- Improve Productivity: Focus on more important tasks by delegating routine actions to Quick Steps.
Step-by-Step Guide to Set Up Quick Steps in Outlook
In this section, you will learn how to set "Quick Steps" in both classic and new Outlook version.So, no matter whichever you are using now, we will get your requirements covered.
For Classic Outlook
Step 1. Access the Quick Steps Menu: In the Home tab, locate the Quick Steps group. Click the small arrow to expand the menu.
Step 2. Create a New Quick Step: Click "New Quick Step" to open the Create New Quick Step dialog box.
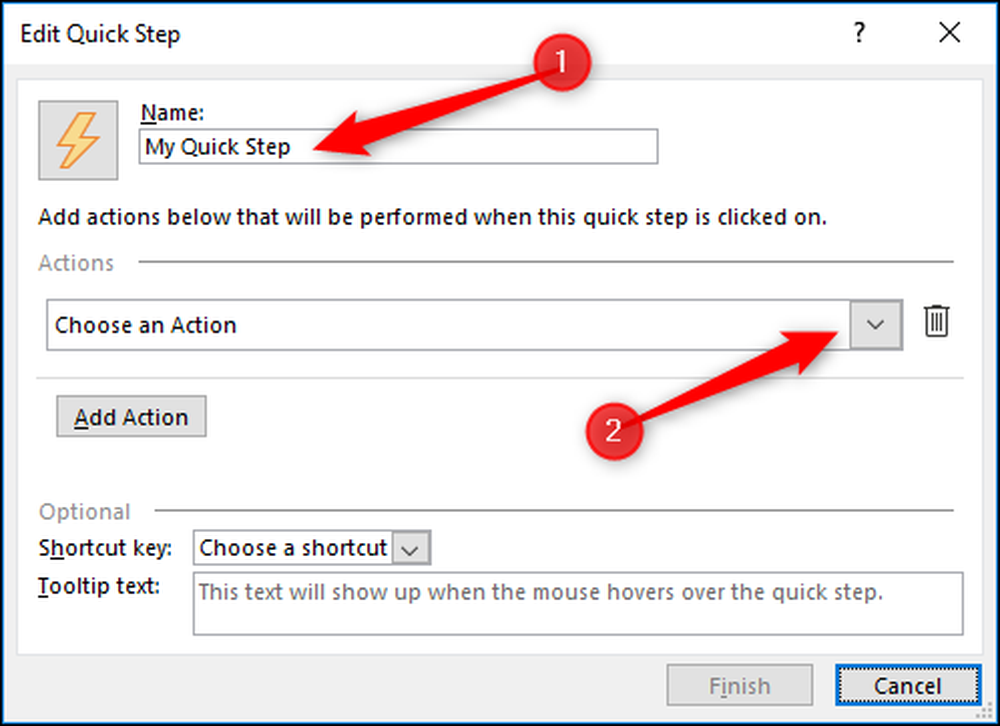
Step 3. Name the New Quik Step: In the "Name" box, type a name for the new quick step.
Step 4. Choose an Icon: Select the icon button next to the Name box, select an icon, and then select OK. (Optional: To create a keyboard shortcut, in the Shortcut key box, select the keyboard shortcut that you want to assign.)
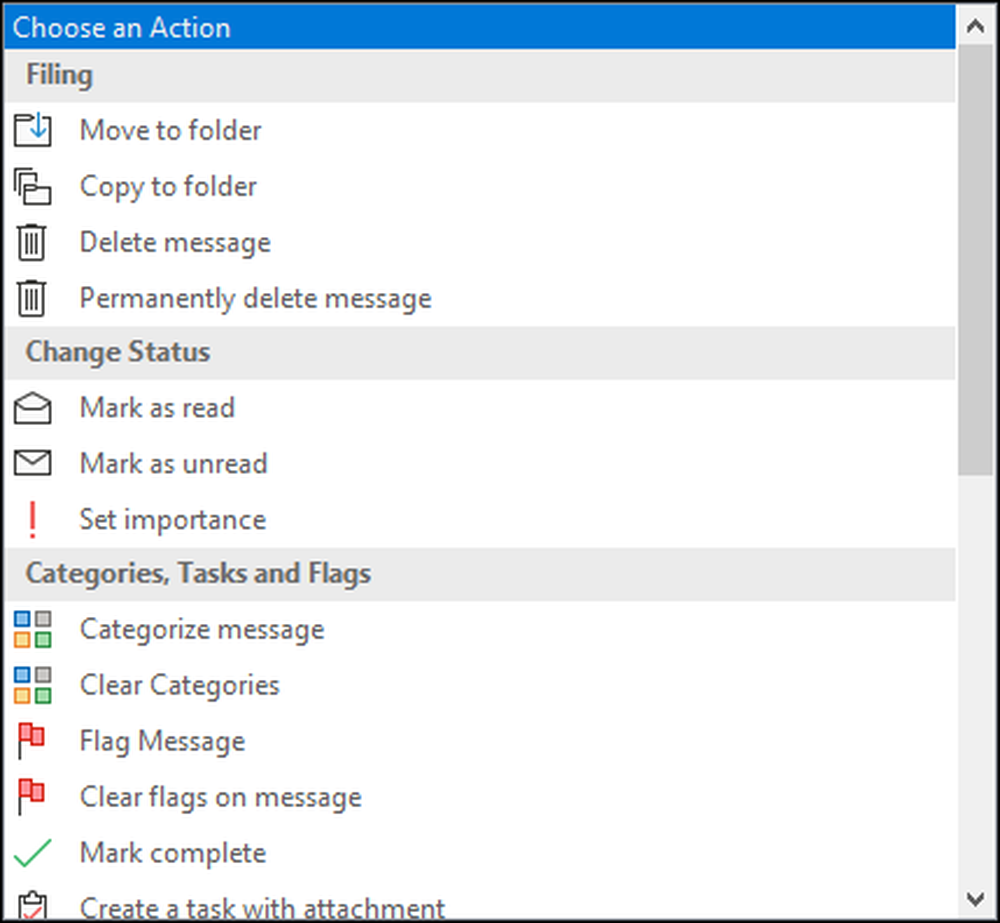
Step 5. Choose an Action:Under "Actions", choose an action that you want the quick step to do:
- Flagging emails
- Moving emails to specific folders
- Copying emails Replying to emails
- Forwarding emails
- Categorizing emails
- Marking emails as read or unread
- Creating tasks from emails
Step 6. Click "OK" to save the new Quick Step.
For New Outlook
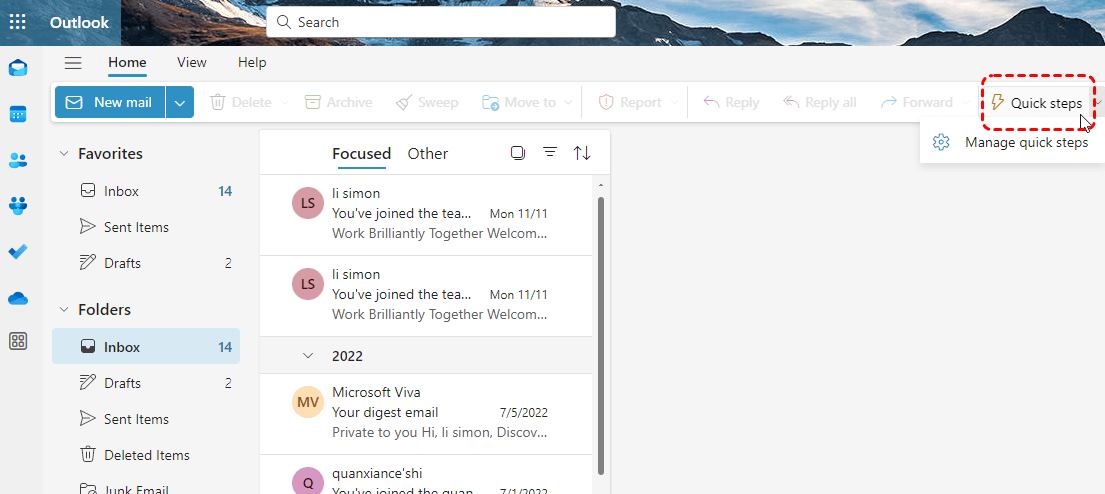
Step 1. In new Outlook, select Mail from the navigation pane.
Step 2. From the Home tab, select the drop-down menu next to Quick steps and select Manage quick steps.
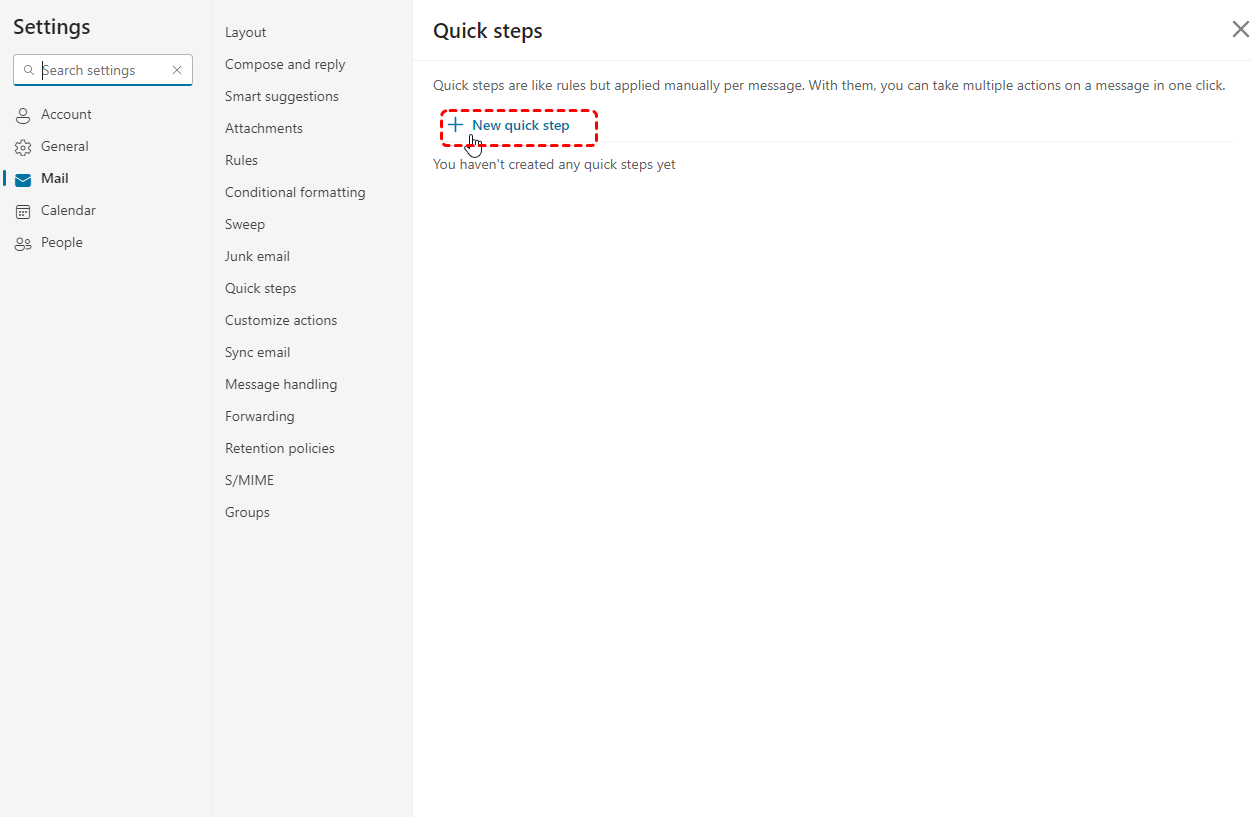
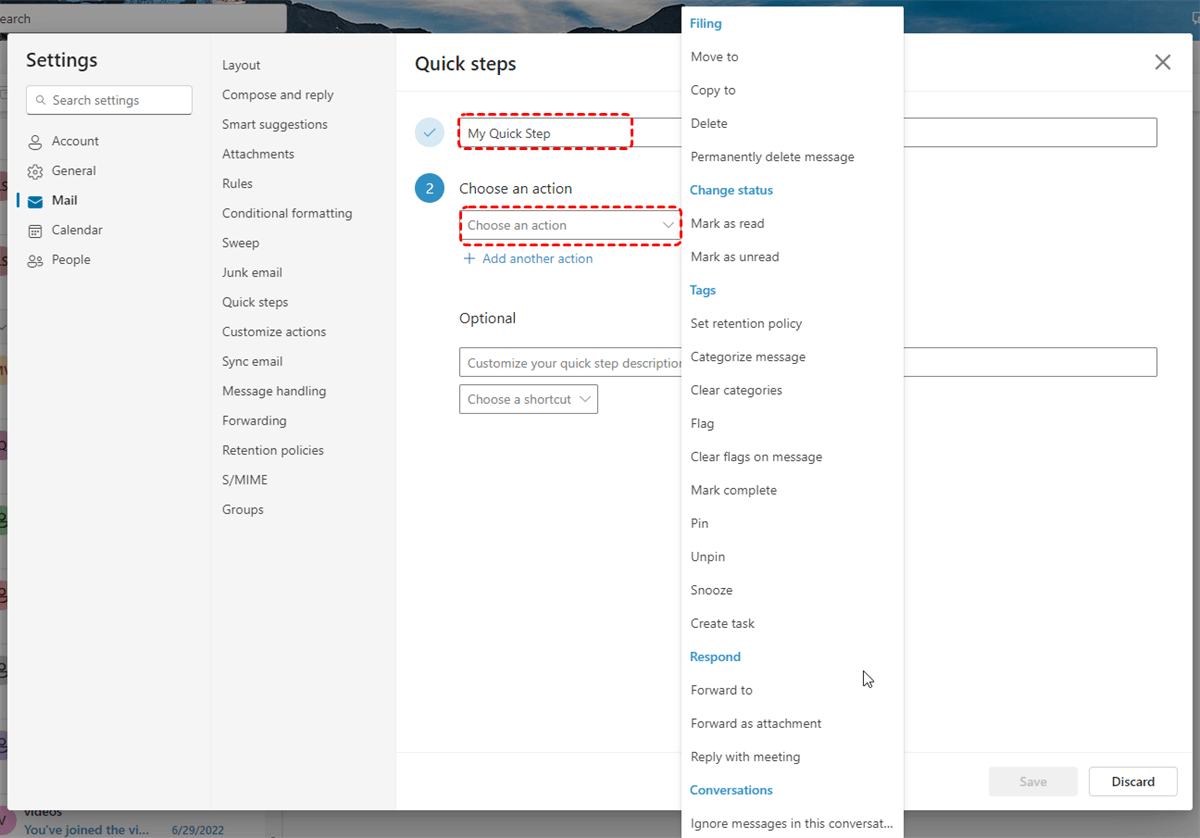
Step 3. In the Settings window, under Quick steps, select +New quick step.
Step 4. Then type a name for the new Quick Step to manifest its purpose.
Step 5. Under Choose an action, select the action that you want the Quick step to do. You can choose more than 1 action at the same time, just click on Add another action.
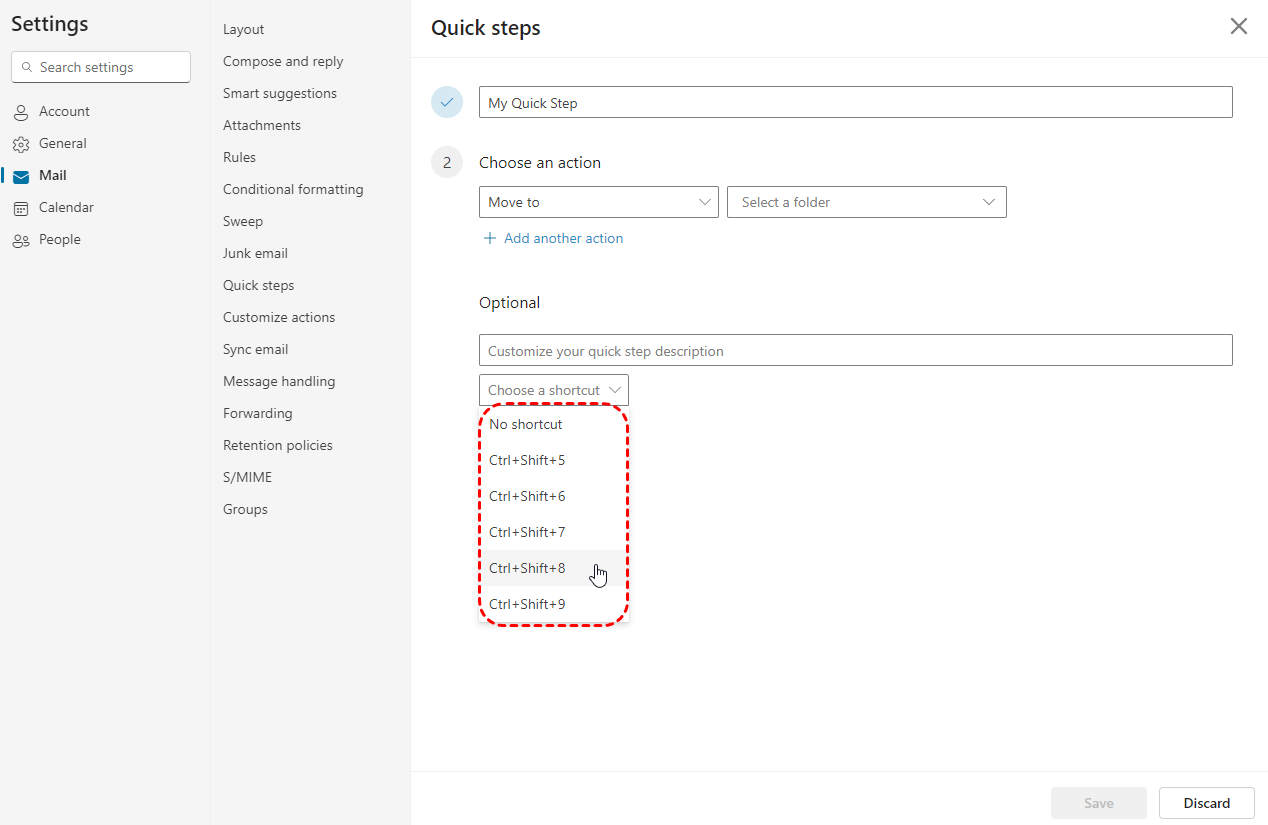
Step 6. (Optional): You can add a description to Customize your quick step. Besides, you can create an optional keyboard shortcut for the new quick step.
Step 7. Click Save.
Personalizing Quick Steps for Different Scenarios
To tailor Quick Steps to your specific needs, consider the following:
- Customize Keyboard Shortcuts: Assign keyboard shortcuts to frequently used Quick Steps for faster access.
- Create Multiple Quick Steps: Create Quick Steps for different scenarios, such as work, personal, or specific projects.
- Experiment with Different Actions: Combine multiple actions into a single Quick Step to streamline complex tasks.
- Share Quick Steps: Share your custom Quick Steps with colleagues to improve team efficiency.
By mastering Quick Steps, you can significantly enhance your productivity and efficiency in Outlook. By automating repetitive tasks and streamlining your workflow, you can focus on more important tasks and reduce stress.
Bonus Tip: How to Manage and Back up Outlook Emails
This article addresses the question “how to set up quick steps in Outlook?”. If you’re considering backing up your Outlook, MultCloud can be extremely useful. Trusted by over 3 million users, MultCloud is a multi-cloud management tool that facilitates the transfer or synchronization of files between various cloud services.
For instance, you can save your Outlook emails as PDFs to your computer or cloud drives, such as Google Drive, OneDrive, or Dropbox, in bulk. MultCloud also enables you to access and manage all your cloud or Email accounts via a single application. Currently, it supports more than 30 different cloud services, including Google Drive, OneDrive, Dropbox, Box, Google Photos, iCloud Photos, FTP, WebDav, and more.

- Cloud Transfer: MultCloud can transfer files from one cloud service to another directly without downloading and re-uploading.
- Cloud Sync: With MultCloud, you can easily sync two folders between different cloud services in real-time.
- Cloud Backup: You can backup and restore data between different cloud services automatically.
- Instagram Downloader: MultCloud can help you download Instagram videos, photos, reels and stories to local device or remotely upload them to your clouds.
- Email Migration: You can directly back up and save Gmail emails as PDFs to your computer or cloud drive in bulk.
- Manage all cloud accounts in one place: Connect all your clouds to MultCloud and you'll find it so easy to access and manage multiple cloud storage files with a single login.
MultCloud Supports Clouds
-
Google Drive
-
Google Workspace
-
OneDrive
-
OneDrive for Business
-
SharePoint
-
Dropbox
-
Dropbox Business
-
MEGA
-
Google Photos
-
iCloud Photos
-
FTP
-
box
-
box for Business
-
pCloud
-
Baidu
-
Flickr
-
HiDrive
-
Yandex
-
NAS
-
WebDAV
-
MediaFire
-
iCloud Drive
-
WEB.DE
-
Evernote
-
Amazon S3
-
Wasabi
-
ownCloud
-
MySQL
-
Egnyte
-
Putio
-
ADrive
-
SugarSync
-
Backblaze
-
CloudMe
-
MyDrive
-
Cubby
