About Device Removal from Gmail
Removing a device from your Gmail account is essential for security and privacy reasons. It helps prevent unauthorized access to your account, especially if you've lost or misplaced a device. By removing a device, you effectively terminate its connection to your Gmail account, ensuring that no one can use it to log in or access your email.
Main Reasons of Removing a Device from Gmail Account
- First, in consideration of security, removing the device can reduce potential security risks. If a device is no longer in use or is lost, removing it from your Google Account can prevent others from accessing your Google Account through the device, thereby protecting your personal information and account security.
- Secondly, privacy protection is also an important reason to remove the device. If a device is no longer needed to store or process sensitive personal information, removing it from your Google Account can prevent that information from being improperly accessed or disclosed.
- Finally, removing devices you no longer use can make account cleaner and easier to manage. If you have multiple devices associated with the same Google account, regularly cleaning out devices that are no longer in use can help you better control which devices can access your Google services.
Steps to Remove a Device from Your Gmail Account
In this section, we will show the detailed steps to remove a device from Gmail account on both computer and mobile device.
Remove a Device from Your Google Account Settings [Computer]
Step 1. Access Google Account Settings: Open your Gmail account on a web browser and click on your profile picture in the top right corner. Select "Google Account."
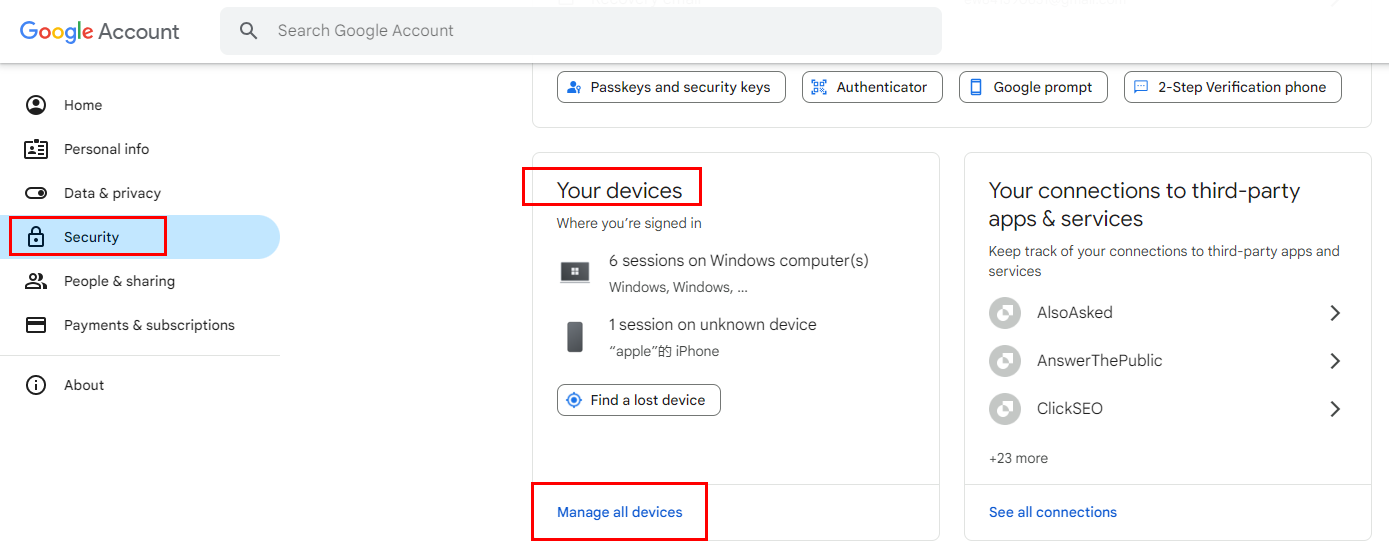
Step 2. Navigate to Security: In the "Google Account" menu, click on "Security."
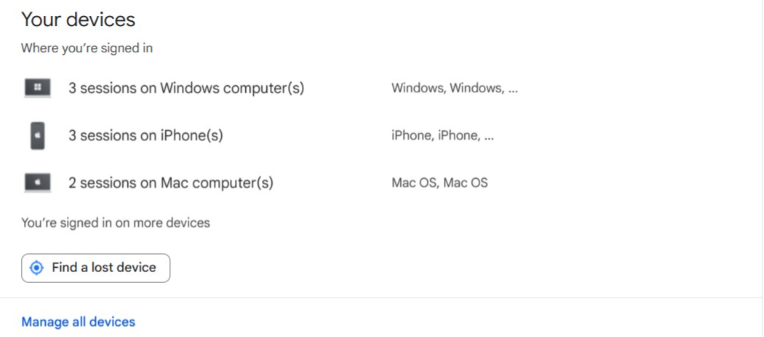
Step 3. Review Signed-in Devices: Under the "Signed-in devices" section, you'll see a list of devices that have recently accessed your account.
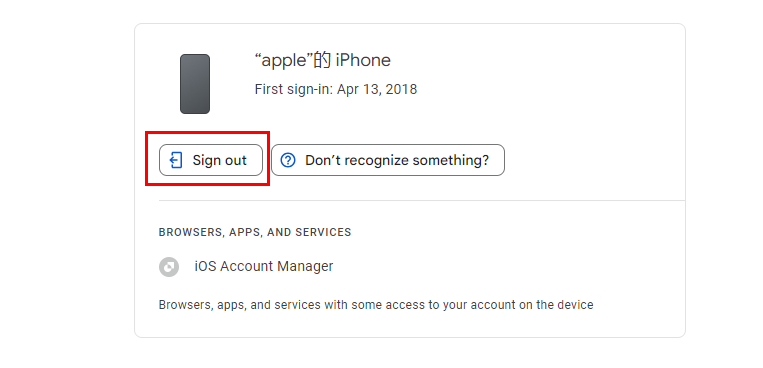
Step 4. Identify the Device to Remove: From the Your devices section, tap the Manage devices option. From the list of devices connected to your Google account shown, tap the three-dotted menu icon at the top corner of the device you want to remove from your Google account.
Step 5. Sign out the Device: Then select Sign out from the options displayed.
Remove a Device Using the Google Activity Page
Step 1. Access Google Activity: Visit the Google Activity page (https://myactivity.google.com/).
Step 2. Review Recent Activity: Scroll through your recent activity to find the device you want to remove.
Step 3. Remove the Device: Click on the device's activity and select "Remove."
Remove a Device from Your Google Account on Android
Step 1. Open Settings: On your Android device, go to "Settings."
Step 2. Select Google: Tap on "Google" or "Accounts."
Step 3. Choose Manage Accounts: Select "Manage accounts" or a similar option.
Step 4. Select Your Google Account: Tap on your Gmail account.
Step 5. Manage Devices: Look for a section related to "Devices" or "Security."
Step 6. Remove the Device: Identify the device you want to remove and click "Sign Out".
Remove a Device from Your Google Account on iOS
Step 1. Open Settings: On your iOS device, go to "Settings."
Step 2. Select Google: Tap on "Google."
Step 3. Choose Manage Accounts: Select "Manage accounts."
Step 4. Select Your Google Account: Tap on your Gmail account.
Step 5. Manage Devices: Look for a section related to "Devices" or "Security."
Step 6. Remove the Device: Identify the device you want to remove and follow the instructions to remove it.
Additional Tips for Device Removal
- Regularly Review Signed-in Devices: Check your signed-in devices periodically to ensure that only authorized devices are connected to your account.
- Enable Two-Factor Authentication: Adding an extra layer of security like two-factor authentication can help protect your account even if a device is compromised.
- Report Unauthorized Access: If you suspect that an unauthorized device is accessing your account, report it to Google immediately.
Summary
Whether you need to secure your emails or switch your device, you can successfully remove a Google Account from an iPhone, Android, or desktop device by following these steps and tips above. In most cases, simply access your profile through Gmail, and you’ll be able to manage your accounts following the steps we outlined earlier in this article.
Bonus Tip: How to Manage and Back up Gmail Emails
This article addresses the question “how to remove a device from Gmail account?”. If you’re considering backing up your Gmail, MultCloud can be extremely useful. Trusted by over 3 million users, MultCloud is a multi-cloud management tool that facilitates the transfer or synchronization of files between various cloud services.
For instance, you can save your Gmail emails as PDFs to your computer or cloud drives, such as Google Drive, OneDrive, or Dropbox, in bulk. MultCloud also enables you to access and manage all your cloud or Email accounts via a single application. Currently, it supports more than 30 different cloud services, including Google Drive, OneDrive, Dropbox, Box, Google Photos, iCloud Photos, FTP, WebDav, and more.

- Email Migration: Convert emails to PDF and save to local or even cloud.
- Cloud Transfer: Move one cloud data to another without download and re-upload.
- Cloud Sync: Sync data across clouds seamlessly in real time.
- Cloud Backup: Dynamically backup and restore files between clouds.
- Share: Private and password protect share cloud data to others.
- Automatic: Set up a schedule to make task automatically run as preferred.
- Offline: Transfer, sync or backup cloud data online without going through local.
- Efficient: Access and manage all your clouds with a single login.
MultCloud Supports Clouds
-
Google Drive
-
Google Workspace
-
OneDrive
-
OneDrive for Business
-
SharePoint
-
Dropbox
-
Dropbox Business
-
MEGA
-
Google Photos
-
iCloud Photos
-
FTP
-
box
-
box for Business
-
pCloud
-
Baidu
-
Flickr
-
HiDrive
-
Yandex
-
NAS
-
WebDAV
-
MediaFire
-
iCloud Drive
-
WEB.DE
-
Evernote
-
Amazon S3
-
Wasabi
-
ownCloud
-
MySQL
-
Egnyte
-
Putio
-
ADrive
-
SugarSync
-
Backblaze
-
CloudMe
-
MyDrive
-
Cubby


