What is Email Forwarding?
Email forwarding is a feature that allows users to forward received emails to one or more email addresses. This action does not alter the content of the original email but creates a new email that contains all the information from the original message. Users can freely choose whether to automatically forward all new emails to another email address or only forward specific types of new emails. This can be useful for various reasons, such as managing multiple accounts or keeping your inbox organized.
Why Setting Up Email Forwarding for Specific Senders in Gmail?
One common use case for email forwarding is to automatically forward emails from certain senders to a different address. This can be helpful for managing emails from specific contacts or organizations.
Reasons to forward emails from specific senders:
- Manage Spam: You can set up filters in Gmail to automatically forward emails from known spammers to a separate folder or label, ensuring your main inbox remains clutter-free. This helps you avoid unnecessary distractions and keeps your important emails front and center.
- Delegate Tasks: When managing tasks or projects, forwarding emails related to specific tasks to the appropriate team member can streamline communication. This ensures that the right person receives relevant information, helping your team stay organized and efficient.
- Create a Separate Archive: If you receive important emails from certain senders that you want to keep for future reference, you can forward them to a dedicated archive folder. This allows you to store valuable information in one place, making it easy to access when needed without sifting through your primary inbox.
How to Use Gmail to Forward Emails From Certain Senders
To set up automatic forwarding for emails from specific senders, follow these steps:
Steps to Automatically Forward Selected Emails in Gmail
1. Open your Gmail account: Log in to your Gmail account.
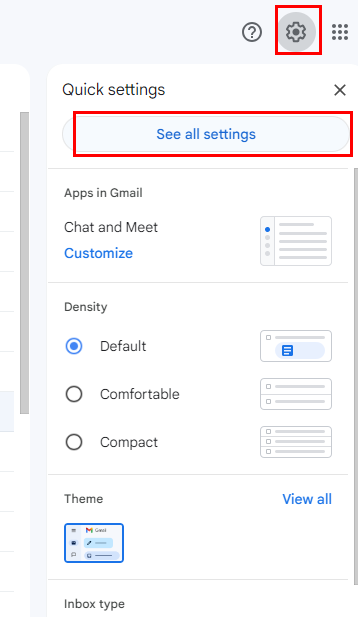
2. Click on the "Settings" gear icon: This is located in the top right corner of your screen.
3. Select "See all settings": This will open a new tab with more detailed settings.
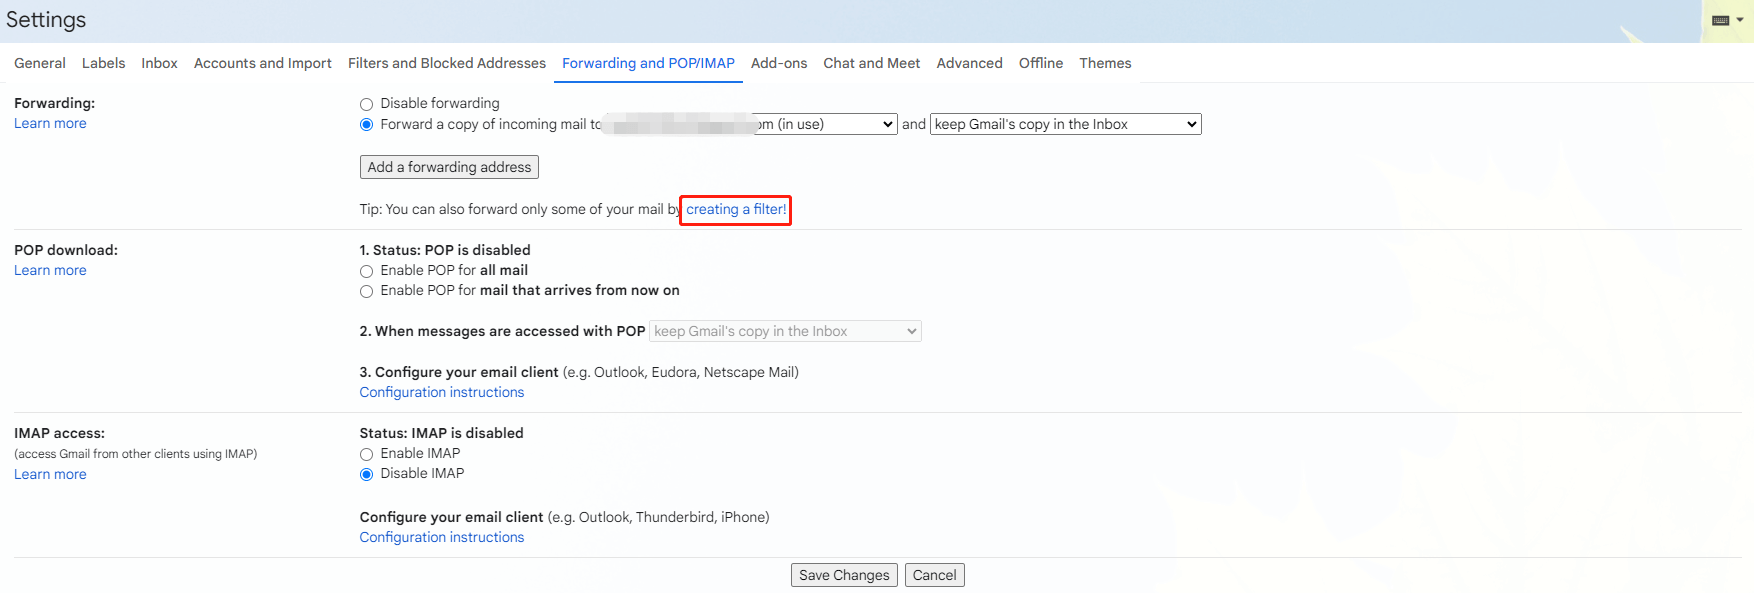
4. Go to the "Forwarding and POP/IMAP" tab: Click on this tab to access forwarding settings.
5. Enable forwarding: If forwarding is not already enabled, click on the "Add a forwarding address" button.
6. Enter your forwarding address: Enter the email address where you want to forward your emails.
7. Verify your forwarding address: Gmail will send a verification email to the forwarding address. Click on the verification link in the email to confirm.
8. Choose a forwarding option: You can choose to forward all incoming emails or only copies.
9. Create a filter: To forward emails from specific senders, click on the "Create a filter" link.
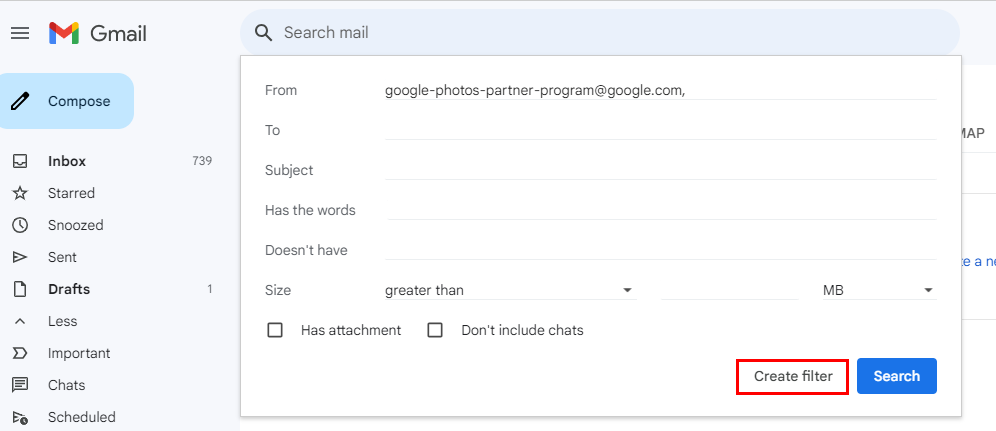
10. Enter the sender's email address: In the "From" field, enter the specific email address of the sender whose emails you want to forward.
11. Select the forwarding action: Choose the "Forward to" option and select the forwarding address you previously added.
12. Create the filter: Click on the "Create filter" button to save your settings.
Now, emails from the specified sender will be automatically forwarded to the designated address.
Conclude
With about 12 steps, you can forward emails from a specific sender in Gmail to others. Easy steps to follow! But there are some common issues you might encounter:
- Verification email not received: Check your spam or junk folder for the verification email. If it's not there, try resending the verification email from your Gmail settings.
- Emails not being forwarded: Ensure that the filter you created is active and that the sender's email address is correct. Also, double-check that the forwarding address is valid and accessible.
- Forwarding stopped working: If forwarding suddenly stops working, check your Gmail settings to ensure that the forwarding option is still enabled and that the forwarding address is correct.
Bonus Tip: Gmail Management and Backup Service
This article addresses the question “how to forward emails from a specific sender in gmail”. If you’re considering backing up your Gmail, MultCloud can be extremely useful. Trusted by over 3 million users, MultCloud is a multi-cloud management tool that facilitates the transfer or synchronization of files between various cloud services.
For instance, you can save your Gmail emails as PDFs to your computer or cloud drives, such as Google Drive, OneDrive, or Dropbox, in bulk. MultCloud also enables you to access and manage all your cloud or Email accounts via a single application. Currently, it supports more than 30 different cloud services, including Google Drive, OneDrive, Dropbox, Box, Google Photos, iCloud Photos, FTP, WebDav, and more.

- Cloud Transfer: Move one cloud data to another without download and re-upload.
- Cloud Sync: Sync data across clouds seamlessly in real time.
- Cloud Backup: Dynamically backup and restore files between clouds.
- Share: Private and password protect share cloud data to others.
- Email Migration: Convert emails to PDF and save to local or even cloud.
- Automatic: Set up a schedule to make task automatically run as preferred.
- Offline: Transfer, sync or backup cloud data online without going through local.
- Efficient: Access and manage all your clouds with a single login.
MultCloud Supports Clouds
-
Google Drive
-
Google Workspace
-
OneDrive
-
OneDrive for Business
-
SharePoint
-
Dropbox
-
Dropbox Business
-
MEGA
-
Google Photos
-
iCloud Photos
-
FTP
-
box
-
box for Business
-
pCloud
-
Baidu
-
Flickr
-
HiDrive
-
Yandex
-
NAS
-
WebDAV
-
MediaFire
-
iCloud Drive
-
WEB.DE
-
Evernote
-
Amazon S3
-
Wasabi
-
ownCloud
-
MySQL
-
Egnyte
-
Putio
-
ADrive
-
SugarSync
-
Backblaze
-
CloudMe
-
MyDrive
-
Cubby
