Why Export Notes from iCloud?
Have you ever set up yourself demanding to pierce your notes from iCloud on a different device or platform? Maybe you are looking to produce a backup of your important notes for added security and peace of mind. Whatever the reason may be, understanding how to export notes from iCloud can prove to be inestimable in colorful scripts. In this comprehensive companion, we'll explore the significance of exporting notes from iCloud and give step-by-step instructions on how to do it effectively.
Exporting Notes from iCloud to PDF
Exporting your notes from iCloud to PDF format offers several benefits. Not only does it give a accessible way to view and partake your notes across different bias and platforms, but it also ensures that your notes remain accessible indeed if you no longer have access to your iCloud account. To export your iCloud notes to PDF, follow these simple way:
- Access iCloud Notes on Your Device: Open the Notes app on your iPhone, iPad, or Mac and navigate to the note you wish to export.
- Elect the Note: Tap or click on the note to elect it.
- Export the Note as PDF: Look for the option to export the note and choose" Export as PDF" from the menu.
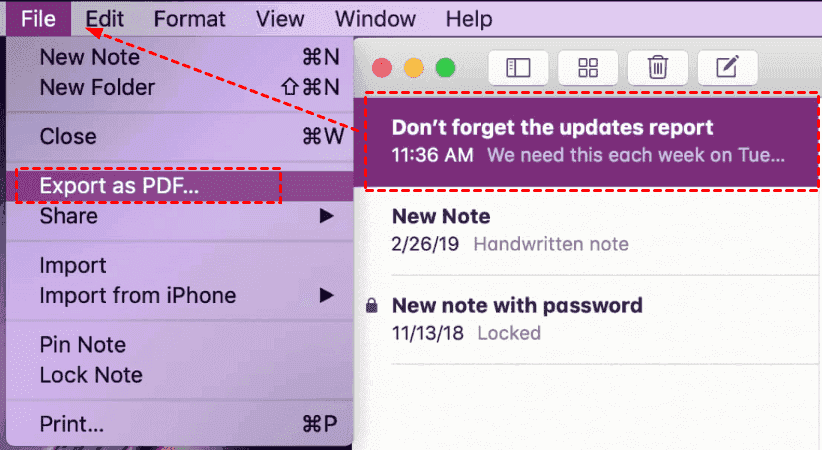
- Choose Destination: Select where you want to save the PDF train, similar as your device's original storehouse or a pall storehouse service like Dropbox or Google Drive.
- Save the PDF. Confirm the import and stay for the PDF file to be generated and saved to your chosen destination.
By following these way, you can fluently export your iCloud notes to PDF format and insure that they remain accessible whenever and wherever you need them.
Exporting Notes from iCloud to Text File
Exporting your iCloud notes to a text file provides a simple and straightforward way to access and edit your notes using a wide range of text editing applications. Whether you're looking to perform bulk edits on your notes or simply prefer working with plain text files, exporting your iCloud notes to a text file can be a convenient solution. Here's how to do it:
-
Access iCloud Notes on Your Device: Launch the Notes app on your iPhone, iPad, or Mac and locate the note you want to export.
-
Select the Note: Tap or click on the note to select it.
-
Export the Note as Text: Look for the option to export the note and choose "Export as Text" from the menu.
-
Choose Destination: Select where you want to save the text file, such as your device's local storage or a cloud storage service.
-
Save the Text File: Confirm the export and wait for the text file to be generated and saved to your chosen destination.
With these simple steps, you can export your iCloud notes to a text file and enjoy greater flexibility in how you access and manage your notes.
Further Reading: How to Export Notes from iPhone and Mac
If you're interested in learning more about exporting notes from your iPhone and Mac, we've got you covered. Follow these step-by-step instructions to export notes from your iPhone and Mac devices:
1. Exporting Notes from iPhone
a. Open the Notes app on your iPhone.
b. Select the note you want to export.
c. Tap the share icon and choose "Export Note".
d. Select the desired format (PDF, text, etc.) and follow the prompts to complete the export process.
2. Exporting Notes from Mac
a. Launch the Notes app on your Mac.
b. Select the note you wish to export.
c. Click on the "File" menu and choose "Export as".
d. Select the desired format and destination for the exported note.
By following these instructions, you can easily export your notes from both your iPhone and Mac devices, ensuring that your important information is always accessible when you need it.
Bonus Tip: Always Protect iCloud Files in Advance
This article addresses the question “How to export notes from iCloud?” If you’re considering protect iCloud files to another location, or vice versa, MultCloud can be extremely useful. Trusted by over 3 million users, MultCloud is a multi-cloud management tool that facilitates the transferring or synchronizing of files between various cloud services. Check these benefits for iCloud data migration:
- You can perform seamless file transfers between clouds without downloading and re-uploading files.
- You can add as many as clouds you have and access and manage all your cloud accounts in one place.
- Currently, it supports more than 30 different cloud services, including Google Drive, OneDrive, Dropbox, Box, Google Photos, iCloud Photos, FTP, WebDAV, iCloud Drive, pCloud, Amazon S3, 4shared, Icedrive, Wasabi, ownCloud, Backblaze, IDrive e2, Box for Business, Google Workspace, Gmail, Outlook, MySQL, NAS, FTP/SFTP, and more.
- Multiple functions can be used to move files between clouds, backup, sync or transfer files from one cloud to another easily.
If you would like to migrate iCloud Drive files to Google Drive, check the following guide and decide what to do next:
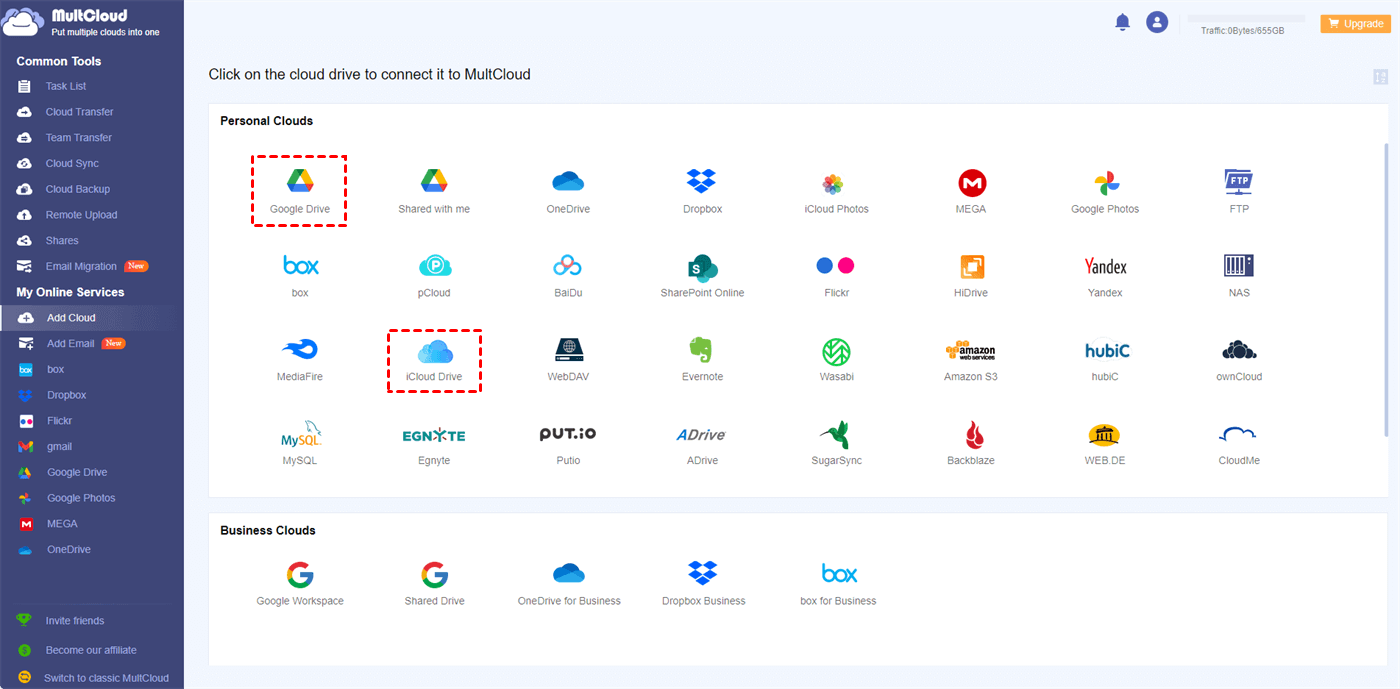
1. Register a MultCloud account and log in to your MultCloud Dashboard.
2. Add iCloud Drive and Google Drive to MultCloud. Click Add Cloud, then choose one of them to add at a time.
3. Hit Cloud Transfer, choose iCloud Drive files as the source and a location in Google Drive as the destination.
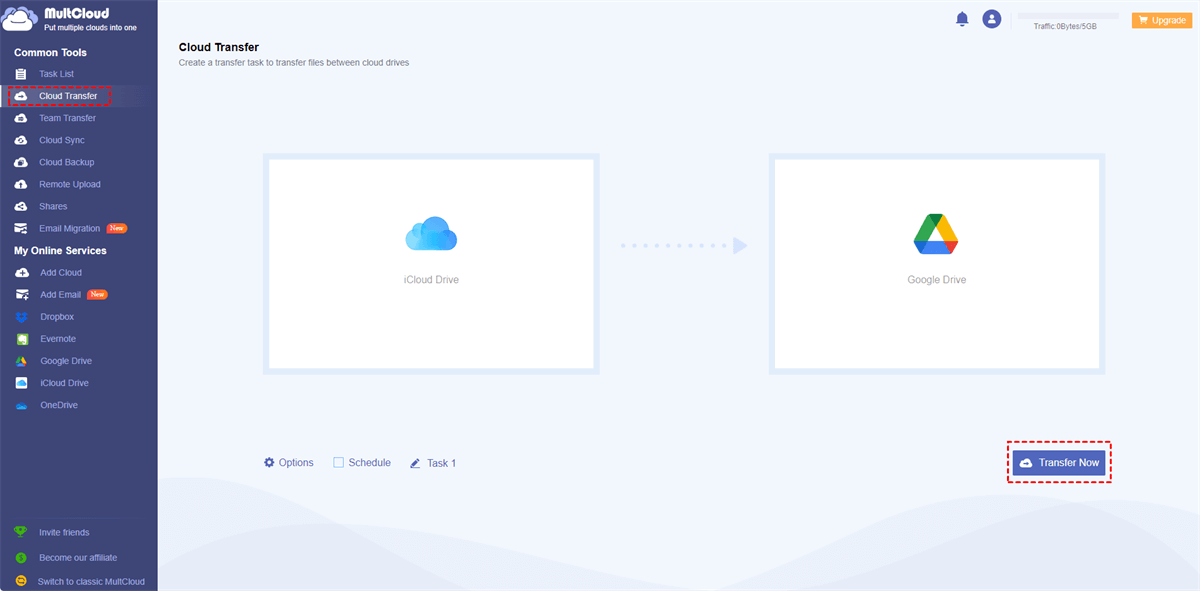
4. Configure settings if reuiqred and hit Transfer Now button to move iCloud Drive files to Google Drive directly and quickly.
Settings Tips:
- Options allows you to set up transfer methods, email and filter. To migrate certain file types instead of everything, hit Filter > Only include files with these extensions or Ignore files with these extensions. To free up space for iCloud, you can hit Options > Transfer > Delete all source files after transfer is complete to configure.
- Schedule helps you to run the task daily, weekly, or monthly, which generates changes autoamtically without human intervention.
- Enjoy all these premium features, like filter, schedule, or other functions after subscribing.
Besides, you can use Cloud Sync to real time sync iCloud files to Google Drive, or other clouds to always keep files up to date.
- Cloud Transfer: Move one cloud data to another without download and re-upload.
- Cloud Sync: Sync data across clouds seamlessly in real time.
- Cloud Backup: Dynamically backup and restore files between clouds.
- Instagram Downloader: Download Instagram videos, photos, reels and stories to local device or remotely upload them to your clouds.
- Email Migration: You can directly back up and save Gmail emails as PDFs to your computer or cloud drive in bulk.
- Manage all cloud accounts in one place: Connect all your clouds to MultCloud and you'll find it so easy to access and manage multiple cloud storage files with a single login.
- Automatic: Set up a schedule to make task automatically run as preferred.
- Offline: Transfer, sync or backup cloud data online without going through local.
- Efficient: Access and manage all your clouds with a single login.
On the Bottom Line
In conclusion, knowing how to export notes from iCloud can prove to be incredibly useful in a variety of situations. Whether you are looking to produce backups of your notes, partake them with others, or simply pierce them on different bias, learning the art of exporting notes from iCloud is a skill worth acquiring. By following the step- by- step instructions handed in this companion, you can confidently export your iCloud notes to PDF, textbook lines, and more, icing that your precious information remains safe and accessible at all times.
MultCloud Supports Clouds
-
Google Drive
-
Google Workspace
-
OneDrive
-
OneDrive for Business
-
SharePoint
-
Dropbox
-
Dropbox Business
-
MEGA
-
Google Photos
-
iCloud Photos
-
FTP
-
box
-
box for Business
-
pCloud
-
Baidu
-
Flickr
-
HiDrive
-
Yandex
-
NAS
-
WebDAV
-
MediaFire
-
iCloud Drive
-
WEB.DE
-
Evernote
-
Amazon S3
-
Wasabi
-
ownCloud
-
MySQL
-
Egnyte
-
Putio
-
ADrive
-
SugarSync
-
Backblaze
-
CloudMe
-
MyDrive
-
Cubby