Why You Should Use Filters to Manage Your Gmail Inbox
Gmail filters are a powerful tool that can significantly enhance your email management experience. By automating various tasks and organizing your inbox, filters can save you time and effort. Here are some common use cases for Gmail filters:
Common Use Cases for Gmail Filters
- Separate important emails: Create filters to automatically move emails from specific senders or with certain keywords to a dedicated folder or label. For example, you can create a filter to move emails from your boss or colleagues to a "Priority" folder.
- Manage newsletters and promotions: Filter and organize newsletters and promotional emails into separate folders or labels to keep your inbox clutter-free. This allows you to easily access and unsubscribe from unwanted emails.
- Deal with spam: Set up filters to automatically move spam emails to the "Spam" folder or delete them. This helps protect your inbox from unwanted and potentially harmful content.
- Prioritize tasks: Use filters to label or star emails that require immediate attention, ensuring you don't miss important messages. This helps you stay organized and focused on your most critical tasks.
How Do I Set Filters in Gmail: A Step-by-Step Guide
Setting up filters in Gmail is a straightforward process that can be customized to meet your specific needs. Let's guide you through the steps:
Step 1. Access the Gmail Filter Settings
>Open Gmail: Log in to your Gmail account in your prefer browser.
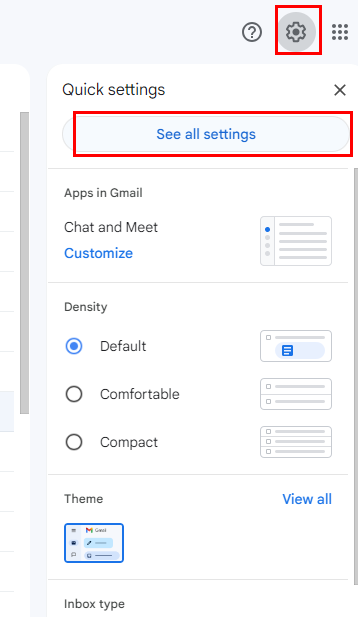
>Access settings: Click on the gear icon in the top right corner and select "See all settings."
>Go to filters: Navigate to the "Filters and Blocked Addresses" tab.
Step 2. Creating Custom Filters for Specific Email Management
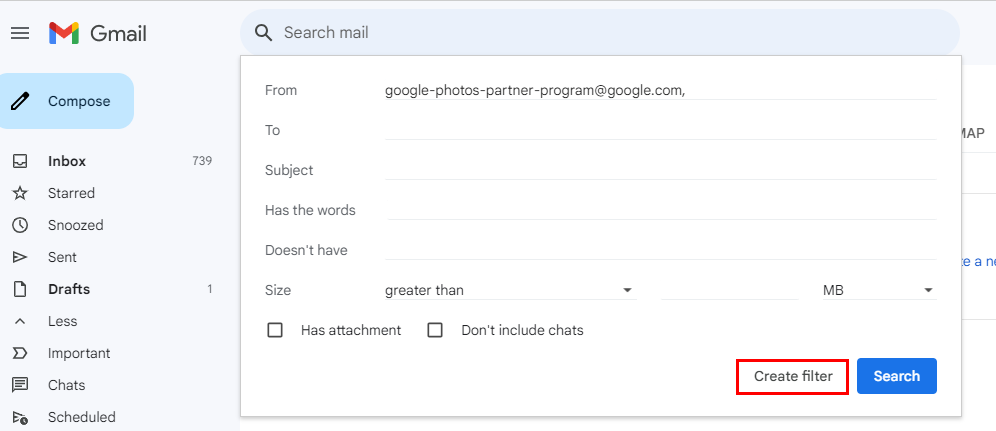
>Create a new filter: Click on "Create a new filter."
>Define criteria: Specify the conditions you want the filter to match, such as sender, recipient, subject, keywords, or labels. For example, you can create a filter to match emails from your boss, with the subject "Urgent," and containing the keyword "meeting."
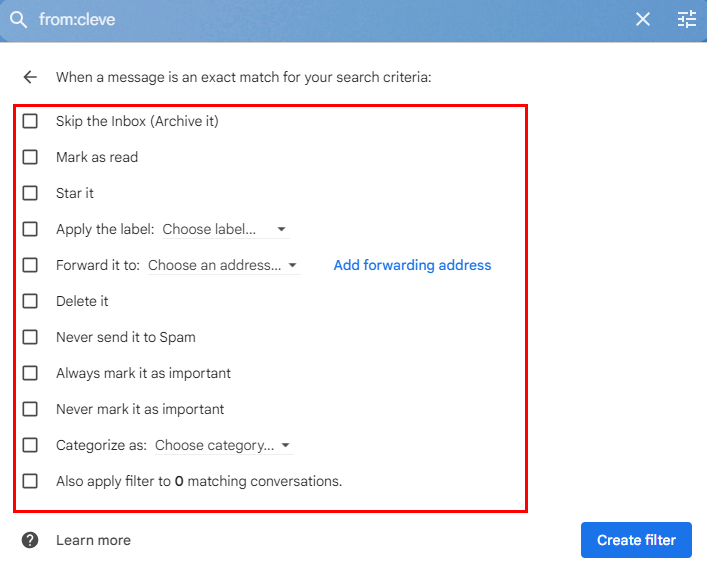
>Choose actions: Select the desired actions for the matching emails, such as moving them to a specific folder, labeling them, or starring them. You can also choose to delete the emails or mark them as "Not Spam."
Gmail Filter Actions
| Action | Description |
|---|---|
| Skip the Inbox (Archive it) | Moves the email to the Archive folder, removing it from your inbox. |
| Mark as read | Marks the email as read, even if it hasn't been opened yet. |
| Star it | Adds a star to the email, making it stand out in your inbox. |
| Apply the label | Adds a specific label to the email, allowing you to organize and categorize your emails. |
| Delete it | Moves the email to the Trash folder, deleting it. |
| Never send it to Spam | Prevents Gmail from mistakenly marking the email as spam. |
| Always mark it as important | Labels the email as important, making it a priority. |
| Never mark it as important | Tells Gmail not to label the email as important. |
| Categorize as | Adds the email to an existing category, if applicable. |
| Also apply filter to # matching conversations | Applies the filter to all emails in the conversation, including new, archived, and deleted messages. |
>Save the filter: Click on "Create filter" to save your new filter.
Step 3. Manage and Edit Your Gmail Filters
Modify Existing Filters
>Access filter settings: Go to the "Filters and Blocked Addresses" tab.
>Find the desired filter: Locate the filter you want to modify.
>Edit criteria or actions: Change the filter's conditions or actions as needed. For example, you can modify a filter to include a new keyword or move emails to a different folder.
>Save changes: Click on "Update filter" to save your modifications.
Delete Unwanted Filters in Gmail
>Access filter settings: Go to the "Filters and Blocked Addresses" tab.
>Find the filter to delete: Locate the filter you no longer need.
>Delete the filter: Click on the "Delete" link next to the filter.
Wrapping Up
As we wrap up, setting filter in your Gmail can help improve the email management and organization to some degree. To maximize the filter effectivness, you can use "Or" & "And" operator to combine multiple conditions in a single filter. For example, you can create a filter that matches emails from a specific sender and contains a particular keyword. This allows you to create more targeted and precise filters.
Email Backup Service Recommendation: If you are planning to back up your important emails in Gmail server, MultCloud is a nice choice. Under its help, you are able to easily transfer all emails or some specific emails (by filter) to a local drive, or even a cloud drive including Google Drive, OneDrive, SharePoint, Dropbox, iCloud Drive, iCloud Photos, MEGA, etc. Furthermore, you are allowed to set a schedule to automatically execute the backup or migration task as you wish.
At last, as a multiple cloud manager, it is, of course, able to transfer, back up or sync data from one cloud drive to another cloud drive. The entire process will go on MultCloud Server consuming data traffic, not go through the local device and rely on internet connection.

- Cloud Transfer: Move one cloud data to another without download and re-upload.
- Cloud Sync: Sync data across clouds seamlessly in real time.
- Cloud Backup: Dynamically backup and restore files between clouds.
- Share: Private and password protect share cloud data to others.
- Email Migration: Convert emails to PDF and save to local or even cloud.
- Automatic: Set up a schedule to make task automatically run as preferred.
- Offline: Transfer, sync or backup cloud data online without going through local.
- Efficient: Access and manage all your clouds with a single login.
MultCloud Supports Clouds
-
Google Drive
-
Google Workspace
-
OneDrive
-
OneDrive for Business
-
SharePoint
-
Dropbox
-
Dropbox Business
-
MEGA
-
Google Photos
-
iCloud Photos
-
FTP
-
box
-
box for Business
-
pCloud
-
Baidu
-
Flickr
-
HiDrive
-
Yandex
-
NAS
-
WebDAV
-
MediaFire
-
iCloud Drive
-
WEB.DE
-
Evernote
-
Amazon S3
-
Wasabi
-
ownCloud
-
MySQL
-
Egnyte
-
Putio
-
ADrive
-
SugarSync
-
Backblaze
-
CloudMe
-
MyDrive
-
Cubby


