How to Locate Hidden Emails in Gmail?
Some new emails are missing from my Gmail inbox, causing issues like a missed job opportunity. For example, job offer emails from my desired company didn’t appear in my inbox when scrolling through it. However, they show up in search results with the "Inbox" label and are also visible in "All Mail." These emails weren’t deleted, forwarded, or labeled otherwise. How do I see hidden emails in Gmail? Anyone can help? Thanks in advance!

If you're missing emails in Gmail, they might be hidden due to filters, incorrect labels, or being archived. In this article, we will walk you through 6 different methods to find and see hidden emails in Gmail.
Method 1: Find Hidden Emails by Checking the Gmail "All Mail" Folder
The "All Mail" folder in Gmail is a comprehensive location that stores all your emails, including those that might appear hidden. Let's explore how to use this feature to find your missing emails:
1. Access the "All Mail" folder: Open your Gmail account and click on the "All Mail" label in the left-hand sidebar.
2. Search for specific emails: Use the search bar at the top to find emails by sender, recipient, subject, or keywords. You can also refine your search using advanced search operators.
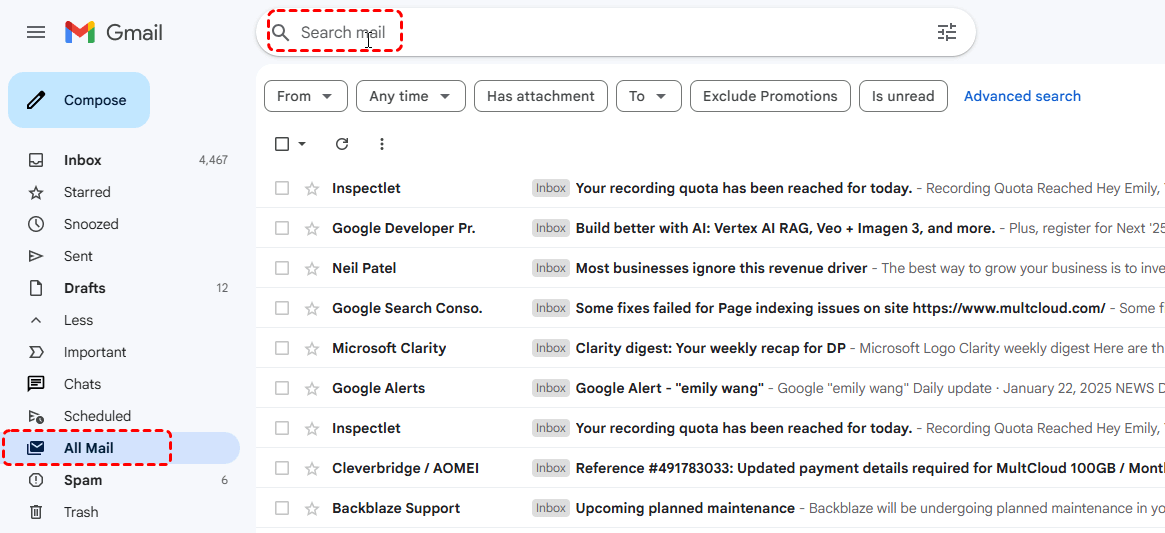
3. Review and recover emails: Once you locate the hidden emails, click on them to open and review their content. If needed, you can move them back to your inbox or other desired folders.
Method 2: Check Gmail Categories
If you have enabled several category tabs like: Primary, Social, Promotions, Updates, and Forums, you need to check All the tabs for the messages, not just in Primary.

Method 3: Find Hidden Emails in "Archive"
Another common reason for emails appearing hidden is that they might have been archived. Archived emails are moved to a separate folder but still remain accessible. To find the emails you’ve archived in Gmail from your computer, follow these 5 simple steps. The process is the same on PC or Mac.
Note: Archive folder won't appear on the left side of your Gmail screen.
1: On the left side of your screen, click on “More” to display all your email folders.
2: Select the “All Mail” folder. In this folder, you’ll find all the emails you’ve received or archived.
3: Find the email you want to retrieve. Archived emails are easy to locate. They’re the ones without the “Inbox” label in front of the subject line.

4: Once you’ve found the email you wish to recover from the Gmail archive, open it and click on "Move to Inbox" icon on the top left corner.

Method 4: How Do I Find Hidden Emails in Gmail with Search Operators
Gmail's advanced search operators allow you to perform more precise searches and find hidden emails effectively. Here are some useful search tips:
1. Use quotation marks: Enclose exact phrases in quotation marks to find emails containing those specific words.
2. Combine keywords: Use the AND operator to find emails containing multiple keywords.
3. Exclude keywords: Use the NOT operator to exclude certain keywords from your search.
4. Search by sender or recipient: Use the from:, to:, or cc: operators to search by specific email addresses.

5. Search by date range: Use the after: and before: operators to search within a specific date range.
By combining these search operators and keywords, you can effectively locate hidden emails that might have been missed or misplaced. Experiment with different search combinations to find the emails you're looking for.
Method 5: See Hidden Emails in Gmail Account Using Gmail Filters
Gmail filters are a powerful tool that can automatically categorize and organize your emails based on specific criteria. You can use filters to uncover hidden emails by creating and editing them to match your desired search parameters:
1. Create a new filter: Click on the gear icon in the top right corner of Gmail, select "See all settings," and go to the "Filters and Blocked Addresses" tab. Click on "Create a new filter."
2. Define filter criteria: Specify the conditions you want the filter to match, such as sender, recipient, subject, keywords, or labels.
3. Choose actions: Select the desired actions for the matching emails, such as moving them to a specific folder, labeling them, or starring them.
4. Save the filter: Click on "Create filter" to save your new filter.

Method 6. Retrieve Hidden Messages in Gmail with the Spam and Trash Folders
Sometimes, emails might be accidentally marked as spam or deleted, causing them to appear hidden. Let's explore how to retrieve these emails:
1. Access the "Spam" folder: Click on the "Spam" label in the left-hand sidebar.
2. Review emails: Go through the emails in the "Spam" folder and check if any legitimate emails have been marked incorrectly.
3. Mark as "Not Spam": If you find valid emails, click on them and mark them as "Not Spam."

By reviewing and marking legitimate emails as "Not Spam," you can ensure that important messages don't get lost in the "Spam" folder.
Gmail's "Trash" folder stores deleted emails for a period of 30 days. If you've accidentally deleted an important email, you can recover it from the "Trash" folder:
1. Access the "Trash" folder: Click on the "Trash" label in the left-hand sidebar.
2. Locate the deleted email: Search for the deleted email using the search bar or by browsing through the "Trash" folder.
3. Restore the email: If you find the desired email, click on it and move it back to your inbox or another folder.

In Conclusion
In this comprehensive guide, you have learnt how to see emails in Gmail in different situations. To prevent Email from getting disappearing in future, you had better organize your emails using different lables, ensure Gmail filters are configured correctly to avoid accidentally hiding important emails. Besides, you can try backing up important emails to another location (local hard drive or cloud drive).
Thus, MultCloud comes into play. It embeds with the Email Migration feature, making it easy and efficient to move Email and its attachments to both local and cloud drive (by far, it supports about 40 clouds) to create a backup as PDF format. Besides, as a multiple cloud management tool, it is excellent in helping users to transfer, sync or back up data from one cloud to another online directly.
- Cloud Transfer: Move one cloud data to another without download and re-upload.
- Cloud Sync: Sync data across clouds seamlessly in real time.
- Cloud Backup: Dynamically backup and restore files between clouds.
- Share: Private and password protect share cloud data to others.
- Email Migration: Convert emails to PDF and save to local or even cloud.
- Automatic: Set up a schedule to make task automatically run as preferred.
- Offline: Transfer, sync or backup cloud data online without going through local.
- Efficient: Access and manage all your clouds with a single login.
MultCloud Supports Clouds
-
Google Drive
-
Google Workspace
-
OneDrive
-
OneDrive for Business
-
SharePoint
-
Dropbox
-
Dropbox Business
-
MEGA
-
Google Photos
-
iCloud Photos
-
FTP
-
box
-
box for Business
-
pCloud
-
Baidu
-
Flickr
-
HiDrive
-
Yandex
-
NAS
-
WebDAV
-
MediaFire
-
iCloud Drive
-
WEB.DE
-
Evernote
-
Amazon S3
-
Wasabi
-
ownCloud
-
MySQL
-
Egnyte
-
Putio
-
ADrive
-
SugarSync
-
Backblaze
-
CloudMe
-
MyDrive
-
Cubby