If you are wondering how to upload photos from iPhone to iCloud, then this post is for you. We will introduce how to upload photos to iCloud from different devices in detail. Please read further to get the answer.

Quick Search:

iCloud is a smart and reliable cloud service for Apple users to store their precious documents, photos, and videos. And users can access their data from any device, anywhere, and anytime. This service can bring many conveniences. For example, when you want to share a specific photo with your friends or family members, creating an iCloud sharing link is a good way to achieve this.
Also, by uploading your photos to iCloud, you create a secure backup of your valuable memories. In case your device gets lost, damaged, or stolen, your photos will still be accessible and safe in the cloud. Furthermore, iCloud provides powerful photo editing tools and organizational features. When you edit a photo on one device, the changes are automatically synced across all your devices.
In this article, we will offer you how to upload old photos to iCloud from iPhone, iPad, and Mac. At the same time, there is a tip for you to move photos between iCloud Photos and Google Photos. If you are interested, continue to read.
In this section, you will learn the way to upload photos from iPhone, iPad and Mac to iCloud. After reading the content, you can set it up based on your needs.
If you want to upload iPhone photos to iCloud, you can make the setting directly. And here’s the way to achieve this:
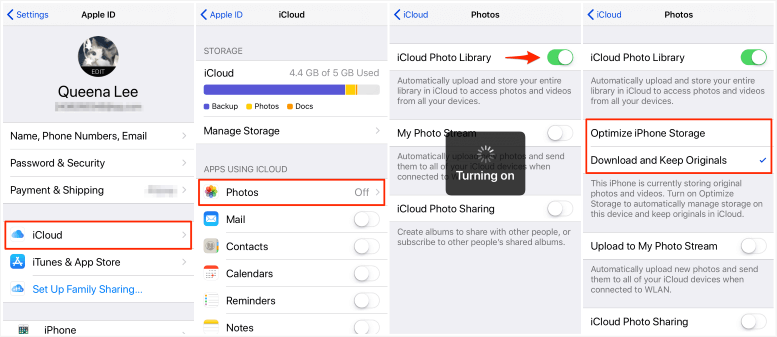
Step 1: Open your iPhone. Then head to Settings > your profile image > iCloud > Photos.
Step 2: Turn on iCloud Photo Library. And you can also enable iCloud Photos Sharing. Then, you will asked to choose the photo size you want.

For your information, there are two options. The first is Optimize iPhone Storage, which means optimized, lower-resolution versions of your iCloud photos will be saved on your iPhone and full-resolution versions will be stored on iCloud.
The second is Download and Keep Originals. This option allows you to download all your photos in full-resolution, which means you can save higher quality images, but it will require much more storage space.
By choosing the options you need, photos can be saved on iCloud easily and quickly. Also, if you wonder how to upload photos to iCloud from iPad, you can follow the same steps above. If you intend to upload photos to iCloud on a Mac, you can simply drag and drop the selected files into the Photos library. Then photos and videos will be automatically uploaded to iCloud Photos. And here’s what you should follow:
Step 1: Head to your iCloud on Mac and navigate to Photos.
Step 2: Press the Photos button on the top left side. Then tap the Preferences button.
Step 3: Go to iCloud and tick iCloud Photos to choose the data size you want. After setting this, data can be uploaded to iCloud Photos on Mac easily.
Although it is easy and simple to upload photos to iCloud from iPhone, iPad, and Mac. However, sometimes users are complaining “Why are my iPhone photos not uploading to iCloud?”. Also, the iCloud backup not working issue happens as well. This kind of problem might be caused by several reasons, such as unstable network connection, insufficient storage space, unfixed errors or bugs on iCloud app, and so on.
When this issue happens, you can set a good and stable connection and check your storage space before uploading photos to iCloud from iPhone.
If you are wondering how to upload specific photos to iCloud from iPhone, iPad and Mac, you can simply utilize the iCloud web app to manually upload photos to iCloud. In other words, you can sign into your iCloud on the web and go to Photos.
Then, you can tap the upload icon icon on the upper side and upload photos from your iPhone, iPad, and Mac.
Q: What if unable to upload photos to iCloud from iPhone?
A: Before turning to how to fix the problem of uploading problems, it is better to know what causes this issue. Normally, an unstable network connection and insufficient storage can cause a sudden stop of uploading. Also, old version of iOS/macOS glitches can lead to this problem.
So, to fix the photos not uploading to iCloud issue, it is recommended to make sure your network is stable when uploading photos to iCloud. Meanwhile, if the version of your iCloud is out-of-date, you should upgrade the app to the latest version.
Q: What if upload photos to iCloud from iPhone stuck?
A: Somtimes, unfixed errors will cause the issue, and you can restart your iPhone and begin the upload process again. Also, you can try to upgrade your app.
Q: How to force upload photos to iCloud from iPhone?
A: Try to connect to a stable Wi-Fi network.
We all know that it is photos that take up large storage space in most cases. Sadly, iCloud only offers 5GB of free storage space and it can be quick to find that iCloud is full. So, what should you do to fix this problem? There are 2 solutions. One is to upgrade your iCloud account and expand more storage space. The other is to transfer photos from iCloud Photos to Google Photos.
After transferring photos from iCloud Photos to Google Photos, you can then free up the storage space on iCloud. On the other hand, Google Photos offers a generous 15GB of free storage space, which is sufficient for you to store a number of photos and videos. Then, the question comes into how to move photos from iCloud Photos to Google Photos.
In this case, it’s efficient and simple to use MultCloud to accomplish this target. This service is an advanced cloud-to-cloud transfer service that allows you to move data from one cloud to another directly without going through the download-and-upload process. To the greatest extent, it helps to improve efficiency and reduce burden.
Why utilize MultCloud to transfer photos between iCloud Photos and Google Photos? You might wonder this question. And there are some conveniences you can enjoy when using this service to migrate data across cloud drives.
Then, it’s time to show you how to move iCloud Photos to Google Photos with the help of MultCloud:
Step 1: If you don’t have a MultCloud, please sign up one for free by your email.
Step 2: Head to Add Cloud on the left sidebar. Then you will see what cloud drives MultCloud supports. Simply hit the icon of iCloud Photos to add and give MultCloud permission by following the on-screen instructions. Later, use the same way to add Google Photos.
Step 3: Click on Cloud Transfer, then choose iCloud Photos as the original cloud drive and Google Photos as the target cloud drive.
Apart from transferring data from one cloud to another, MultCloud also allows you to make basic functions, such as sharing, downloading, uploding, moving, copying, deleting, and more. So, when you want to upload photos to iCloud from iPhone, you can take advantage of MultCloud too.
After reading the text, you now know how to upload photos to iCloud from iPhone, iPad, and Mac automatically and manually. Also, when you want to move photos on iCloud Photos to free up iCloud storage, you can move them to Google Photos via a smart and useful service named MultCloud. On top of transferring, it also allows you to sync and backup data between clouds. For example, you can sync Google Drive with Dropbox without any effort.