Moving photos from Mac to iPhone makes it easier to edit a photo directly. If you want to transfer photos from Mac to iPhone wirelessly without using iCloud, this complete article can be helpful. There are 4 simple and easy methods, namely using iTunes/Finder, iCloud Photos, AirDrop, as well as Google Photos. To find out more, read this tutorial carefully.

Quick Search:
I can't believe in 2024 there still isn't a simple solution to this... I have about 10k of photos on my mac that I want to transfer to my new iPhone 13's "Recents/Camera Roll" album. I don't want to use iTunes since you can't delete those photos, if I use AirDrop it takes a long time and the photos don't seem to appear in chronological order once imported (not sure why), and most third-party apps only create a new album for the imported photos under "My albums" which isn't the right location.
- Question from Reddit
Moving and syncing photos from Mac to iPhone is typically done through iCloud. This service allows you to access and view the same photos on different Apple devices. If you don’t want to use iCloud to deliver the goal since it doesn’t allow you to exclude specific photos, then you have some walkarounds. In this article, we will provide you with 4 useful solutions.
In this part, 4 methods are offered for your reference. After reading, you can select the method that suits you most.
To migrate photos from Mac to iPhone, you can simply sync them with iTunes. Meanwhile, there is one thing you should notice starting with macOS Catalina, Finder has replaced iTunes, and all its functions have been integrated into Finder. So, you can use iTunes in macOS Mojave and earlier versions, or Finder in macOS Catalina and later.
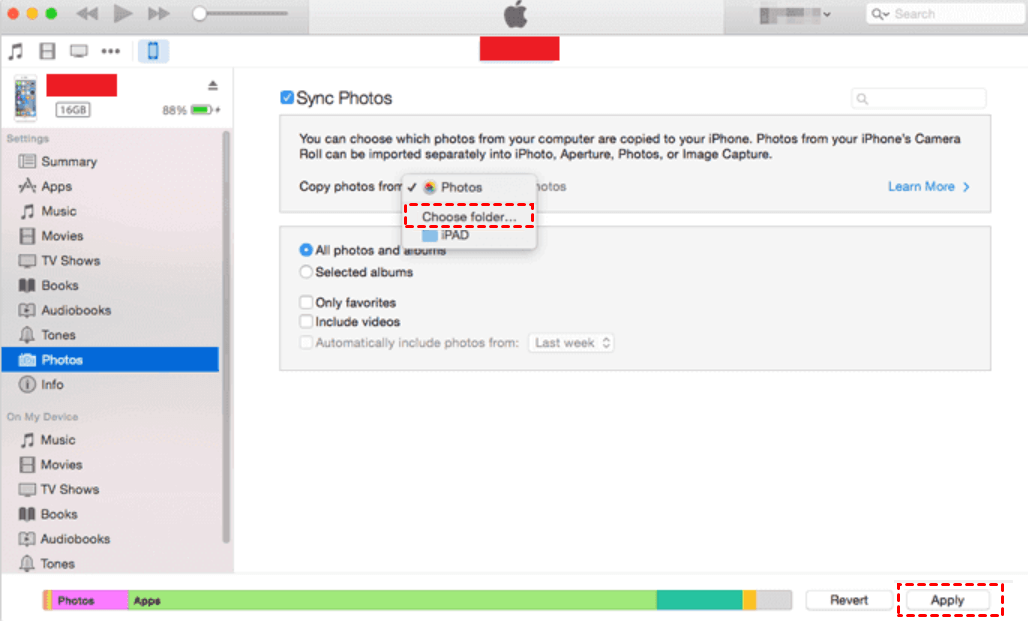
❤This is how to transfer photos from Mac to iPhone via iTunes:
Step 1: Connect your iPhone to Mac with a USB cable. Then iTunes will run automatically.
Step 2: Tap the device icon > Photos > Sync Photos > Choose folder > Apply.
❤This is how to transfer photos from Mac to iPhone via Finder:
Step 1: Connect your iPhone to Mac and open Finder. Don’t forget to unlock your iPhone and trust Mac.
Step 2: In Finder, tap the iPhone icon > choose the category you want to move > Photos.
Step 3: Hit Sync [category] > choose the specific items you want to share > Apply.
If you want to transfer photos from Mac to iPhone without iCloud, you can take advantage of iCloud Photos. Once you enable this service, photos on Mac and iPhone will be synced. This is how:
Step 1: Launch System Preferences > Apple ID.
Step 2: Check the box next to Photos.
Step 3: Now, go to Settings on your iPhone. Then head to iCloud > Photos. Enable iCloud Photos. Then, the sync between your iPhone and Mac will happen.
Note: Find your iCloud Photos not loading? Visit solutions with a simple click.
AirDrop is another wireless option for moving photos from Mac to iPhone. With AirDrop enabled, you can share photos, videos, contacts, and other content between Apple devices. Now, let’s figure out the detailed operations:
Step 1: Head to Finder > Go > AirDrop. Turn on Bluetooth and WiFi to switch on AirDrop.
Step 2: Select Allow to be discovered by as Everyone or Contacts Only.
Step 3: Turn on AirDrop on your iPhone by swiping up from the top of your screen to open Control Center. Click on AirDrop and set your iPhone to be found by Contacts Only or Everyone.
Step 4: Drag the photos you want to send from Mac to iPhone to the recipient's image and press Send. Alternatively, tap the Share button, and select AirDrop. Then, choose the right recipient and tap Done.
Note: How to transfer photos from iPhone to MacBook Air? Use AirDrop too.
In addition to iCloud Photos, Google Photos is also a smart and useful photo-sharing and saving service. Different from iCloud which only offers 5GB of free space, Google Photos provides users with 15GB of free space. Does Google Photos now have free unlimited storage? Although the answer is NO, you can store a lot of photos and videos for free.
To transfer photos from Mac to iPhone without iCloud, here is how to deliver the goal with Google Photos:
Step 1: Download and install Google Photos on your Mac.
Step 2: Upload the photos to Google Photos from your Mac. You can simply drag and drop.
Step 3: Now, install the app on your iPhone. Sign in with your Google account and download the photos that you want to keep on your smartphone.
Note: Can I transfer photos to a new iPhone without iCloud? Yeah, you can make it via Google Photos.
As said before, iCloud only provides users with 5GB of free space. If you don’t want to upgrade your account, you cannot store more photos and situations. To ease the burden on iCloud, you can move some photos to another cloud, such as Google Photos, MEGA, Flickr, etc. The point is how to move photos between cloud services quickly. Thankfully, MultCloud can be helpful.
MultCloud is a professional and useful cloud-to-cloud transfer service that allows you to migrate files across different cloud services/accounts. Currently, over 30 leading and popular cloud drives are supported on MultCloud, such as Google Drive, Google Photos, Dropbox, iCloud Drive, iCloud Photos, MEGA, Amazon S3, OneDrive, SharePoint, Box, pCloud.
There are some benefits you can enjoy if you use MultCloud:
Seamless Transfers: MultCloud facilitates smooth and efficient data transfers between different cloud services without needing to download and re-upload files. This saves your time and improves efficiency.
Scheduled Transfers: MultCloud allows users to set up scheduled transfers, automating the process according to user-defined times and frequencies. 4 options are provided, such as daily, weekly, monthly, at a specific time.
Real-Time Syncing: MultCloud offers real-time syncing capabilities to ensure that files are consistently up-to-date across multiple cloud services. For example, you can sync 2 iCloud accounts in real time.
High-Level Security: MultCloud ensures the safety and privacy of user data with robust encryption protocols and secure transfer methods. Both data in transit and at rest will be protected.
Transfer Filters: Users can filter files during transfers, such as by file type or size, to customize and streamline the process. So, you can quickly find what you really want.
No Installation Required: MultCloud operates entirely online, eliminating the need for downloading or installing additional software on devices, which saves your local storage space.
Now, let’s delve into how to move iCloud Photos to another cloud via MultCloud:
Step 1: Sign up for an account for free.
Step 2: Navigate to Add Cloud. Add iCloud Photos by tapping its icon and permitting MultCloud. Then, repeat the same way to add another cloud. Take Google Photos as an example.
Step 3: Go to Cloud Transfer. Choose iCloud Photos as the source cloud, then select Google Photos as the target cloud. Finally, hit Transfer Now.
That’s all about how to transfer photos from Mac to iPhone without iCloud. In a nutshell, you can use iTunes/Finder, iCloud Photos, Google Photos, as well as AirDrop. Meanwhile, when you find your iCloud storage space is limited, you can try MultCloud to migrate photos from iCloud to another cloud.


