Synology, a leading provider of network-attached storage (NAS) solutions, offers a powerful feature called WebDAV, which allows users to access and manage files stored on their Synology NAS from anywhere with an internet connection. Let’s start to learn how to enable WebDAV Synology.

Quick Search:
WebDAV, short for Web Distributed Authoring and Versioning, is a protocol that enables users to collaborate and manage files over the Internet. It extends the Hypertext Transfer Protocol (HTTP) to facilitate file management tasks such as creating, modifying, and moving documents on remote servers.
Synology NAS (Network Attached Storage) systems are renowned for their robustness and versatility in data storage and management solutions. These devices offer a wide array of features, including file sharing, backup, multimedia streaming, and more, making them popular choices for both home and business users to backup to Synology NAS. Because of this, Synology NAS is an ideal platform for hosting WebDAV services.
Enabling WebDAV on your Synology NAS provides several benefits, including:
Note: You may be interested in WebDAV access to Google Drive.
To enable WebDAV Synology, you need to perform the following 3 important parts.
To enable WebDAV on your Synology NAS, follow these steps:
Step 1. Log in to the Synology DiskStation Manager (DSM) interface.
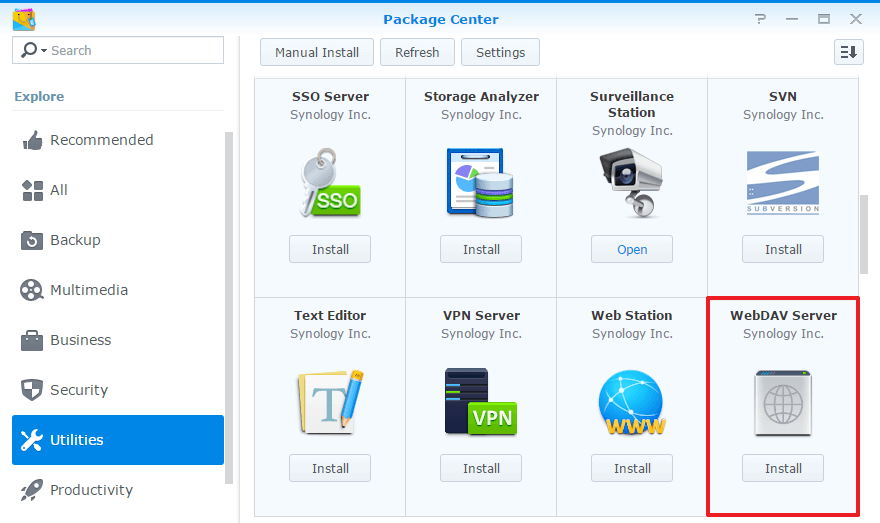
Step 2. Navigate to the Package Center, tap "Utilities", and choose "WebDAV".
Step 3. Click on "Install" to download and install the WebDAV package on your NAS.

>> Look here if you can’t connect to Synology NAS.
Once the WebDAV package is installed, configure it by:
Step 1. Accessing the WebDAV Server application from the main menu.
Step 2. Configuring server settings such as port number, SSL encryption, and authentication method.
Step 3. Creating user accounts and setting permissions for accessing WebDAV shares.
Ensure that appropriate permissions are set for WebDAV shares to control access levels for users and groups. You can define read, write, and delete permissions based on user requirements.
After enabling and configuring WebDAV on your Synology NAS, you can access it using various clients and applications. Most operating systems have built-in support for WebDAV, allowing users to connect to Synology NAS remotely and seamlessly.
You may encounter some problems when enabling and setting up Synology WebDAV. The solution shall be as follows:
The following scenarios can help you make use WebDAV on Synology better:
After enabling WebDAV on Synology, you should be able to connect to Synology NAS remotely and seamlessly. In addition, you can also better use Synology to sync data in your cloud storage service. Although Synology has provided cloud sync service, sometimes you may encounter a situation where you cannot connect to Synology NAS. In this case, you can directly use the professional cloud-to-cloud sync tool---MultCloud.
When using MultCloud, you can:
✅Connect and sync with 30+ cloud storage services, including QNAP, FTP or other file services. ✅Manage and migrate data between multiple accounts (e.g. Google Drive to S3) on any device in just a few steps. ✅Sync data between two or more accounts in real time without manual uploading. ✅Back up email data to cloud services or NAS devices, such as backup Gmail to Synology.
So, how to use MultCloud to synchronize Synology NAS and cloud storage services? Let's take syncing iCloud Photos to Synology NAS as an example.
Step 1. Sign up for a MultCloud account. Alternatively, you can authorize your Google, Facebook, or Apple ID to register and log in.
Step 2. Then go to "Add Cloud" on the left sidebar. Then press the iCloud Photos and NAS icons respectively to grant MultCloud access.
Step 3. Now, go to "Cloud Sync" on the left sidebar. Then select the data in iCloud Photos as the source directory and the folder in Synology NAS as the destination directory. Finally, click on the "Sync Now" tab.
Note: If you want to automatically sync iCloud Photos to Synology NAS, please enter "Schedule" to set the time to perform the task.
In conclusion, Synology WebDAV is a valuable tool for individuals and businesses seeking efficient file management and remote access solutions. By enabling WebDAV on your Synology NAS and following best practices, you can streamline your workflow, enhance collaboration, and ensure the security of your data.