Some are asking me how do I sync Google Drive to my external hard drive. So, in this article, I will show you 3 free and useful solutions to sync files on Google Drive to an external hard drive, namely using Google Takeout and the Google Drive Disk.

Quick Search:
How to backup G-Drive to an External HDD? I intend to use an HDD to back up the entirety of My Drive once per week using USB. I tried this today and my computer returned an error saying the process was not supported. So, my question is how do I backup my Google Drive to an external USB HDD. Will I need to copy the files manually? Thank you!

Offering 15GB of free storage space, Google Drive is a brilliant cloud storage solution that enables users to store many kinds of files, including videos, screenshots, PDF files, documents, music files, etc. With Google Drive, users can access their files across multiple devices, such as computers, laptops, phones, etc.
However, it’s not secure enough to only store files on Google Drive. Although Google Drive is an excellent cloud storage service, there are unfixed errors and bugs that may lead to data loss somehow. In this situation, syncing files on Google Drive to an external hard drive is a good way to protect data security. Meanwhile, there are other benefits you can enjoy, such as:
So, how to sync Google Drive with an external hard drive? The following content gives you 3 useful methods. After reading, you can choose the one that suits you most.
In this part, there are 3 easy methods offered for your reference. Specifically speaking, you can use Google Takeout, the Google Drive Disk, or Drive for Desktop. Now, continue to read the detailed steps.
Google Takeout is a service that can help you export data from Google products such as Google Drive, Google Photos, YouTube, etc. at once. So, if you want to sync Google Drive to an external hard drive, you can export data from Google Drive to your computer, and then move them to your external hard drive. Here’s what you should follow:
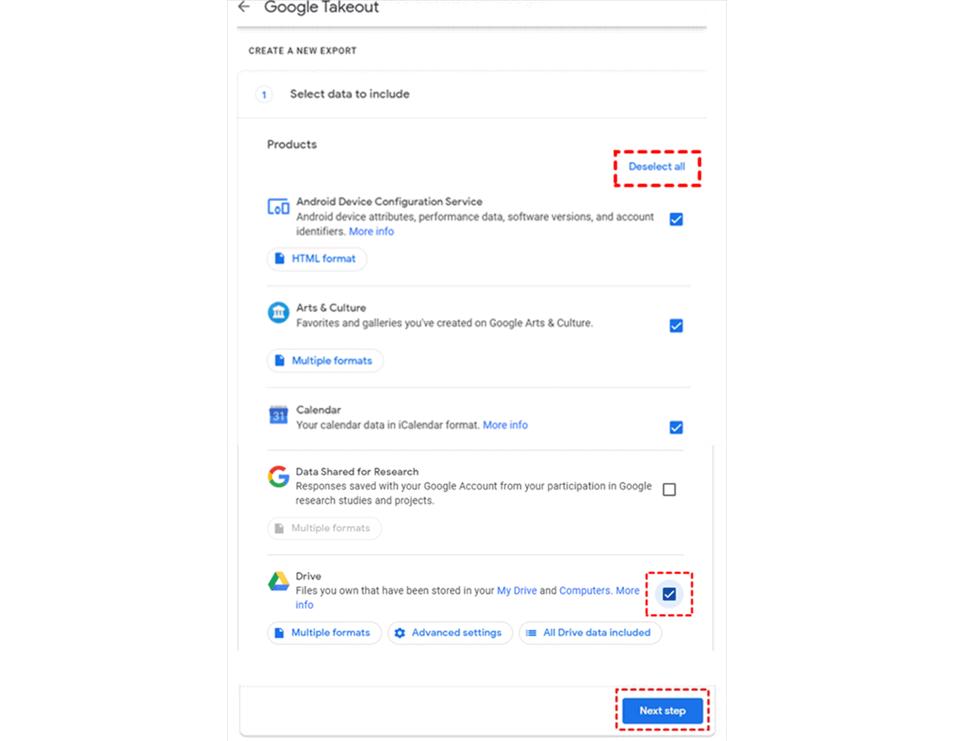
Step 1: Head to Google Takeout on the web, Deselect all on the top right side, and scroll down your cursor to tick Drive only. Then go to the bottom of the page to click on Next step.

Step 2: Choose the file type, frequency, and destination according to your situation. Then, Create export.
Step 3: Then you will receive an email with a downloading link. Then you can click to download that folder to your computer. Step 4: The folder from Google Takeout is a compressed folder, you need to decompress it. Next, connect your external hard drive to your PC, and then you can move the folder on your computer to the external hard drive.
Tip: Sometimes, Google Takeout cannot export your large files successfully, so you need to care about the exporting process. Meanwhile, the shared files on Google Drive cannot be exported. And if you want to store shared files on the external hard drive, you need to download them manually.
If you have downloaded and installed Google Drive on your computer, there is a Google Drive Disk generated automatically on your PC. So, you can simply take advantage of this virtual disk. Now, we will walk you through the steps:
Step 1: Connect the external hard drive to your computer. Step 2: Go to the Google Drive Disk on your PC and locate the files/folders you want to sync.
Step 3: Open the folder that you want to move data into on the external hard drive. Then drag files/folders on Google Drive Disk and drop them to the external hard drive.
Tip: You should make sure the Internet connection remains stable. Or, the process will be stuck and cost much of your time.
Google was discontinuing the Backup & Sync service. Instead, it launched a new service called Drive for Desktop, which is the pro version of Backup & Sync. By using this feature, you can also make Google Drive sync to an external drive. Now, follow the steps below:
Step 1: Connect your external hard drive to your computer first.
Step 2: Download and install Drive for Desktop on your computer.
Step 3: Launch the app and log into your account. Hit the cog icon to tap Preferences.
Step 4: Head to Google Drive > Mirror Sync > change folder location. Choose the external hard drive as the destination.
Then tap Select Folder in the next window. Next, your Google Drive data can be synced to the external hard drive seamlessly and effortlessly.
That's all about how to sync an external hard drive with Google Drive. You have learned 3 simple solutions. Now, you can select the method based on your situation.
You’ve learned how to sync Google Drive to the external hard drive. Then how about syncing Google Drive to another cloud? With the development of cloud storage services, many people are using different cloud services at the same time. In this case, syncing files from one cloud to another is inevitable for better management and sharing.
Traditionally, many users would download files from one cloud and upload them to another cloud. This method can deliver the goal though, it’s time-consuming. To improve sync efficiency, a practical cloud sync service, MultCloud, can do you a favor.
MultCloud is a wonderful cloud file manager that can help you manage multiple cloud storage solutions in only one place. Currently, MultCloud supports Google Drive, Google Photos, OneDrive, OneDrive for Business, Dropbox, Dropbox Business, MEGA, Flickr, Amazon S3, etc.
With MultCloud, you don’t need to jump to different apps to manage data on those clouds. Instead, you can perform basic features on different clouds via MultCloud. For example, you can upload folders to Google Photos, download files from OneDrive, and share files on other clouds. Also, there are advanced features such as Cloud Sync, which helps you sync files across clouds directly.
Why choose MultCloud to sync files between clouds? Here are some reasons:
Now, refer to the following steps to learn how to sync Google Drive to another cloud, taking OneDrive as an example.
Step 1: Create an account with MultCloud and sign in. Step 2: Hit Add Cloud on the left and add Google Drive and OneDrive, respectively. Then, follow the instructions on the screen to permit MultCloud.
Note: MultCloud utilizes 256-bit AES Encryption and an OAuth Authorization System. It will never save your info. So, you can use this service with confidence.
Step 3: Head to Cloud Sync, select Google Drive as the original directory and OneDrive as the target directory, and then click on Sync Now.
Tip: MultCloud allows you to select specific items to move by using the Filter feature (tap Options). This feature allows you to include files with certain extensions.
With the help of MultCloud, you will only go through 3 steps when syncing data across cloud drives. Likewise, if you want to sync files between 2 Google Drive accounts, you can repeat the same way above. The only difference is the target directory. And it will accomplish your tasks as quickly as possible.
Cloud Transfer. MultCloud simplifies the migration of files between clouds without the need for downloading and uploading. It offers a high migration speed, allowing even large numbers of files to be transferred quickly and efficiently.
Cloud Backup. MultCloud efficiently backs up files between cloud services. After backing up, you can restore your files for free. It also features a versioning option, letting you choose a specific backup version to recover. For example, you can backup Google Photos to Synology NAS.
Image Saver. MultCloud makes it easier to download photos and videos from Instagram, Pinterest, and other websites to local devices or cloud services at once.
After reading the whole article, you now know how to sync Google Drive to an external hard drive by Google Takeout, the Google Drive Disk, as well as Drive for Desktop. Meanwhile, if you want to sync files from Google Drive to another cloud, you can turn to MultCloud to complete the target without any effort.