How to use Power Automate to save email attachments to SharePoint directly, even with different names, just follow the below steps of 3 ways to make it, and one tip for you.

Quick Navigation:
Microsoft Power Automate is a powerful service for you to create automated workflows between many apps and services to sync files, get notifications, generate data, and more. Microsoft Power Automate supports services including Gmail, Office 365 Outlook, OneNote, SharePoint, OneDrive for Business, Microsoft Forms, Planner, Microsoft Teams, Outlook.com, SQL Server, and many more.
So, Can Power Automate save attachment to SharePoint? Definitely. How to use Power Automate save email attachments to SharePoint? You're in the right place because today we will show you the detailed steps to use Power Automate to migrate Gmail email attachments to SharePoint.
There are two ways for you to save email attachment to SharePoint in Power Automate, and another way to save email attachments to SharePoint manually.
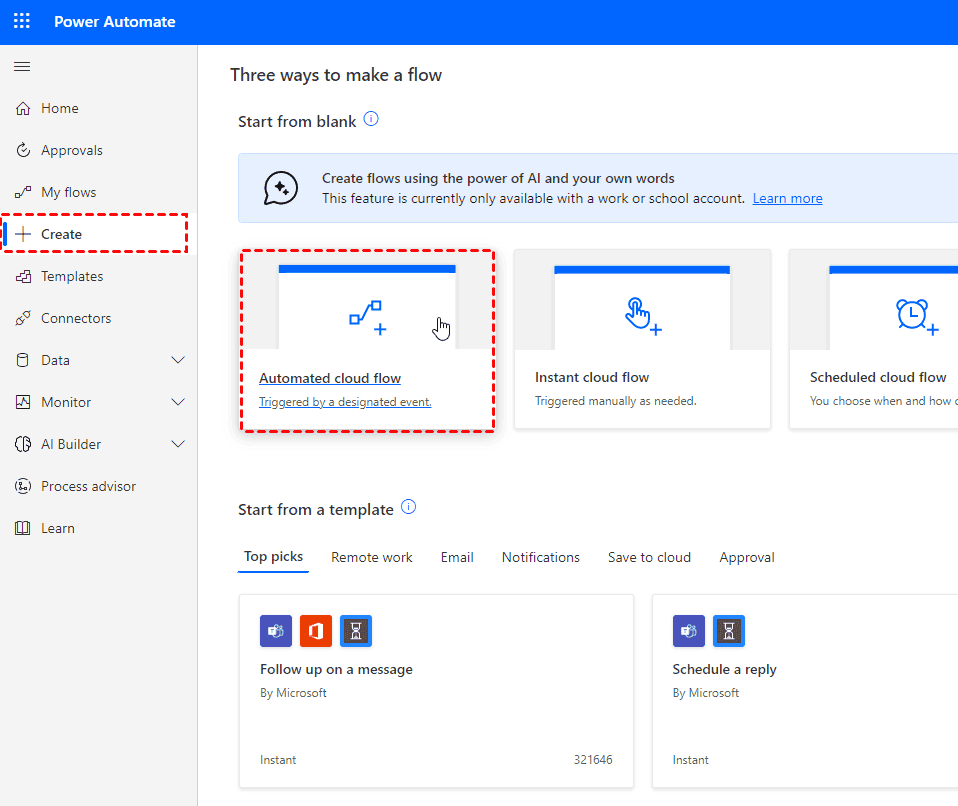
1. Please go to Microsoft Power Automate, and click Create on the left panel, choose the Automated cloud flow option.

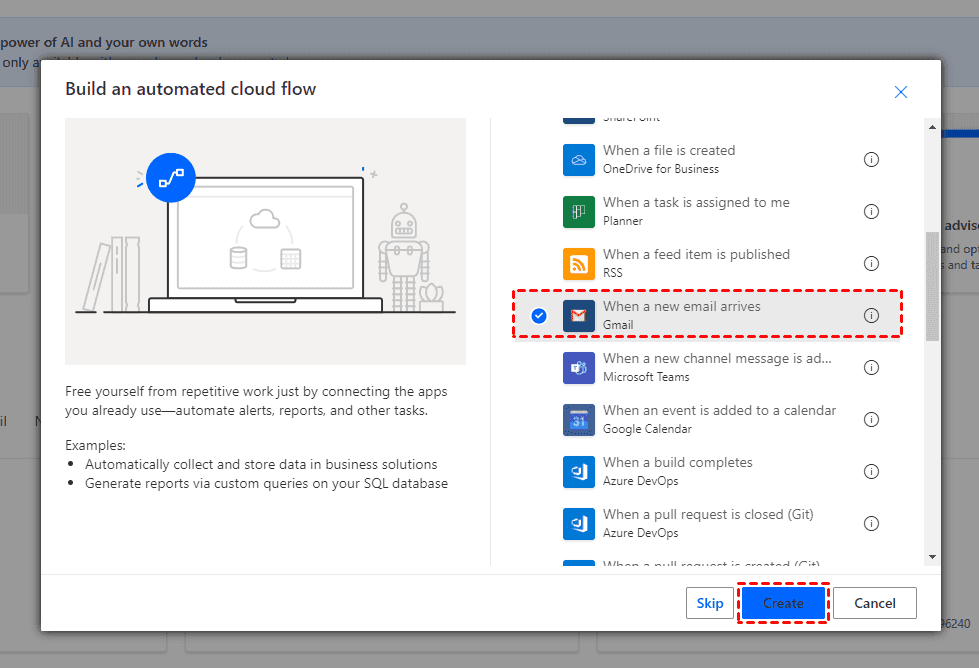
2. Rename Flow Name and tick When a new email arrives Gmail or When an email arrives (V3) Office 365 Outlook in Choose your flow’s trigger according to your need, and click Create. (Here we take Gmail for example)

Note: If you would like to save email attachments from Outlook.com, you can choose When an email arrives (V3) Office 365 Outlook in this step.
3. Sign in to your Gmail account. Select the Inbox label or other labels that you want to save email attachments. Select Yes for both Has Attachments and Include Attachments, and hit + New step.
Tips: You can also set up other fields to save the email attachments from specific emails.
4. Type in Apply to each and choose it from Actions.
5. Input Attachments in the Dynamic content, then choose it and hit Add an action.
6. Input SharePoint, and choose Create file SharePoint from the result. Then sign in to your SharePoint account.
7. Choose your Site Address, Folder Path, File Name, and File Content. Set Attachments Name as File Name, and Attachments Content as File Content, and click Save to save Gmail email attachment to SharePoint in Power Automate.
8. Click Test > Manually or Automatically > Test to test the task for power automate save email attachment to SharePoint.
You have to send a new email with email attachments to test if the task is set up correctly. Then you can see the email attachments have been saved to SharePoint.
If you prefer to make Power Automate save email attachment to SharePoint with a different name:
1. You have to follow the step 1-3 above.
2. Then input "variable" and choose Initialize variable to create two variables.
3. Set up AttachmentName in Name, and String type, and click + New step. Repeat the process to set up FileName in Name, and String in Type.
3. Click + New step, type apply to each, and choose it. Then select Attachments from dynamic content, then click Add an action.
4. Then input "condition", and choose it, then select AttachmentName you created as a value, containing docx, or other file types you want to save with different name.
5. Click Add an action in the If yes section, input, and choose Set variable, Select the AttachmentName you created and Attachment Name in value. Then customize the file name you want.
6. Type and choose Get email details Gmail, choose Message ID, and select Yes in the Include Attachments.
7. Then hit Add an action, input "create file", choose Create File SharePoint, choose the Site Address and folder path to save the email attachments, and choose the variable FileName in the File Name section, Attachments Content in the File Content section, click Save.
8. And now, you can test it to let Power Automate save attachments to a SharePoint-specific folder with a different name.
As a matter of fact, you cannot directly save email attachments to SharePoint List if you want to do so. If you would like to use Power Automate to save email attachment to SharePoint Documents library, try the following steps to make it:
1. Please install the Outlook desktop app on your computer, then open the email with your attachments.
2. Open your SharePoint website, and go to the My Files page.
3. Drag and drop these attachments directly to the SharePoint folder, and then they will be automatically uploaded to SharePoint.
Limitation: You have to repeat the process for all Attachments to move email attachment to SharePoint, it's time-consuming and not recommended.
According to the above ways to save email attachments to SharePoint, it’s quite complex for all of us to set it up. If you’d prefer an easy way to save email attachments to SharePoint, the powerful web-based multi-cloud manager - MultCloud will do you a big favor.
MultCloud is able to migrate Gmail or Outlook emails with all attachments to SharePoint, and other 30+ clouds. Besides, you can download all of them at once to make a backup for all your Gmail and Outlook emails with attachments for archiving with simple clicks.
Here are the steps to save Gmail email attachments to SharePoint with MultCloud:
1. Please create a new MultCloud account and sign in.
2. Click Add Email > Gmail to add, then click Add Cloud > SharePoint Online to add.
3. Select Email Migration, choose Gmail as the source, and select a subfolder in SharePoint as the target.
Tips: Before clicking migrate now, you can set up the useful features below:
4. Press Migrate Now to save Gmail email attachments to SharePoint directly.
Now, that you have mastered how to use Power Automate to save email attachments to SharePoint, just follow the above steps to save email attachments to SharePoint in Power Automate. If you prefer an easy way to migrate Gmail email attachments to SharePoint, MultCloud is your best choice, so why not give it a try?
Besides, you can backup Gmail emails to USB, and other devices with MultCloud, and save emails and attachments to OneDrive, Dropbox, and other clouds directly.