Do you think it is hard to integrate Microsoft 365 and pCloud? You may find it possible after looking through this comprehensive guide. It will tell you how to sync files from OneDrive, OneDrive for Business, and SharePoint to pCloud easily. Besides, you can learn an automatic way to save Outlook emails to pCloud.


Microsoft Office 365 has been rebranded as Microsoft 365. It is a subscription-based suite of productivity tools and services that includes various applications and cloud services, such as Outlook, OneDrive, and SharePoint. If you also use pCloud at the same time, you may want to integrate Microsoft 365 and pCloud to make them work more seamlessly and bring you some benefits like:
Although Microsoft 365 services and apps can share the same account, you may also have to open different interfaces when using them together. Here comes a new way to manage them just on one website to make pCloud Office integration – using MultCloud. It is a professional service for managing your multiple cloud storage services and email clients. Basic operations like Download, Upload, Cut, Delete, Copy, Copy to, Share, Rename, and Add New Folder can be easily achieved on it.
For example, if you want to move files from pCloud to OneDrive and SharePoint, or vice versa, at the same time, you can use the “Copy to” function.
Step 1: Sign up for a MultCloud account.
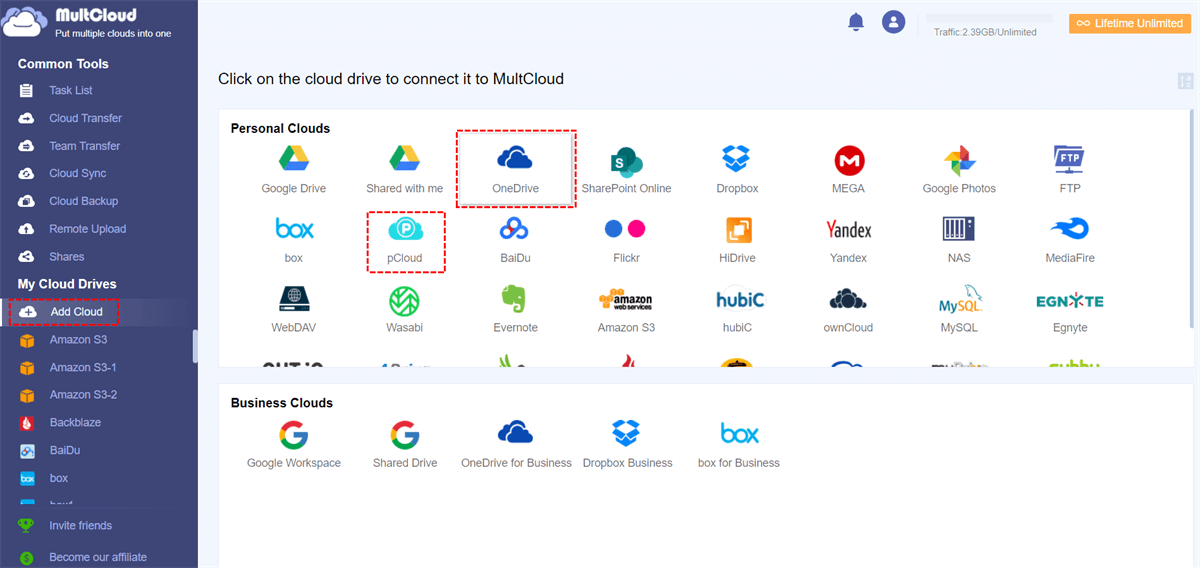
Step 2: Add pCloud, OneDrive, and OneDrive for Business to MultCloud by clicking “Add Cloud” and choosing the cloud icon.

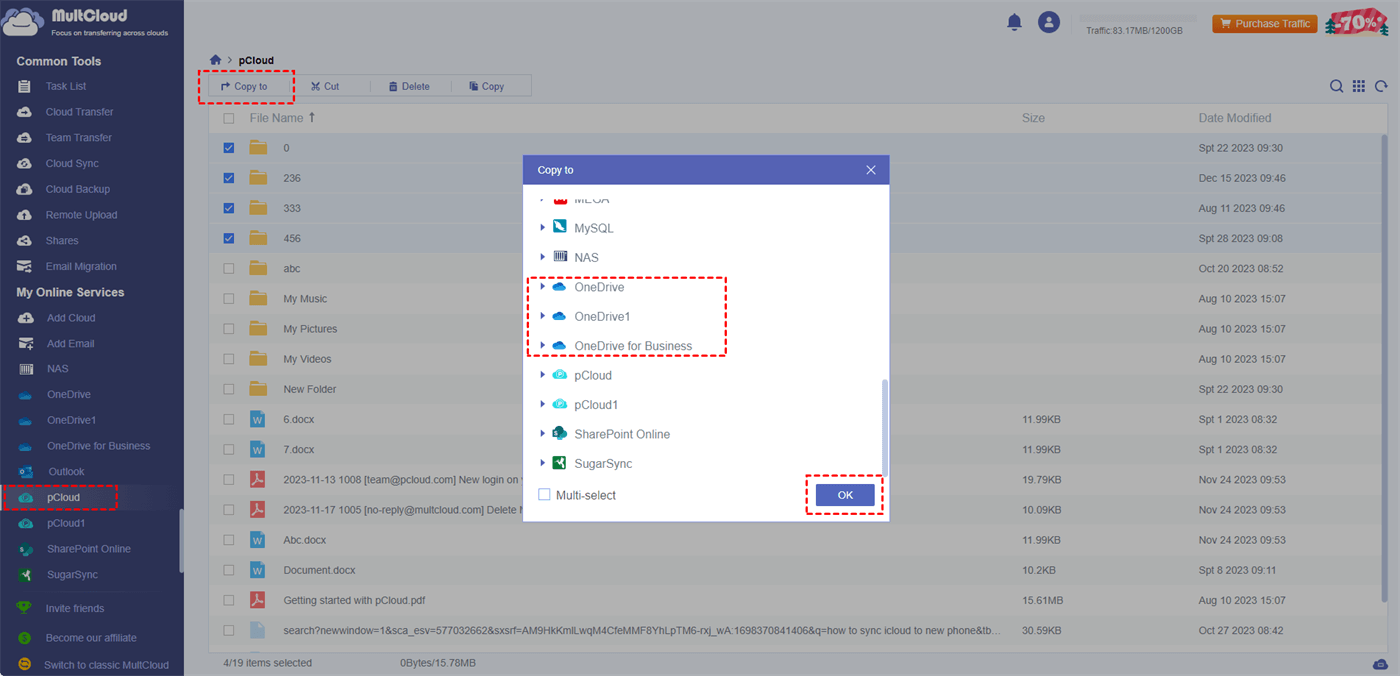
Step 3: Open pCloud on MultCloud and select the files that you want to move. Then, click “Copy to” in the upper bar.

Step 4: Tick “Multi-select” in the lower-left corner of the “Copy to” pop-up window and choose OneDrive and SharePoint folders to save these files. Then, click “OK” to start this process.
If the basic operations cannot meet your needs and you prefer a more seamless integration, try MultCloud Cloud Sync and Email Migration this time. Cloud Sync is one of the main functions of MultCloud, aiming at automatically syncing files from one cloud to another in real time. It offers various sync modes, like Two-way Sync, Real Time Sync, and others.
Email Migration converts emails into PDFs and transfers them to a cloud. You are allowed to convert and transfer multiple emails at once. Besides, you can choose whether to transfer with attachments or not. Although Email Migration does not provide the Real Time Sync feature, you can set an auto-start time by scheduling the migration task.
Now, you have a basic impression of Cloud Sync and Email Migration, and the steps for using them to set up pCloud Office integration are shown below.
Step 1: Add pCloud and OneDrive/OneDrive for Business/SharePoint to MultCloud after having a MultCloud account.
Step 2: Navigate to the “Cloud Sync” page and choose pCloud as the source and the Office service as the target.
Step 3: Open “Options” to choose the sync modes if you need them. Then, click “Sync Now” to initiate this task.
Note: MultCloud offers 5 GB of free traffic every month to transfer files. If you want more to foster pCloud Office integration, you can upgrade to a premium plan.
Step 1: Click “Add Email” and the Outlook icon to add Outlook to MultCloud. Also, add pCloud with the same operation shown above.
Step 2: Select “Email Migration” in the left sidebar and choose Outlook and pCloud in the corresponding boxes. Then, click “Migrate Now” to start this task.
Notes:
Although pCloud Office integration cannot be realized directly, you can try some workarounds to connect them like syncing files between cloud services and migrating emails from Outlook to pCloud. In this regard, MultCloud will be a good choice for you. It can manage the Microsoft services and pCloud together as well as automate the sync/migration tasks.
Additionally, when you become a MultCloud user, you can use other functions like Cloud Transfer and Cloud Backup to transfer or backup files between pCloud and OneDrive/OneDrive for Business and SharePoint.