Whether it's due to a change in organizational structure, personal reasons, or other factors, understanding how to transfer ownership efficiently is crucial. In this article, we'll delve into the process of transferring ownership of OneDrive files or folders.

Quick Search:
Transferring ownership of a shared OneDrive folder
Hi, I need help with how to transfer the ownership of a OneDrive folder I created to someone else in the team using the folder. Multiple other people have edit rights to the folder. Is there a way to do so, or does the other team member has to create his own, new shared folder and go through the hassle of inviting the other team members again to join the shared folder? Thanks for your help!
- Question from https://answers.microsoft.com/
OneDrive ownership transfer refers to the process of transferring control and management of files and folders stored on the OneDrive platform from one user to another. This enables the new owner to seamlessly access, edit and manage the transferred content.
There are several reasons why a person or organization might need to transfer ownership of files on OneDrive. Some common scenarios include:
Currently, users cannot directly transfer ownership of a Microsoft OneDrive folder from one user to another. This process requires the cooperation of the original folder owner and the new folder owner. As part of this process, the new owner of the file will need to download the folder to their computer, re-upload it to their own OneDrive account, and re-create any sharing and collaboration permissions.
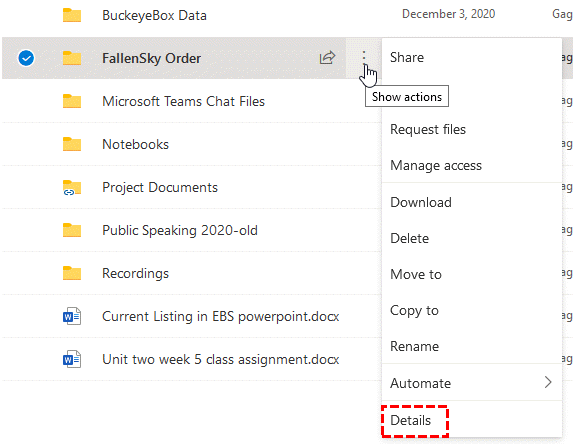
Step 1. In the OneDrive web app, right-click the folder whose ownership you want to change, and then click "Details".

Step 2. In the "Details" pane, under the "Has Access" heading, click "Manage Access". Make a note of any sharing permissions for the folder so you can pass them on to the new folder owner.
Step 3. In the "Manage Access" pane, under the "Direct Access" heading, click the "+" icon. In the "Enter a name or email address" text field, enter the name or email address of the new folder owner.
Notes:
Step 4. Click "Grant Access". Once the operation is complete, you will need to make the new folder owner follow the instructions below as the new folder owner.
Step 1. On the OneDrive web app, click "Share". On the "Shared" page, locate and click the shared folder.
Step 2. On the folder page, click "Download".
Step 3. Find the zip file in the Downloads folder. It will have the filename OneDrive_, followed by the date you downloaded the folder. Click "Extract All", and then click "Extract".
Step 4. In OneDrive, click "My Files", then click "Upload", then click "Folder".
Step 5. Find the OneDrive_ folder, then select the shared folder in it and click "Upload". If prompted, click "Upload".
Once you upload the folder to OneDrive, you will need to re-create any sharing permissions that the original folder owner sent you for the folder.
After understanding the above-detailed steps, you may feel that the whole process is cumbersome because it requires the cooperation of multiple people. At this point, you can leverage SharePoint in Office 365 to assign ownership of the file or folder. When using SharePoint, you can assign file ownership directly to team or non-team users. >> Let us understand how to transfer SharePoint ownership.
If you trust your colleagues, friends or other new folder owners enough, you can choose MultCloud, a professional cloud file manager, to transfer files or folders to another account directly in the same interface, without the need to manually download and upload updates, and the cooperation of multiple people is not required.
Step 1. Please create a MultCloud account and then log in to your MultCloud account immediately. Of course, you can register directly using Google, Facebook or Apple ID.
Step 2. Click "Add Cloud" and follow the steps to add both OneDrive accounts to MultCloud.
Step 3. Enter the "Cloud Transfer" page, select the files or folders you want to transfer from the first OneDrive account, and then select the second OneDrive account or the path in it as the destination.
Step 4. Set the transmission preference in "Options", and then set the transmission time in "Schedule" if the scheduled transmission is required. Finally, click "Transfer Now" to transfer data from OneDrive to another account.
In conclusion, knowing how to perform OneDrive ownership transfer is crucial for effective file management and collaboration. By following the step-by-step guide outlined in this article, you can confidently navigate the ownership transfer process and ensure seamless access to files and folders on OneDrive. In addition, professional tools can also help you transfer all OneDrive data to another account at once.