Wondering how to restore IDrive to a new computer? Look here and learn the detailed steps to reach your goal. Moreover, if you also use another cloud, there is the best way that shows you how to move files from IDrive to other clouds.


Users of IDrive can restore files and folders that have been backed up from the IDrive cloud storage or any of their local backups on their personal computers by using the Restore feature. The available options are:
This also makes data recovery simple if there are any hardware failures, accidental deletions, or when transferring data from one device to another.
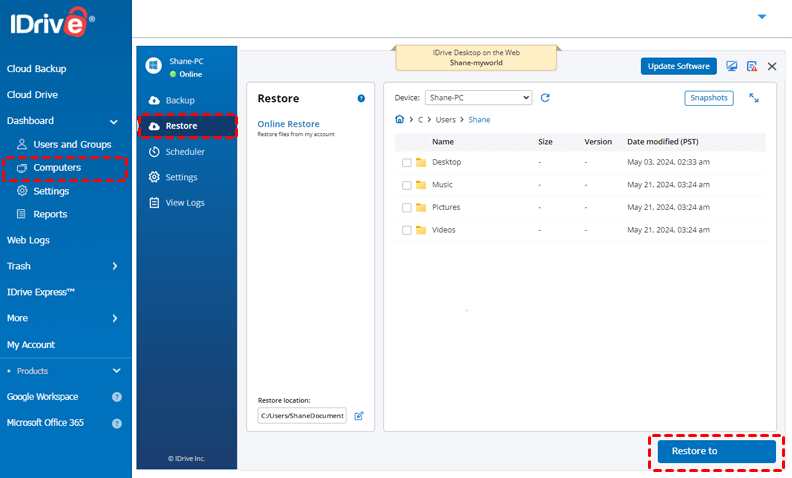
It is easy to execute the steps of how to restore IDrive to a new computer. You just need to download the IDrive app on your new computer, choose your desired files or folders, and click the restore button. More details will be told in the next part.
After finishing backing up files from your old computer, you can install the IDrive app on your new computer and restore files to it.
Step 1. Download and install the IDrive app.
Step 2. Log in to your IDrive account to connect your computer with IDrive.
Step 3. Select “Dashboard” in the left sidebar and choose “Computers”. Then, choose your new computer as the restore destination.
Step 4. Choose “Restore” in the left menu bar and choose the old computer as the restore source in the upper bar.
Step 5. Select the files you want to restore and tap on the restore button. Then, you just need to wait for the task completed.

Here are some common troubleshooting steps for restoring your IDrive backup to a new computer:
1. Re-check your login credentials: Make sure you are using the correct username and password.
2. Check Internet connection: Make sure that you have a steady and trustworthy connectivity.
3. Firewall and antivirus setting: Temporarily disable any firewalls or antivirus software which may conflict.
4. Verify restore destination: Ensure that the restore destination is right and has enough space to store files.
5. Look for updates: Make sure you are using the latest version of IDrive software as old versions might not be compatible.
6. File-by-file restore: If full-system restore encounters problems, attempt to restore files individually.
7. Consider reinstallation the app: If still facing issues, try uninstalling and then reinstalling IDrive software on your new computer.
8. Seek help: After following all troubleshooting steps but the issue persists, IDrive customer support will help with specific advice because there could be other reasons involved in this matter.
If you use other clouds like Google Drive, OneDrive, Dropbox, or iCloud Drive as the main cloud storage service but now want to use IDrive e2 instead, you can use MultCloud to directly transfer files between clouds without downloading and re-uploading.
MultCloud is welcomed by its automatic cloud-to-cloud file transfer functionality. You can use MultCloud Cloud Transfer to easily create a file transfer task and move files from other clouds to IDrive e2. There are some advantages that you may be in favor of.
There is an example of using Cloud Transfer to transfer files from Google Drive to IDrive e2.
Step 1. Open the MultCloud website and sign up for a free account.
Step 2. Add Google Drive to MultCloud by clicking “Add Cloud” and the Google Drive logo. Also, add IDrive e2 to MultCloud with the same operations.
Note: You can get the IDrive e2 Endpoint, Access Key ID, and Secret Access Key by creating an Access Key on the IDrive e2 website.
Step 3. Select “Cloud Transfer” in the left bar and choose Google Drive as the transfer source and IDrive e2 as the transfer target. Then, open “Options” to check the transfer settings and tap “Transfer Now” to start the task.
Note: The “Filter” feature is in “Options”, You can use it for selecting the files you want to transfer or ignore by file extensions.
As you can see, it is quite easy to make IDrive restore to new computer and you can follow the steps above to make it without efforts. Besides, if you plan to use IDrive e2 instead of Google Drive, Dropbox, OneDrive, Wasabi, pCloud, or other clouds, try MultCloud Cloud Transfer to automatically transfer files from them to IDrive without downloading.