Learn how to harness the power of iCloud Selective Sync and optimize your storage management effortlessly. In this guide, we will walk you through the step-by-step process of using iCloud Selective Sync to control which files and folders are stored locally on your device and which ones remain exclusively in the cloud. By mastering this feature, you'll be able to maximize storage space while still accessing your important files whenever you need them. Let's dive in!

Quick Search:
☞ "So I have one iCloud account and two Macbooks: one Mac for work, another for personal use. I want to use iCloud as cloud backup on both Macbooks, BUT I don't want one Mac to download the content of another. I had the Dropbox Selective Sync option, where I could select which folders would be synced. But I could not find something similar on iCloud. Is this possible in iCloud?"
☞ "Hey. I've noticed since moving files over to iCloud that all of the files appear to be downloaded on my Macbook under Finder / iCloud Drive. I just want those folders to stay in the cloud and be accessible, without being downloaded. Is there a way to sync just the desktop and documents folders without syncing all of the iCloud drive folders on a Macbook? Thanks."
Selective Sync iCloud Drive is a feature that allows users to choose specific files and folders to synchronize across their devices. By enabling Selective Sync, users can conserve local storage space on their devices by only syncing the files they need. This feature is particularly useful when storage capacity is limited or when users want to have more control over their file synchronization process.
Selective Sync iCloud offers several benefits for iCloud Drive users:
To start using iCloud Drive Selective Sync, you need to ensure that you have an iCloud account and the iCloud Drive feature enabled on your devices. Once you have set up iCloud Drive, follow the instructions below to enable Selective Sync on different platforms.
If you are using an iPhone or iPad, you can follow the steps below.
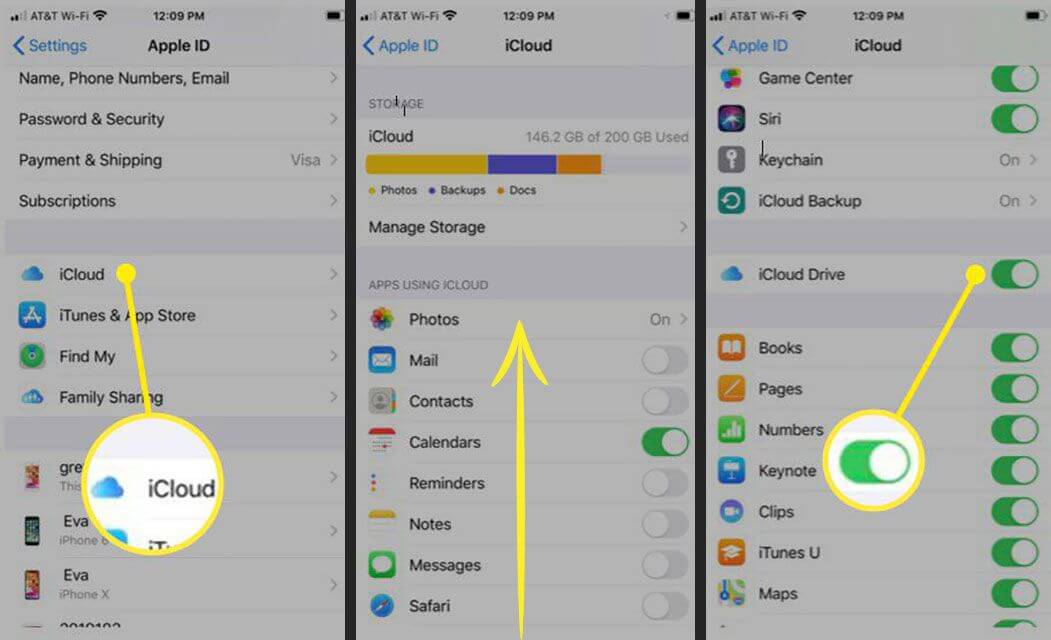
Step 1. Open the "Settings" app on your iPhone or iPad.
Step 2. Tap on your name at the top of the Settings menu.
Step 3. Select "iCloud" from the list of options.
Step 4. Tap on "iCloud Drive" and toggle the switch to enable it if it's not already enabled.

Step 5. Now, you will see a list of apps with individual toggles next to them.
Step 6. Click the toggles next to any app to enable or disable iCloud Drive sync.
Once you've made your selections, tap on "Done" or navigate back to the main settings screen to save your changes.
For Mac users, the detailed steps are different.
Step 1. Click on the Apple menu in the top-left corner of your screen and select "System Preferences".
Step 2. In the System Preferences window, click on "Apple ID" or "iCloud" (depending on your macOS version).
Step 3. Ensure that iCloud Drive is enabled by checking the box next to it.
Step 4. Click on the "Options" button next to iCloud Drive.
Step 5. In the iCloud Drive options, you'll see a list of apps that support iCloud Drive syncing.
Step 6. Enable or disable the apps as per your preference.
Step 7. To sync specific files or folders within an app, open the Finder, navigate to the file or folder, and right-click on it. Then, select "Remove Download" or "Download Now" to enable or disable syncing for that item.
If you are using iCloud for Windows, you can use iCloud Drive’s selective sync to get more control over which files or folders are kept on your device locally or uploaded to the cloud. You need to open the context menu for any file located in your iCloud Drive folder and select either "Free up space" to stop syncing a file to that specific device or "Always keep on this device" to make sure you have offline access at all times.
While iCloud Drive Selective Sync is generally reliable, you may encounter occasional issues. Here are some common problems and their solutions:
iCloud Drive Selective Sync provides users with a powerful tool to manage their files and optimize storage usage across their devices. By selectively syncing files and folders, users can conserve storage space, enhance device performance, and have greater control over their data. Understanding how to enable and manage Selective Sync settings is essential to leverage this feature effectively. With the comprehensive guide provided in this article, you can make the most of iCloud Drive Selective Sync and streamline your file management process.
Q1: Does Selective Sync affect file accessibility across different devices?
A1: Selective Sync allows you to choose which files and folders to sync across devices. Files and folders not selected for syncing will only be accessible through iCloud Drive's web interface or the respective app that created them.
Q2: Will disabling Selective Sync delete files from my devices?
A2: Disabling Selective Sync will remove synced files and folders from your devices, but they will still be accessible through iCloud Drive's web interface and other devices with Selective Sync enabled.
Q3: Is there an alternative to iCloud Drive?
A3: While iCloud Drive is a popular choice, there are several alternative cloud storage services available. Some notable alternatives include Google Drive, Dropbox, and Microsoft OneDrive. Each service offers its own set of features, pricing plans, and integration options. Consider exploring these alternatives to find the one that best suits your specific needs.
Q4: Is there a way to transfer iCloud Drive to other clouds?
A4: Yes, there is a cloud-to-cloud transfer tool --- MultCloud that can help transfer files across different cloud accounts. Also, you can set a scheduled plan and email notification during the file migration procedure.