How do I restore pictures saved in Google Photos to my new phone after my phone is stolen? Don't worry, you can directly transfer Google Photos to gallery on your iPhone or Android device. The article provides details for your reference.

Quick Search:

► "How to put photos from Google Photos into the gallery on Samsung s8? Because I want to send pictures to contacts directly from my local gallery." ► "My phone was accidentally stolen and all my local pictures are gone. How do I transfer my album pictures from Google Photos to my local albums?"
Today, Google Photos is a photo savior in real life. Whether you're replacing your existing smartphone or just doing a factory reset, you'll need to get back your photos uploaded to the Google Photos app. In these cases, it's important to know how to transfer photos from Google Photos to Gallery. After all, some photos may have beautiful memories or great commercial value.
When it comes to images, hardly any platform comes close to Google Photos in terms of efficiency. Google Photos makes it easy to view photos from any smartphone. The best time to use this service is when you need to change your phone. With Google Photos, you can easily move pictures from your old device to your new one.
Let's start learning how to restore your photos on any new smartphone using this cloud photo backup service.
This section will demonstrate how to transfer multiple photos from Google Photos to gallery no matter you are using Android or iOS devices.
Before changing your Android device, managing and working with photos was an easy process. If you lose or break your phone, Google Photos can help you restore your photos stored in cloud end. Next, here is a simple step-by-step guide on how to restore photos from Google Photos to your Android phone.
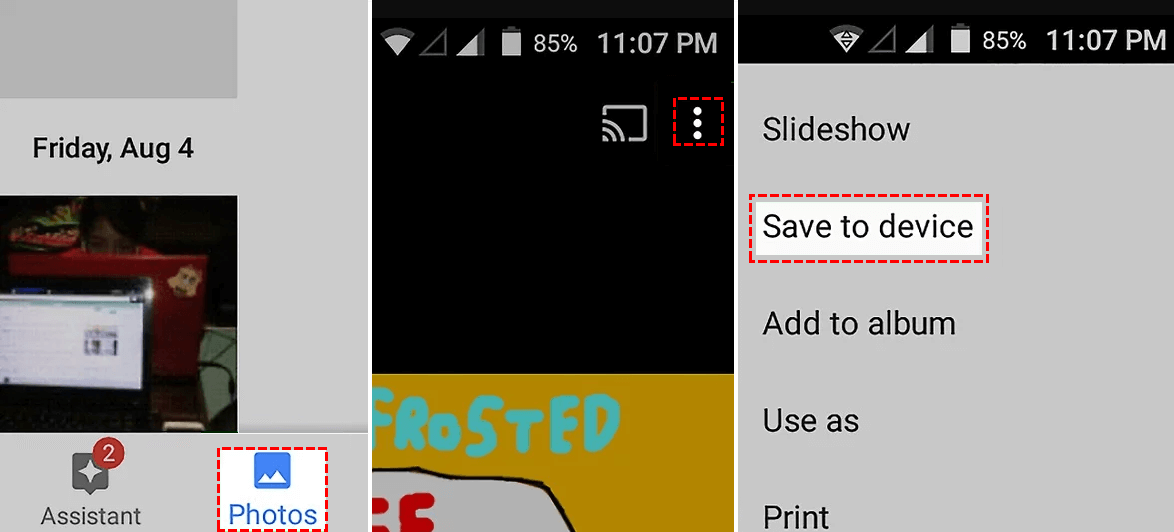
Step 1: Open Google Chrome on your Android device. Sign in with the Gmail account where you saved the photo. Make sure you're signed in with the same Gmail account you want to access your photos. Step 2: Open the Google Photos app on your phone. If you don't have this program installed, you need to go to the app store to download and install it. Step 3: Click on the "Photos" option. A new window will open with all of your photos saved in Google Photos. Select photos to transfer. Step 4: With the photo selected, press the three vertical dots in the upper right corner. Step 5: Select the "Save to device" option from the drop-down menu that appears after clicking the three dots.

Note: If you don't see the "Download" option on the menu, you already have this file saved in the gallery app.
This is how to transfer Google Photos to gallery on Android device. To transfer multiple photos Google Photos to gallery, you need to select multiple photos and click the download option in the drop-down menu with three vertical dots. Once the download is complete, all of your photos will appear in your phone's file manager.
If you have an iOS phone, you may be wondering how to sync photos or precious memories on your new iPhone. You don't have to go to great lengths to save old photos on your new iPhone. With the advancement of technology, syncing your photos through Google Photos has become very simple. Here is a simple step-by-step guide on how to transfer Google Photos to iPhone gallery.
Step 1: Go to the app store and search for Google Photos in the search bar. An icon for the Google Photos app will appear. Install the Google Photos app on your iPhone. Step 2: Open the app and accept the terms and conditions to access your phone's photos. Step 3: Sign in with the account where you saved the photo. You'll find all your photos and videos in Google Photos. Step 4: Select the photos you want to transfer to the gallery. Click the three dots in the upper right corner. Step 5: Click on the "Save to device" option after clicking the three dots. Your photos will be saved in the iPhone Camera Roll.
You can also transfer multiple photos from Google Photos to gallery in this way. Just select multiple photos to transfer and click on the "Save to device" option.
Here is a simple step-by-step guide on how to download photos from Google Photos to computer gallery.
Step 1: Open Google Chrome on your computer. Sign in to Google Photos with the email account where you saved the photos. Step 2: Select photos and click on the three vertical dots in the upper right corner and select the "Download" option.
Notes:
Hope this article is of great help to you. With the methods and steps provided in this article, you should be able to clearly know how to transfer Google Photos to gallery. When you need to get images saved in Google Photos, the methods and steps in this article can solve most of the problems you encounter.
If you encounter problems with downloading, transferring or syncing while using Google Photos, you can also solve it perfectly with the detailed steps provided in this article.
In the process of using Google Photos, you may encounter common problems, such as how to automatically sync photos on your phone to Google Photos, or how to transfer pictures between multiple Google Photos accounts. The detailed steps below can help you operate faster.
If you want to create a backup of the photos and videos you take with your iPhone, you can activate the automatic backup option in Google Photos.
Step 1: Go to your Google Photos. Step 2: Click on your account profile and select "Photo Settings". Step 3: Switch the "Back up & sync" option to the ON state.
That's it, all your recent photos taken and collected can now be automatically stored in Google Photos. Remember, Google Photos limits the file size to 16 megapixels, so any photos with greater definition will be compressed.
If you want to transfer files between two or more Google Photos accounts you have registered, MultCloud, a cloud file manager, can help you. The "Cloud Transfer" in MultCloud can help you easily complete data migration tasks without switching accounts. For example, after graduation, you want to migrate data from your school account to your newly registered Google Photos account.
Step 1: Create a MultCloud account, or you can log in directly with your Google+ or Facebook account.
Step 2: On the main interface of this tool, move to the "Add Cloud" tab and scroll down to select "Google Photos" in the list. Then, follow the simple instructions to complete the adding tasks.
Note: To differentiate the two accounts, you can name the first Google Photos account to Google Photos 1 and the other account to Google Photos 2.
Step 3: Add another Google Photos account in the same way as above. Step 4: Go to the "Cloud Transfer" tab and select the Google Photos directory where your personal photos are located as the source and your own photo account as the destination. Click "Transfer Now" to start transferring photos from one Google account to another account.
Notes:
If you want to sync Google Photos to another account, such as transfer Google Photos to Flickr, you can add Flickr in MultCloud, and then change the destination cloud drive to Flickr.