How to save directly to SharePoint without errors? With the most detailed instructions illustrated in this full guide, you will get the best way to successfully save files like documents and images to SharePoint.

Quick Search:
How do I save files to SharePoint? For example, can files on my computer, files created in Microsoft Office, or other cloud drives be saved directly to SharePoint?
In many communities and forums, users are asking questions about how to save files to SharePoint. While this seems like a simple problem, it's actually quite tedious because there are so many techniques for saving files to SharePoint, each with its advantages and disadvantages. Therefore, in order to better solve the doubts of many users, I decided to write this article to provide you with all the options.
As a web-based collaborative platform that integrates natively with Microsoft Office, SharePoint helps users share and manage content, knowledge, and applications to enhance teamwork, find information quickly, and collaborate seamlessly across the organization. But because of its powerful functions, many users have doubts about how to save files to SharePoint. Below you will find 7 important and commonly used options for saving files to SharePoint.
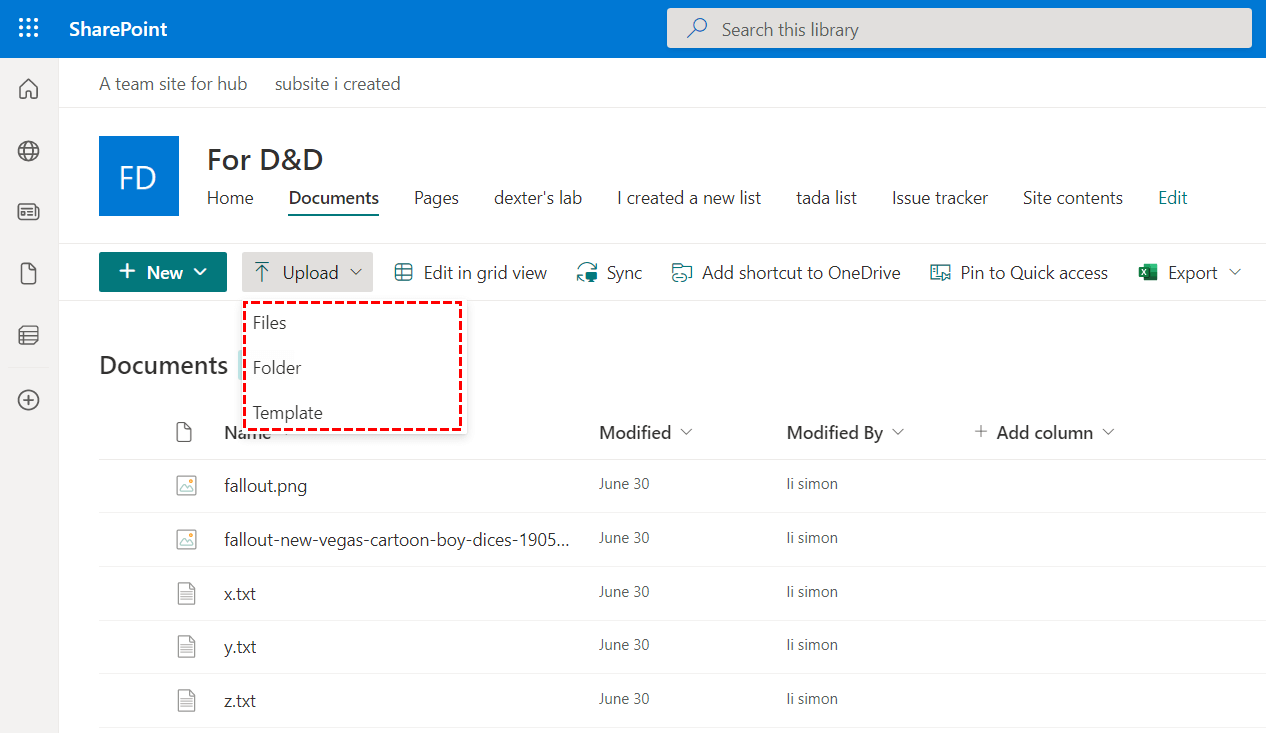
The most basic and intuitive option is to use the upload button on the SharePoint library. Users using SharePoint Online can use this button to upload multiple files and upload folders to SharePoint Office 365. And people using older versions of SharePoint or running SharePoint locally or still running the classic look of a document library - you can only upload one file at a time using this method.

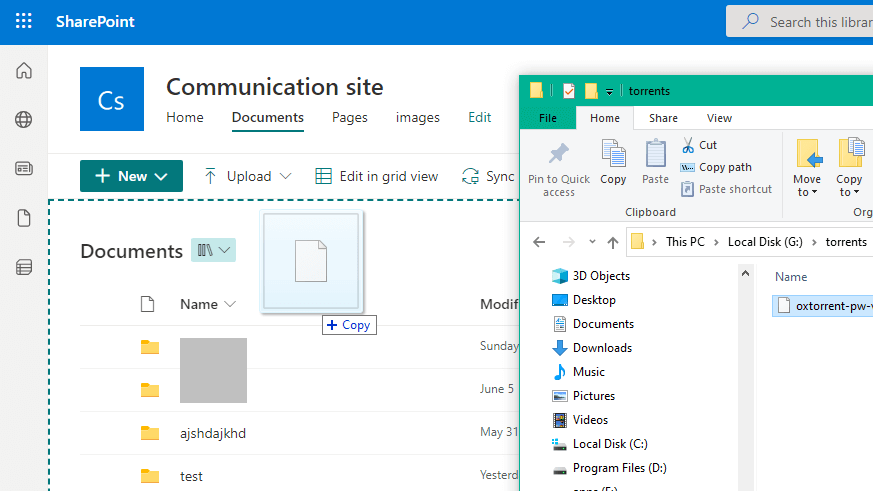
You'll find a new feature called drag and drop in SharePoint Online or SharePoint 2013. The advantage of using this method is that you can drag and drop multiple files and folders onto the browser from anywhere. Note that like the previous option, you can't drag and drop folders unless you have the modern experience for SharePoint Online and document libraries.

The above methods are helpful if you only use one cloud account in your day-to-day life and you don't have many sites in your SharePoint account. If not, you might be confused when you want to switch between clouds or find the right SharePoint site to upload files to.
Here, a free web-based multiple cloud storage manager called MultCloud can make your SharePoint upload process easier and more convenient.
MultCloud is a professional and reliable cloud file manager that provides an excellent web interface that allows you to efficiently and securely use, manage and transfer data between 30+ brands of clouds.
If you want an easier way to upload files to SharePoint, follow the instructions below.
Step 1. Create a MultCloud account on your browser and log in. Step 2. Click the "Add Cloud" button and select the SharePoint icon. Then follow the popup to add your SharePoint account to MultCloud.
Step 3. Open your SharePoint account in MultCloud, then open the "Documents" folder in your site. Step 4. Click the "Upload File" button in the upper function bar and navigate to the file in the pop-up window. Then click "Open" and your file will be successfully uploaded to SharePoint immediately.
Notes:
If you author a brand new document in Word, Excel, PowerPoint, or OneNote, you can save the document directly to a specific SharePoint site/library. By saving files this way, you don't need to save the document to the desktop first and then upload it to SharePoint, eliminating cumbersome upload steps. You can do this by following these steps:
Step 1. Copy the URL of the SharePoint site where you want to save the document.
Step 2. In Word, Excel, PowerPoint or OneNote, go to File > Save As > Browse. In the window that pops up, paste the URL of the SharePoint site into the address window.
Note: Make sure not to include the full path. For example, if the full path to a library/view is https://companyname.sharepoint.com/sites/intranet/accounting/Shared%20Documents/Forms/AllItems.aspx, the path you need to paste in the address bar of the pop-up is https://companyname.sharepoint.com/sites/intranet/accounting/Shared%20Documents (without /Forms/AllItems.aspx). Otherwise, the location will not resolve and you will receive the following error message:
Step 3. After doing the above, you will see the content of the website. So just navigate to the library and specific folder where you want to save the document and click "Open". The document will then be saved directly to SharePoint.
The fourth option for saving documents to SharePoint is to create them from SharePoint. Instead of creating a new document in Word or Excel on your desktop, you can use the "New" drop-down button and select the file you want to create. You can choose to create Word, Excel, PowerPoint and OneNote files. The nice thing about this approach is that files created this way are automatically saved to the document library/folder where you click the "New" button!
Another option for saving files to SharePoint is through Windows Explorer. When you open a document library through Windows Explorer, a regular File Explorer window opens and you can drag and drop documents and folders just like you would move/copy files in Windows.
Note: You can only use this option if you have a classic document library, are running SharePoint locally, or have non-Microsoft Office files (i.e. AutoCAD or Photoshop files). If you use the modern library experience, use any of the above options instead.
Another option for saving files to SharePoint is to use the OneDrive sync client. This means you save the file to a OneDrive sync folder on the C: drive, save it to a previously synced document library, and then do the rest by syncing (copying) the file to SharePoint Online.
Step 1. Go to the library you want to sync and click the "Sync" button. Step 2. If the OneDrive application is not installed on your computer, it will prompt you to download the software first. Step 3. After all settings are complete, the library will be synced to your computer.
For how to save to SharePoint directly and quickly, this article describes 7 possible ways. You can choose the method that works best for you and follow the step-by-step guide to quickly save whatever you want to SharePoint Online.
Moreover, as the best cloud file transfer service, MultCloud not only helps you save files to SharePoint Online, but also provides you with Cloud Transfer, Cloud Sync, Cloud Backup and Team Transfer functions. Therefore, you can easily achieve cloud-to-cloud transfer without downloading and uploading steps.