Are you looking for methods to make Evernote backup all notes? In this tutorial, we will show you how to export all Evernote notes to a local device and cloud drive. If you are interested, keep reading.

Quick Search:
I'm using Evernote Personal 10.68.3 on a PC and can no longer export the entire content of Notebooks as a single file to store as a security precaution. I used to sign out and then pressed Ctrl/Shift/E to create the file as a backup when logging back in again. In the current version this no longer works for me. What is the way to create the backup please?
- Question from Reddit
To export all notes from Evernote to your Mac, you can follow the steps below:
Step 1: Launch your Evernote client app on your PC. And head to Notebooks.
Step 2: Select the notes you want to back up. Then, tap File > Export Notes.
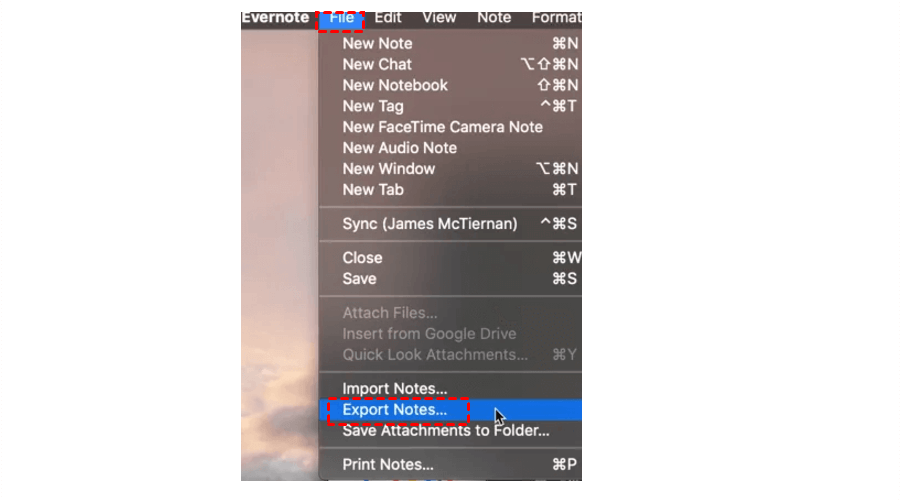
Step 3: Select a target path on your computer to save the downloaded notes. You can name it and choose the right Format you need. Next, tap the Save button.

If you haven’t installed Evernote on your device, you can utilize its web app to back up Evernote:
Step 1: Log into your Evernote account on the web.
Step 2: Select the note you want to back up. Tap the 3-dots icon in the upper right corner. Then hit Print to select Destination as Save as PDF.
Step 3: Select a local path to save the note.
Step 4: Repeat the steps above to export all your Evernote notes.
Notes:
We have shown you how to make Evernote data backup on your local device. But what if your local device’s storage is insufficient? In this situation, utilizing cloud services is helpful since many cloud providers offer cost-effective storage space, such as Google Drive, MEGA, etc. You can simply back up Evernote notes to a cloud drive directly via MultCloud.
MultCloud is a smart and versatile cloud backup service that allows you to back up files from one cloud to another directly without going through a download-and-upload process. It currently supports more than 30 leading and professional cloud services, such as Evernote, Dropbox, OneDrive, Google Drive, MEGA, iCloud Drive, iCloud Photos, Flickr, Box, pCloud, etc.
By utilizing MultCloud to back up files between cloud drives, you can enjoy many benefits:
Now, refer to the following section to learn how to make Evernote data backup to another cloud drive via MultCloud. We will take OneDrive as the target cloud:
Step 1: Create an account on MultCloud for free. Or, log in with your Google, Facebook, or Apple ID.
Step 2: Under Cloud-to-cloud Transfer, tap Add Cloud, and then all cloud services that MultCloud supports will be displayed on the main page. Tap the icon of Evernote to add your account. Follow the on-screen notes to permit MultCloud. Next, apply the same way to add OneDrive.
Step 3: Navigate to Cloud Backup. Select Evernote as the source directory and OneDrive as the target directory. At last, hit Backup Now.
Note: You can also select partial files from Evernote as the source directory.
As you can see, the way to back up notes from Evernote to OneDrive via MultCloud is simple and easy. Likewise, you can back up Dropbox to iCloud too. All you need to change is the source and target directories. To create scheduled tasks, simply tap the Schedule button on the main page. Additionally, you can oversee the process by visiting the Task List on the left upper side.
On top of backing up files between cloud services, MultCloud also makes it easy to transfer and sync data from one cloud to another. Similar to the Cloud Backup feature, you can enjoy a leading transfer/sync speed during the process. You can create automatic and offline transfer/sync tasks too. For instance, the way to transfer data from Dropbox to SharePoint via MultCloud is easy.
That’s all about how to make Evernote data backup to a local device or cloud drive. In a nutshell, you can utilize the Evernote client or web app to download notes on your computer. Meanwhile, when you plan to back up Evernote to a cloud service, you can utilize MultCloud to ease the process smoothly.
By utilizing MultCloud, you can manage different cloud services together. This way, you don’t need to head to different platforms frequently. Instead, you can access different cloud services with a simple click. Meanwhile, you can download files and videos from torrent files and magnet links to cloud service easily. For example, you can download directly to Google Drive.


