Can you have two iPhones with the same Apple ID? Yes, but it can lead to data confusion. This guide details how to separate two iPhones with the same iCloud account, giving you control over your information and separate experiences on each device.

Imagine this: you take a photo on your iPhone, and it instantly appears on your friend's phone. Or, you receive a text message meant for them, and vice versa. This data confusion can happen when two iPhones share the same Apple ID. While sharing an Apple ID offers convenience – think shared App Store purchases and iCloud storage – it can also lead to privacy concerns and a lack of personalization.

Sharing an Apple ID can be a great way to streamline App Store purchases and access to iCloud storage. You can download apps your friend bought and vice versa, and both devices benefit from the same iCloud storage plan. However, this convenience comes with a cost.
If you're experiencing any of the following, it's a sign you might need separate Apple IDs:
Ready to give each iPhone its own identity? Here are 5 ways to unlink two iPhones with the same Apple ID:
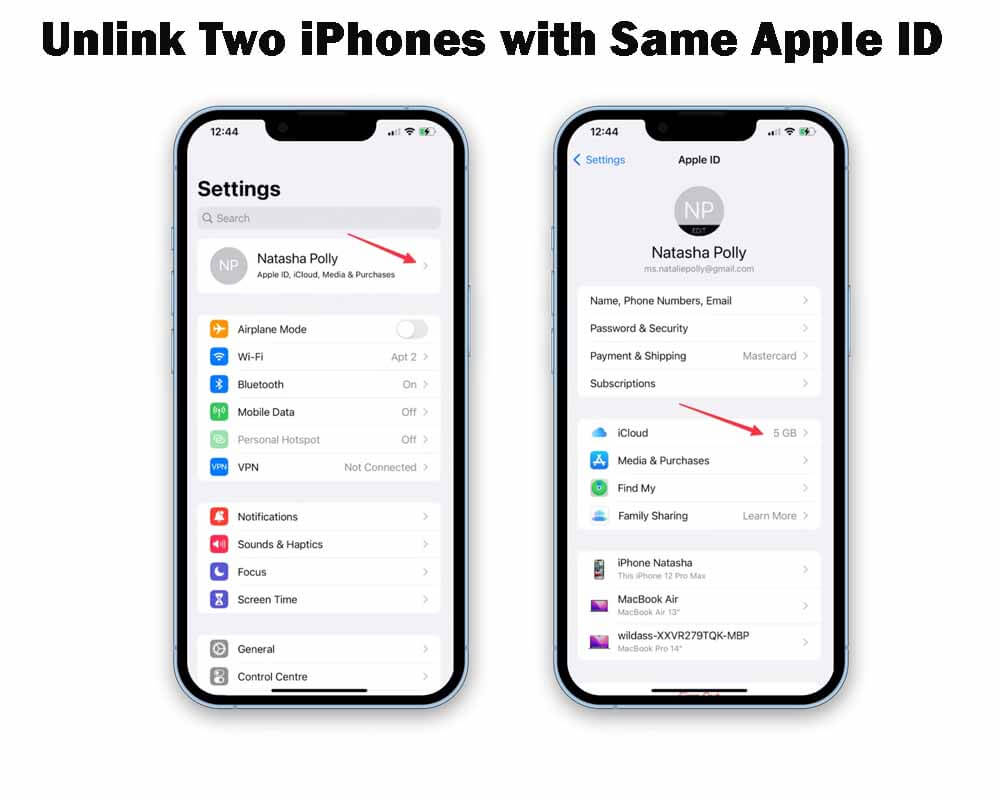
1. Open the Settings app on the iPhone you want to unlink.
2. Tap on your Apple ID at the top.
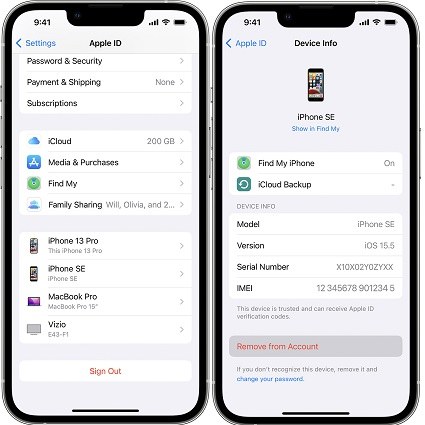
3. Scroll down and select the other iPhone from the list of devices under your Apple ID.
4. Select "Remove from Account" and make sure it's what you want.

5. A window asking you to "Remove from Device" or "Keep iCloud Data" will appear.
1. Open a web browser, navigate to https://www.icloud.com/, and log in using your shared Apple ID.
2. Click on "Find My iPhone".
3. Choose "All Devices" from the top menu.
4. From the list, select the iPhone that you wish to unlink.
5. Click on "Remove This Device" and confirm by tapping "Remove".
1. Using a different Apple device (iPad, Mac, etc.) that is signed in with your shared Apple ID, launch the Find My iPhone app.
2. Choose the "Devices" tab from the screen's bottom.
3. Choose the iPhone you want to unlink.
4. Scroll down and tap "Remove This Device".
5. Verify your selection by selecting "Remove" and providing your Apple ID password.
1. Sign in with your shared Apple ID at https://support.apple.com/en-us/105023.
2. In the "Account" section, select "Sign In and Security".
3. Choose the iPhone that you wish to unlink under "Devices".
4. Confirm your selection by clicking "Remove from Account" next to the device.
This method is optional but can be helpful, especially if you chose "Keep iCloud Data" during Method 1. Resetting the iPhone will erase all data and settings, ensuring a clean slate for the new, separate Apple ID.
1. Make a backup to iCloud first if you wish to save your data (it's advised before moving on).
2. Open the Settings app on the unlinked iPhone.
3. Tap on "General".
4. Scroll down and select "Transfer or Reset iPhone".
5. Select "Erase All Content and Settings".
6. To finish the reset, enter your passcode and adhere to the on-screen directions.
Now that you've unlinked the iPhones, it's time to set up separate Apple IDs. Here's what you need to do:
By unlinking your iPhones, you gain control over your data and create a personalized experience for each device. No more accidental text messages or duplicated photos! You can download apps specific to your needs, manage iCloud storage individually, and enjoy the privacy of having your own Apple ID. Now go forth and conquer the world with your newly independent iPhones!
Managing multiple iCloud accounts can feel like juggling a dozen balls in the air—challenging and often chaotic! Whether you’re sharing family storage, collaborating on projects, or simply keeping personal and work files separate, the task can quickly become overwhelming.
Fortunately, there’s an easier way to streamline this process and regain control. Enter MultCloud, a powerful cloud management tool designed to simplify your digital life. With MultCloud, you can effortlessly manage and transfer data between multiple iCloud accounts without the hassle of constant logins and logouts. Its intuitive interface allows you to seamlessly switch between accounts, sync files, and even back up your data, making it a go-to solution for anyone looking to enhance their cloud experience.