Learn how to set rules in Outlook to organize your inbox and manage specific emails effortlessly. This guide covers step-by-step instructions, tips for setting rules for specific emails, and strategies for using Outlook rules effectively to optimize your email experience.

Rules are automated actions that Outlook can perform on incoming and outgoing emails based on specific criteria. They can be as simple as moving emails from a specific sender to a particular folder or as complex as flagging important emails, deleting junk mail, or even forwarding messages to other recipients.
The process of setting up emails rules in Classic Outlook and New Outlook is quite different, and here we will first show you how to create rules in Outlook (Classic) step by step.
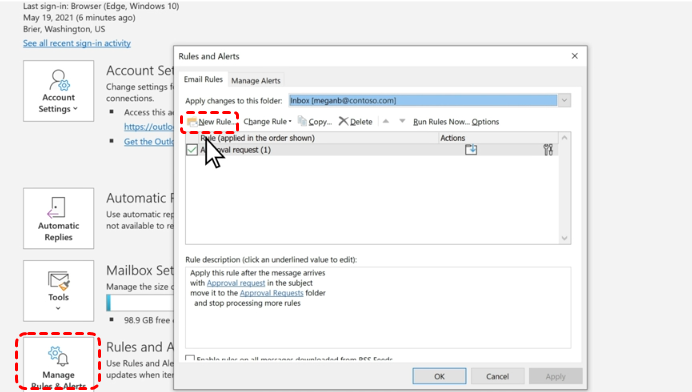
Step 1. Click on "Files" and then "Rules and Alerts" in the new window.
Step 2. In the "Rules Wizard" interface, click on "New Rule" to create a totally new rule for your Outlook account.

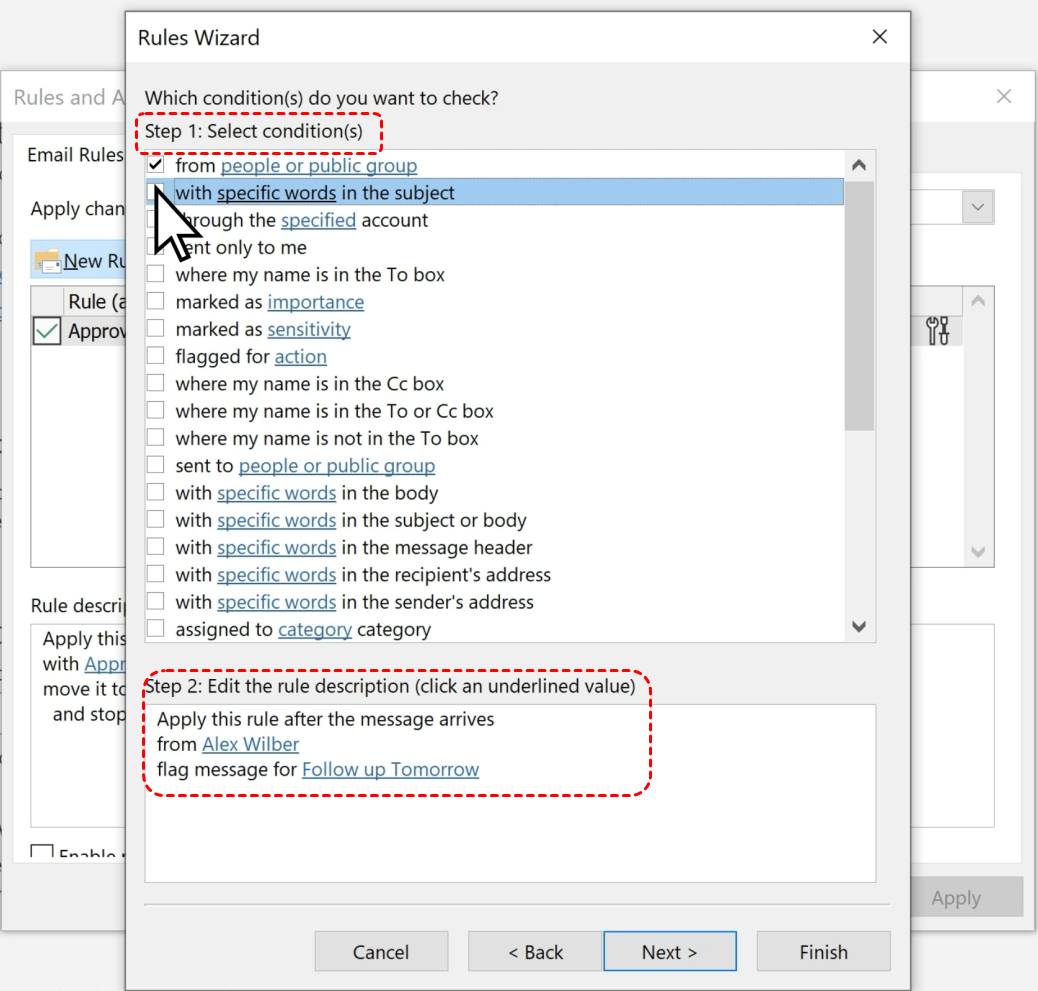
Step 3. Choose a template. For exmaple, you can Select "Flag messages from someone for follow-up".
Step 4. Edit the rule descriptions. Choose an underlined value, select the options you want, and then select "OK".
Step 5. Define Conditions and Actions:

Step 6. Carefully review the rule's settings to ensure it will work as intended. Click "Finish" to save the rule. If you want to use the rule right away, select the "Run this new rule now on messages already in the current folder" checkbox, and then select "OK".
To delete an existing rule, just check the box in front of the target rule and click on "delete" option.
To change an existing rule, check the box in front of the target rule and click on "change rules" option. In the new pop-out window, redefine conditions and actions as you need.
Step 1. Access your Outlook account through a web browser.
Step 2. Click on the gear icon in the top-right corner and select "Settings".
Step 3. In the Settings pane, choose "Mail".
Step 4. Scroll down to the "Rules" section. First of all, input a name to manifest its purpose.
Step 5. Add conditions to the rule, such as specific sender or recipient addresses, to target specific emails for deletion. You can add severnal conditions simultaneously to filter the desired results more precisely.
Step 6. Add an action from the given list. For example, choose "Delete", which is quite useful to automatically delete some spam emails.
Step 7. Click "Save" to apply the settings.
With learning how to create and utilize Outlook rules, you can significantly improve your email management and productivity. By automating routine tasks, you can focus on more important activities and reduce stress. Remember to experiment with different rule combinations to find the best approach for your specific needs.
This article addresses the question “how to set rules in Outlook?”. If you’re considering backing up your Outlook, MultCloud can be extremely useful. Trusted by over 3 million users, MultCloud is a multi-cloud management tool that facilitates the transfer or synchronization of files between various cloud services.
For instance, you can save your Outlook emails as PDFs to your computer or cloud drives, such as Google Drive, OneDrive, or Dropbox, in bulk. MultCloud also enables you to access and manage all your cloud or Email accounts via a single application. Currently, it supports more than 30 different cloud services, including Google Drive, OneDrive, Dropbox, Box, Google Photos, iCloud Photos, FTP, WebDav, and more.