How to Format Hard Drive in Synology NAS: Easy Steps to Optimize Storage
Master how to format hard drive in Synology NAS and optimize your storage with ease. Understand how to reformat Synology NAS hard drive without losing data, tackle volume formatting, and manage failed hard drives effectively. Perfect for beginners and experienced users alike.
February 9, 2025
Preface
Setting up or maintaining a Synology NAS system often brings questions about managing hard drives. Among these, the common query is how to format hard drive in Synology NAS. Whether you're preparing a new drive, optimizing performance, or tackling errors, formatting plays a crucial role. Understanding the "how" and "why" behind formatting can save time, avoid headaches, and ensure your data is safe.
NAS
Why Do You Need to Format a Hard Drive in Synology NAS?
Formatting a hard drive in a Synology NAS isn’t just a technical task—it’s a necessity in multiple scenarios. Here’s a detailed look at why users may need to format their NAS drives:
⭕ Preparing for First-Time Use. New hard drives require formatting to be recognized by your Synology NAS. Without formatting, the system cannot allocate storage properly.
⭕ Resolving Compatibility Issues. Drives formatted with incompatible file systems (e.g., NTFS or FAT32) need reformatting for Synology NAS compatibility.
⭕ Enhancing Performance. Over time, fragmented data or residual files may slow down your NAS. Reformatting clears these issues, improving efficiency.
⭕ Changing File Systems. Switching to a format like Btrfs or EXT4, supported by Synology, ensures advanced features like snapshots and enhanced data integrity.
⭕ Replacing a Failed Drive. When learning how to replace a failed hard drive in your Synology NAS, formatting the new drive becomes a critical step to integrate it seamlessly.
⭕ Clearing Corrupted Data. Data corruption can occur due to power failures, malware, or hardware faults. Reformatting is often the quickest fix.
⭕ Optimizing Storage Allocation. Reformatting allows you to redefine storage allocations and create volumes optimized for your usage patterns.
Now that we’ve established the importance of formatting, let’s dive into actionable solutions.
How to Format Hard Drive in Synology NAS in 3 Ways
Formatting a hard drive in Synology NAS is straightforward when you know what to do. Let’s explore 3 effective solutions:
Way 1. Format Hard Drive via DiskStation Manager
The first solution focuses on formatting via the DiskStation Manager (DSM), which is Synology’s dedicated interface. This approach is ideal for users preparing new drives or addressing compatibility issues. Here are the simple steps:
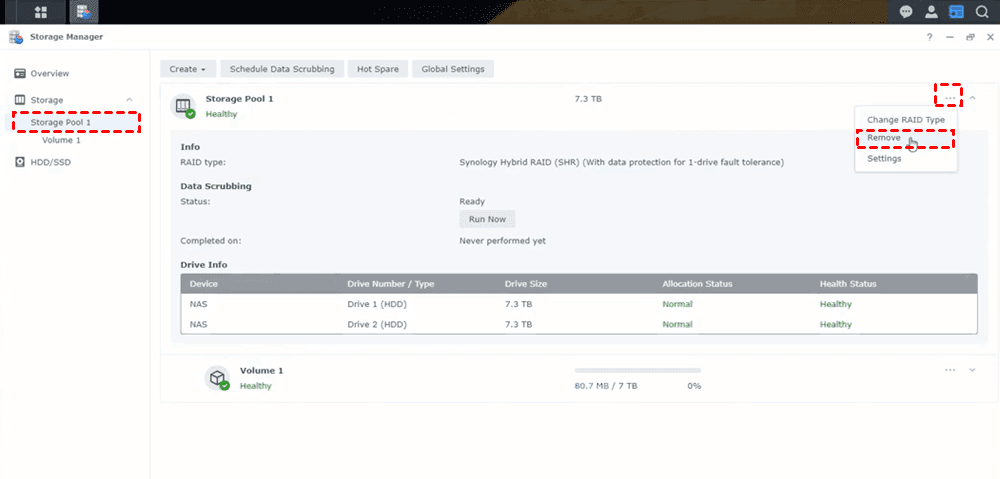
1. First, log in to your DSM interface and navigate to Storage Manager.
2. Select the storage pool you want to format, then choose the three-dot icon at the end of the storage pool.
Remove Storage Pool in Synology NAS
3. Choose Remove from the list, then click Remove > Erase All Data. And follow the prompts to confirm.
Erase All Data
Formatting will begin and may take a while, depending on the drive size. Be patient; interruptions during this process can lead to errors. Ensure your power supply is stable during formatting to avoid unexpected shutdowns.
Way 2. Reformat Synology NAS Hard Drive without Losing Data
Another way to tackle formatting needs is reformatting without losing data. This method is helpful when switching file systems or resolving storage issues.
1. Start by backing up your files to an external device or another NAS.
2. Access DSM and go to Control Panel, choose Update & Restore.
Choose Update and Restore
3. Select System Reset on the top menu, choose Erase All Data > Erase All Data, then input your password to complete the process.
Erase All Data for Synology NAS
4. After formatting, restore your data from the backup.
This ensures your important files are safe while still achieving the desired changes. Double-check your backups before proceeding to avoid unpleasant surprises.
Way 3. Format While Replacing Hard Drive
Lastly, replacing a failed drive requires careful formatting. When your Synology NAS detects a failed drive, it’ll notify you through the DSM interface.
1. Remove the faulty drive and insert the new one into the same bay.
2. The system will prompt you to repair the storage pool.
3. During this process, the new drive will be automatically formatted. If the automatic process fails, you can manually initialize and format the drive via Storage Manager.
Always verify the replacement drive’s compatibility with your NAS model to avoid recurring issues.
Additional Tips for Formatting and Maintenance
Backup Before Formatting: Always back up your data to prevent accidental loss.
Choose the Right File System: For most users, Btrfs offers advanced features like snapshots, while EXT4 is better for speed.
Monitor Drive Health: Use DSM’s Health Info to track your drives’ status regularly.
Update DSM Software: Keeping your NAS firmware updated ensures compatibility with newer drives and features.
Power Protection: Consider using an uninterruptible power supply (UPS) to prevent data corruption during formatting.
Formatting your Synology NAS hard drives doesn’t have to be daunting. By following these solutions and tips, you’ll ensure your NAS runs smoothly and efficiently. Remember, the key is preparation, whether you’re learning how to format NAS drives or how to reformat Synology NAS hard drive without losing data. Regular maintenance and proactive management will keep your system in top shape!
How to Replace a Failed Hard Drive in Your Synology NAS
Replacing a failed hard drive in your Synology NAS is a crucial task to maintain data integrity and the functionality of your storage system. Here's a step-by-step guide to help you replace a failed hard drive in your Synology NAS:
Step 1: Identify the Failed Drive
Check NAS Notifications: Synology’s DiskStation Manager (DSM) will alert you if a drive has failed. Look for notifications in the DSM interface.
Open Storage Manager: Navigate to Storage Manager in DSM and check the status of your storage pool. Failed drives are typically marked as degraded or crashed.
Failed Hard Drive in Synology NAS
Verify Drive Status: Click on the storage pool or volume, then inspect the affected drive to confirm the failure.
Step 2: Backup Your Data (If Possible)
If the system is still operational, perform a full backup of your data to an external drive, cloud storage, or another NAS device to safeguard against unexpected issues during the replacement.
Step 3: Power Down the NAS
Turn Off the Device: Shut down your Synology NAS via DSM or the physical power button to ensure safety while replacing the drive.
Unplug the NAS: Disconnect the power cord and any connected cables.
Step 4: Remove the Failed Drive
Open the Drive Bay: Use the appropriate key or latch mechanism to unlock the drive bay.
Eject the Drive: Carefully pull out the failed drive. Avoid using excessive force.
Label the Drive: If needed, label the failed drive for future reference.
Step 5: Insert the New Drive
Choose a Compatible Drive: Make sure the replacement drive is on Synology’s compatibility list and matches the capacity of the other drives in your array.
Install the Drive: Insert the new drive into the same bay and secure it using the provided brackets or screws.
Step 6: Power On the NAS
Reconnect Power and Cables: Plug in the power cord and any necessary cables.
Boot Up the NAS: Turn on the device and wait for it to initialize.
Step 7: Repair the Storage Pool
Open DSM: Log in to DSM and navigate to Storage Manager.
Repair the Pool: You’ll see a prompt to repair the degraded storage pool. Follow the instructions to integrate the new drive into the array.
Repair Storage Pool
Monitor the Process: The repair process may take hours, depending on the size of the drives and the amount of data. Avoid shutting down the NAS during this time.
Step 8: Verify the Replacement
Check Storage Status: Once the repair process is complete, confirm that the storage pool is healthy and operational.
Run a Test: Use DSM’s Health Info or S.M.A.R.T. test to ensure the new drive is functioning properly.
Tips for a Smooth Replacement
Use Identical Drives: Matching the capacity and specifications of the replacement drive to the existing ones ensures optimal performance.
Keep Spare Drives Handy: Having extra compatible drives reduces downtime in case of future failures.
Monitor Your Drives Regularly: Use DSM’s health monitoring tools to catch potential issues early.
Invest in RAID Protection: Synology’s RAID options can help minimize data loss in the event of a drive failure.
Replacing a failed hard drive in your Synology NAS is manageable with proper preparation and care. By following these steps, you’ll restore your NAS to full functionality and keep your data secure.
Bonus Tip: Backup Files from NAS to Another Cloud Directly
This article addresses the question “How to format hard drive in Synology NAS” If you’re considering migrating files from your NAS to your current cloud service, or vice versa, MultCloud can be extremely useful. Trusted by over 3 million users, MultCloud is a multi-cloud management tool that facilitates the transferring or synchronizing of files between various cloud services.
For instance, it allows for seamless file transfers from cloud drives like Synology NAS to Google Drive without downloading and re-uploading files. MultCloud also enables you to access and manage all your cloud accounts via a single application. Currently, it supports more than 30 different cloud services, including Google Drive, OneDrive, Dropbox, Box, Google Photos, iCloud Photos, FTP, WebDAV, iCloud Drive, pCloud, Amazon S3, 4shared, Icedrive, Wasabi, ownCloud, Backblaze, IDrive e2, Box for Business, Google Workspace, Gmail, Outlook, MySQL, NAS, FTP/SFTP, and more.
Cloud Transfer: MultCloud can transfer files from one cloud service to another directly without downloading and re-uploading.
Cloud Sync: With MultCloud, you can easily sync two folders between different cloud services in real-time.
Cloud Backup: You can backup and restore data between different cloud services automatically.
Instagram Downloader: MultCloud can help you download Instagram videos, photos, reels and stories to local device or remotely upload them to your clouds.
Email Migration: You can directly back up and save Gmail emails as PDFs to your computer or cloud drive in bulk.
Manage all cloud accounts in one place: Connect all your clouds to MultCloud and you'll find it so easy to access and manage multiple cloud storage files with a single login.