A PST file in Outlook is essential for organizing and backing up your emails. Whether you’re using Outlook 365, 2016, or Outlook for Mac, this guide provides a step-by-step approach to create a PST file. Discover how to manage email storage, transfer data, and secure your emails in a few clicks.

Personal Storage Table (PST) is a file format used by Microsoft programs to store items like calendar events, contacts, and email messages.They serve as a versatile container for a wide range of data, including:
Now, we will walk you through the detailed guide for different Outlook version. No matter which one you are using now, you will be able to find the information.
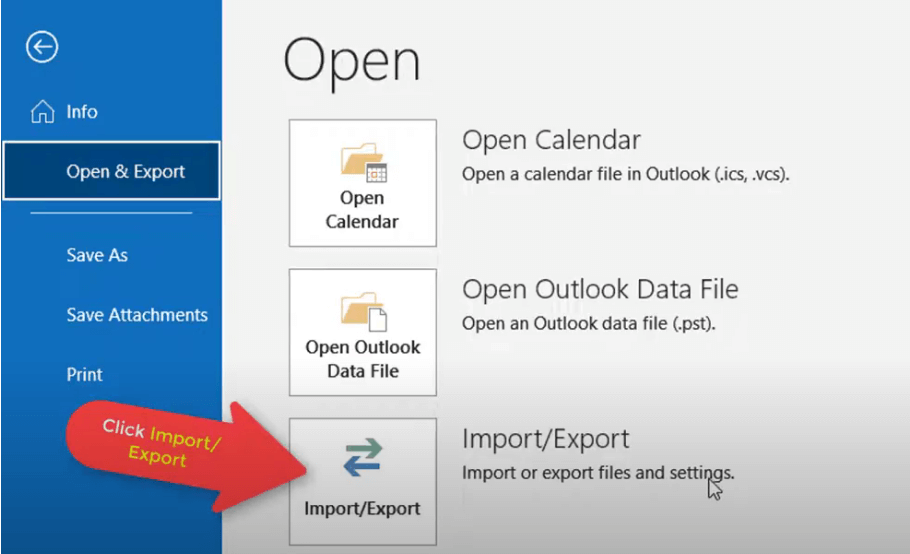
Step 1. Initiate the Export Process: Launch Outlook 365 and navigate to the "File" tab. Select "Open & Export" and then choose "Import/Export."
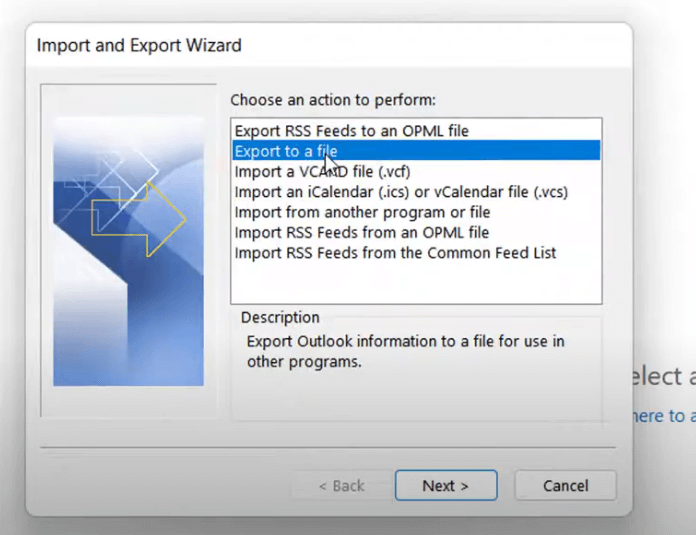
Step 2. Select Export to a File: In the Import and Export Wizard, choose "Export to a File" and click "Next."
Step 3. Specify Export Format: Select "Outlook Data File (.pst)" as the export format and click "Next."
Step 4. Choose Items to Export: Select the specific folders (e.g., Inbox, Calendar, Contacts) that you want to include in the PST file.
Step 5. Set Destination Folder: Browse to the desired location on your computer where you want to save the PST file.
Step 6. Finalize the Export: Click "Finish" to initiate the export process.
To create a PST file (Personal Storage Table) in Outlook 2016, you can also refer to the above steps since they are quite similar.
Follow the below steps to export emails from new version Outlook app to PST:
Step 1. Launch your Outlook application
Step 2. Click the Settings icon on the top right corner.
Step 3. Click on General > Privacy & Data > Export Mailbox in sequence.
Then, you will see the message "Status: Export in progress." You might need to wait for up to 4 days until you receive an email with a link to download the content from your mailbox.
Sorry to tell that you are not allowed to directly export Outlook data as PST files like in Windows. You can create OLM file in Mac.
Step 1. Open Outlook Export: Go to the "Outlook" menu and select "Tools"> "Export."
Step 2. Choose Files: In the window, choose the file you want to export from Outlook.
Step 3. Specify Location and Name: Select the desired location and provide a name for your PST file.
Step 4. Confirm Creation: Click "Save" to finalize the process.
Q: Can I create multiple PST files in Outlook?
A: Yes, you can create multiple PST files to organize your data effectively. This can help you manage different projects, clients, or personal and professional emails separately.
Q: How do I open a PST file in Outlook?
A: To open a PST file in Outlook, follow these steps: Go to the "File" tab. Select "Open & Export." Choose "Open Outlook Data File." Browse to the location of your PST file and select it.
Q: Can I password-protect a PST file?
A: Yes, you can password-protect a PST file during the creation process. This adds an extra layer of security to your sensitive data.
Q: What is the maximum size of a PST file?
A: While there's no strict limit, it's generally recommended to keep PST files below 2GB to avoid performance issues and corruption risks. However, with proper management and optimization techniques, you can work with larger PST files.
This article addresses the question “how to create a PST file in Outlook?”. If you’re considering backing up your Outlook, MultCloud can be extremely useful. Trusted by over 3 million users, MultCloud is a multi-cloud management tool that facilitates the transfer or synchronization of files between various cloud services.
For instance, you can save your Outlook emails as PDFs to your computer or cloud drives, such as Google Drive, OneDrive, or Dropbox, in bulk. MultCloud also enables you to access and manage all your cloud or Email accounts via a single application. Currently, it supports more than 30 different cloud services, including Google Drive, OneDrive, Dropbox, Box, Google Photos, iCloud Photos, FTP, WebDav, and more.


