Discover easy methods for adding emails to the safe sender list outlook, with specific steps for outlook 365, mobile, and iPhone. Prevent essential messages from being marked as spam. This guide walks through adding trusted contacts and creating rules to manage sender settings efficiently.

In today's digital age, email has become an indispensable tool for communication. However, with the increasing prevalence of spam and phishing attacks, it's crucial to protect your inbox from unwanted messages. One effective way to achieve this is by adding trusted senders to your Safe Sender List.

A Safe Sender List is a feature in email clients like Outlook that allows you to designate specific email addresses or domains as trusted sources. By adding senders to this list, you instruct your email client to bypass spam filters and deliver their messages directly to your inbox. This ensures that important emails, such as those from family, friends, colleagues, or businesses you regularly interact with, are not mistakenly marked as spam.
In this section, we will provide a detailed, step-by-step guide on how to add an email to the Safe Sender List in Outlook across different versions. Whether you're using new Outlook or classic Outlook, we've got you covered. Each platform has its own set of instructions, so we'll walk you through the process for each one to ensure your important emails are always delivered directly to your inbox without being mistakenly marked as spam.
Step 1. Launch the Outlook application on your computer.
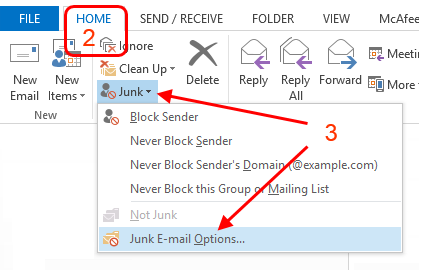
Step 2.In the main window of Outlook, you will see several tabs at the top (e.g., File, Home, Send/Receive, Folder, View). Click HOME at the top menu bar.
Step 3. You should see an option labeled Junk. Click on it to reveal a drop-down menu. From this list, select Junk E-mail Options... to open the settings.

Step 4. Click on the Safe Senders tab. This is where you can manage the list of email addresses or domains that are considered safe and won’t be treated as junk.
Step 5. In the Safe Senders tab, click the Add button, which will open a text box for you to enter the email address or domain you want to mark as safe.
Step 6. In the text box that appears, type the full email address or domain that you want to whitelist. For example, you can enter an email address like example@example.com or just a domain like example.com to mark all emails from this domain as safe.
Step 7. After entering the email address or domain, click OK to add it to the Safe Senders list.
Step 1. Open the Outlook App: Launch Outlook App on your computer.
Step 2. Access to "Setting": Click the gear icon in the upper right.
Step 3. Confirm the Action: Click "Email" and then "Junk Email". Scroll down the right section to "Safe Sender."
Step 4. Type the mail address or domain of the sender and hit enter when finished.
Step 5. Finally, click on "Save" button.
Besides the above method, you can also use "never block this sender" feature. Find out the sender's email in your inbox or junk folder (next we choose "junk email" folder as an example), and right click the three dots in the upper right. Select "Block" and "Never block sender."
The steps for adding email to safe sender list Outlook on a mobile device are similar to those on the web version. You can refer to the above steps.
This article demonstrates “how to add email to safe sender list Outlook”. If you’re considering backing up your Outlook, MultCloud can be extremely useful. Trusted by over 3 million users, MultCloud is a multi-cloud management tool that facilitates the transfer or synchronization of files between various cloud services.
For instance, you can save your Outlook emails as PDFs to your computer or cloud drives, such as Google Drive, OneDrive, or Dropbox, in bulk. MultCloud also enables you to access and manage all your cloud or Email accounts via a single application. Currently, it supports more than 30 different cloud services, including Google Drive, OneDrive, Dropbox, Box, Google Photos, iCloud Photos, FTP, WebDav, and more.